I needed to migrate an existing system to an Hetzner cloud VPS. While it is
possible to attach KVM consoles and custom ISO images to dedicated servers, i
didn t find any way to do so with regular cloud instances.
For system migrations i usually use REAR,
which has never failed me. (and also has saved my ass during recovery multiple
times). It s an awesome utility!
It s possible to do this using the Hetzner recovery console too, but using REAR
is very convenient here, because it handles things like re-creating the
partition layout and network settings automatically!
The steps are:
Create bootable REAR rescue image on the source system.
Register a target system in Hetzner Cloud with at least the same disk size as the source system.
Boot the REAR image s initrd and kernel from the running VPS system using kexec
Make the REAR recovery console accessible via SSH (or use Hetzners console).
Let REAR do its magic and re-partition the system.
Restore the system data to the freshly partitioned disks
Let REAR handle the bootloader and network re-configuration.
Example
To create a rescue image on the source system:
apt install rear
echo OUTPUT=ISO > /etc/rear/local.conf
rear mkrescue -v[..]
Wrote ISO image: /var/lib/rear/output/rear-debian12.iso (185M)
My source system had a 128 GB disk, so i registered an instance on Hetzner
cloud with greater disk size to make things easier:
Now copy the ISO image to the newly created instance and extract
its data:
Note down the current gateway configuration, this is required later
on to make the REAR recovery console reachable via SSH:
root@testme:~# ip route
default via 172.31.1.1 dev eth0
172.31.1.1 dev eth0 scope link
Reboot the running VPS instance into the REAR recovery image using somewhat
the same kernel cmdline:
root@testme:~# cat /proc/cmdline
BOOT_IMAGE=/boot/vmlinuz-6.1.0-13-amd64 root=UUID=5174a81e-5897-47ca-8fe4-9cd19dc678c4 ro consoleblank=0 systemd.show_status=true console=tty1 console=ttyS0
kexec --initrd /tmp/initrd.cgz --command-line="consoleblank=0 systemd.show_status=true console=tty1 console=ttyS0" /tmp/kernel
Connection to 49.13.193.226 closed by remote host.
Connection to 49.13.193.226 closed
Now watch the system on the Console booting into the REAR system:
Login the recovery console (root without password) and fix its default route to
make it reachable:
ip addr
[..]
2: enp1s0
..
$ ip route add 172.31.1.1 dev enp1s0
$ ip route add default via 172.31.1.1
ping 49.13.193.226
64 bytes from 49.13.193.226: icmp_seq=83 ttl=52 time=27.7 ms
The network configuration might differ, the source system in this example used
DHCP, as the target does. If REAR detects changed static network configuration
it guides you through the setup pretty nicely.
Login via SSH (REAR will store your ssh public keys in the image) and start the
recovery process, follow the steps as suggested by REAR:
ssh -l root 49.13.193.226
Welcome to Relax-and-Recover. Run "rear recover" to restore your system !
RESCUE debian12:~ # rear recover
Relax-and-Recover 2.7 / Git
Running rear recover (PID 673 date 2024-01-04 19:20:22)
Using log file: /var/log/rear/rear-debian12.log
Running workflow recover within the ReaR rescue/recovery system
Will do driver migration (recreating initramfs/initrd)
Comparing disks
Device vda does not exist (manual configuration needed)
Switching to manual disk layout configuration (GiB sizes rounded down to integer)
/dev/vda had size 137438953472 (128 GiB) but it does no longer exist
/dev/sda was not used on the original system and has now 163842097152 (152 GiB)
Original disk /dev/vda does not exist (with same size)in the target system
Using /dev/sda (the only available of the disks)for recreating /dev/vda
Current disk mapping table (source=> target):
/dev/vda => /dev/sda
Confirm or edit the disk mapping
1) Confirm disk mapping and continue'rear recover'[..]
User confirmed recreated disk layout
[..]
This step re-recreates your original disk layout and mounts it to /mnt/local/
(this example uses a pretty lame layout, but usually REAR will handle things
like lvm/btrfs just nicely):
mount
/dev/sda3 on /mnt/local type ext4 (rw,relatime,errors=remount-ro)
/dev/sda1 on /mnt/local/boot type ext4 (rw,relatime)
Now clone your source systems data to /mnt/local/ with whatever utility you
like to use and exit the recovery step. After confirming everything went well,
REAR will setup the bootloader (and all other config details like fstab entries
and adjusted network configuration) for you as required:
rear> exit
Did you restore the backup to /mnt/local ? Are you ready to continue recovery ? yes
User confirmed restored files
Updated initramfs with new drivers for this system.
Skip installing GRUB Legacy boot loader because GRUB 2 is installed (grub-probe or grub2-probe exist).
Installing GRUB2 boot loader...
Determining where to install GRUB2 (no GRUB2_INSTALL_DEVICES specified)
Found possible boot disk /dev/sda - installing GRUB2 there
Finished 'recover'. The target system is mounted at '/mnt/local'.
Exiting rear recover (PID 7103) and its descendant processes ...
Running exit tasks
Now reboot the recovery console and watch it boot into your target
systems configuration:
Being able to use this procedure for complete disaster recovery within Hetzner
cloud VPS (using off-site backups) gives me a better feeling, too.
I ve been getting annoyed with Raspberry Pi OS (Raspbian) for years now. It s a fork of Debian, but manages to omit some of the most useful things. So I ve decided to migrate all of my Pis to run pure Debian. These are my reasons:
Raspberry Pi OS has, for years now, specified that there is no upgrade path. That is, to get to a newer major release, it s a reinstall. While I have sometimes worked around this, for a device that is frequently installed in hard-to-reach locations, this is even more important than usual. It s common for me to upgrade machines for a decade or more across Debian releases and there s no reason that it should be so much more difficult with Raspbian.
As I noted in Consider Security First, the security situation for Raspberry Pi OS isn t as good as it is with Debian.
Raspbian lags behind Debian often times by 6 months or more for major releases, and days or weeks for bug fixes and security patches.
Raspbian uses a custom kernel without initramfs support
It turns out it is actually possible to do an in-place migration from Raspberry Pi OS bullseye to Debian bookworm. Here I will describe how. Even if you don t have a Raspberry Pi, this might still be instructive on how Raspbian and Debian packages work.
WARNINGS
Before continuing, back up your system. This process isn t for the neophyte and it is entirely possible to mess up your boot device to the point that you have to do a fresh install to get your Pi to boot. This isn t a supported process at all.
Architecture Confusion
Debian has three ARM-based architectures:
armel, for the lowest-end 32-bit ARM devices without hardware floating point support
armhf, for the higher-end 32-bit ARM devices with hardware float (hence hf )
arm64, for 64-bit ARM devices (which all have hardware float)
Although the Raspberry Pi 0 and 1 do support hardware float, they lack support for other CPU features that Debian s armhf architecture assumes. Therefore, the Raspberry Pi 0 and 1 could only run Debian s armel architecture.
Raspberry Pi 3 and above are capable of running 64-bit, and can run both armhf and arm64.
Prior to the release of the Raspberry Pi 5 / Raspbian bookworm, Raspbian only shipped the armhf architecture. Well, it was an architecture they called armhf, but it was different from Debian s armhf in that everything was recompiled to work with the more limited set of features on the earlier Raspberry Pi boards. It was really somewhere between Debian s armel and armhf archs. You could run Debian armel on those, but it would run more slowly, due to doing floating point calculations without hardware support. Debian s raspi FAQ goes into this a bit.
What I am going to describe here is going from Raspbian armhf to Debian armhf with a 64-bit kernel. Therefore, it will only work with Raspberry Pi 3 and above. It may theoretically be possible to take a Raspberry Pi 2 to Debian armhf with a 32-bit kernel, but I haven t tried this and it may be more difficult. I have seen conflicting information on whether armhf really works on a Pi 2. (If you do try it on a Pi 2, ignore everything about arm64 and 64-bit kernels below, and just go with the linux-image-armmp-lpae kernel per the ARMMP page)
There is another wrinkle: Debian doesn t support running 32-bit ARM kernels on 64-bit ARM CPUs, though it does support running a 32-bit userland on them. So we will wind up with a system with kernel packages from arm64 and everything else from armhf. This is a perfectly valid configuration as the arm64 like x86_64 is multiarch (that is, the CPU can natively execute both the 32-bit and 64-bit instructions).
(It is theoretically possible to crossgrade a system from 32-bit to 64-bit userland, but that felt like a rather heavy lift for dubious benefit on a Pi; nevertheless, if you want to make this process even more complicated, refer to the CrossGrading page.)
Prerequisites and Limitations
In addition to the need for a Raspberry Pi 3 or above in order for this to work, there are a few other things to mention.
If you are using the GPIO features of the Pi, I don t know if those work with Debian.
I think Raspberry Pi OS modified the desktop environment more than other components. All of my Pis are headless, so I don t know if this process will work if you use a desktop environment.
I am assuming you are booting from a MicroSD card as is typical in the Raspberry Pi world. The Pi s firmware looks for a FAT partition (MBR type 0x0c) and looks within it for boot information. Depending on how long ago you first installed an OS on your Pi, your /boot may be too small for Debian. Use df -h /boot to see how big it is. I recommend 200MB at minimum. If your /boot is smaller than that, stop now (or use some other system to shrink your root filesystem and rearrange your partitions; I ve done this, but it s outside the scope of this article.)
You need to have stable power. Once you begin this process, your pi will mostly be left in a non-bootable state until you finish. (You did make a backup, right?)
Basic idea
The basic idea here is that since bookworm has almost entirely newer packages then bullseye, we can just switch over to it and let the Debian packages replace the Raspbian ones as they are upgraded. Well, it s not quite that easy, but that s the main idea.
Preparation
First, make a backup. Even an image of your MicroSD card might be nice. OK, I think I ve said that enough now.
It would be a good idea to have a HDMI cable (with the appropriate size of connector for your particular Pi board) and a HDMI display handy so you can troubleshoot any bootup issues with a console.
Preparation: access
The Raspberry Pi OS by default sets up a user named pi that can use sudo to gain root without a password. I think this is an insecure practice, but assuming you haven t changed it, you will need to ensure it still works once you move to Debian. Raspberry Pi OS had a patch in their sudo package to enable it, and that will be removed when Debian s sudo package is installed. So, put this in /etc/sudoers.d/010_picompat:
pi ALL=(ALL) NOPASSWD: ALL
Also, there may be no password set for the root account. It would be a good idea to set one; it makes it easier to log in at the console. Use the passwd command as root to do so.
Preparation: bluetooth
Debian doesn t correctly identify the Bluetooth hardware address. You can save it off to a file by running hcitool dev > /root/bluetooth-from-raspbian.txt. I don t use Bluetooth, but this should let you develop a script to bring it up properly.
Package first steps
From here on, we are making modifications to the system that can leave it in a non-bootable state.
Examine /etc/apt/sources.list and all the files in /etc/apt/sources.list.d. Most likely you will want to delete or comment out all lines in all files there. Replace them with something like:
deb http://deb.debian.org/debian/ bookworm main non-free-firmware contrib non-free
deb http://security.debian.org/debian-security bookworm-security main non-free-firmware contrib non-free
deb https://deb.debian.org/debian bookworm-backports main non-free-firmware contrib non-free
(you might leave off contrib and non-free depending on your needs)
Now, we re going to tell it that we ll support arm64 packages:
dpkg --add-architecture arm64
And finally, download the bookworm package lists:
apt-get update
If there are any errors from that command, fix them and don t proceed until you have a clean run of apt-get update.
Moving /boot to /boot/firmware
The boot FAT partition I mentioned above is mounted at /boot by Raspberry Pi OS, but Debian s scripts assume it will be at /boot/firmware. We need to fix this. First:
umount /boot
mkdir /boot/firmware
Now, edit fstab and change the reference to /boot to be to /boot/firmware. Now:
mount -v /boot/firmware
cd /boot/firmware
mv -vi * ..
This mounts the filesystem at the new location, and moves all its contents back to where apt believes it should be. Debian s packages will populate /boot/firmware later.
Installing the first packages
Now we start by installing the first of the needed packages. Eventually we will wind up with roughly the same set Debian uses.
If you get errors relating to firmware-brcm80211 from any commands, run that install firmware-brcm80211 command and then proceed. There are a few packages that Raspbian marked as newer than the version in bookworm (whether or not they really are), and that s one of them.
Configuring the bootloader
We need to configure a few things in /etc/default/raspi-firmware before proceeding. Edit that file.
First, uncomment (or add) a line like this:
KERNEL_ARCH="arm64"
Next, in /boot/cmdline.txt you can find your old Raspbian boot command line. It will say something like:
root=PARTUUID=...
Save off the bit starting with PARTUUID. Back in /etc/default/raspi-firmware, set a line like this:
ROOTPART=PARTUUID=abcdef00
(substituting your real value for abcdef00).
This is necessary because the microSD card device name often changes from /dev/mmcblk0 to /dev/mmcblk1 when switching to Debian s kernel. raspi-firmware will encode the current device name in /boot/firmware/cmdline.txt by default, which will be wrong once you boot into Debian s kernel. The PARTUUID approach lets it work regardless of the device name.
Resolving firmware package version issues
If it gives an error about the installed version of a package, you may need to force it to the bookworm version. For me, this often happened with firmware-atheros, firmware-libertas, and firmware-realtek.
Here s how to resolve it, with firmware-realtek as an example:
apt list '?narrow(?installed, ?not(?origin(Debian)))'
Deal with them; mostly you will need to force the installation of a bookworm version using the procedure in the section Resolving firmware package version issues above (even if it s not for a firmware package). For non-firmware packages, you might possibly want to add --mark-auto to your apt-get install command line to allow the package to be autoremoved later if the things depending on it go away.
If you aren t going to use Bluetooth, I recommend apt-get --purge remove bluez as well. Sometimes it can hang at boot if you don t fix it up as described above.
Set up networking
We ll be switching to the Debian method of networking, so we ll create some files in /etc/network/interfaces.d. First, eth0 should look like this:
allow-hotplug eth0
iface eth0 inet dhcp
iface eth0 inet6 auto
Raspbian is inconsistent about using eth0/wlan0 or renamed interface. Run ifconfig or ip addr. If you see a long-named interface such as enx<something> or wlp<something>, copy the eth0 file to the one named after the enx interface, or the wlan0 file to the one named after the wlp interface, and edit the internal references to eth0/wlan0 in this new file to name the long interface name.
If using wifi, verify that your SSIDs and passwords are in /etc/wpa_supplicant/wpa_supplicant.conf. It should have lines like:
network=
   ssid="NetworkName"
   psk="passwordHere"
(This is where Raspberry Pi OS put them).
Deal with DHCP
Raspberry Pi OS used dhcpcd, whereas bookworm normally uses isc-dhcp-client. Verify the system is in the correct state:
Set up LEDs
To set up the LEDs to trigger on MicroSD activity as they did with Raspbian, follow the Debian instructions. Run apt-get install sysfsutils. Then put this in a file at /etc/sysfs.d/local-raspi-leds.conf:
Prepare for boot
To make sure all the /boot/firmware files are updated, run update-initramfs -u. Verify that root in /boot/firmware/cmdline.txt references the PARTUUID as appropriate. Verify that /boot/firmware/config.txt contains the lines arm_64bit=1 and upstream_kernel=1. If not, go back to the section on modifying /etc/default/raspi-firmware and fix it up.
The moment arrives
Cross your fingers and try rebooting into your Debian system:
reboot
For some reason, I found that the first boot into Debian seems to hang for 30-60 seconds during bootstrap. I m not sure why; don t panic if that happens. It may be necessary to power cycle the Pi for this boot.
Troubleshooting
If things don t work out, hook up the Pi to a HDMI display and see what s up. If I anticipated a particular problem, I would have documented it here (a lot of the things I documented here are because I ran into them!) So I can t give specific advice other than to watch boot messages on the console. If you don t even get kernel messages going, then there is some problem with your partition table or /boot/firmware FAT partition. Otherwise, you ve at least got the kernel going and can troubleshoot like usual from there.
Today, the animation figure Mickey Mouse finally was released from
the corporate copyright prison, as the 1928 movie
Steamboat
Willie entered the public domain in USA. This movie was the first
public appearance of Mickey Mouse. Sadly the figure is still on
probation, thanks to trademark laws and a the Disney corporations
powerful pack of lawyers, as described in the 2017 article
in "How
Mickey Mouse Evades the Public Domain" from Priceonomics. On the
positive side, the primary driver for repeated extentions of the
duration of copyright has been Disney thanks to Mickey Mouse and the
2028 movie, and as it now in the public domain I hope it will cause
less urge to extend the already unreasonable long copyright
duration.
The first book I published, the 2004 book "Free Culture" by Lawrence Lessig,
published 2015 in
English,
French and Norwegian Bokm l, touch on the story of Disney pushed
for extending the copyright duration in USA. It is a great book
explaining problems with the current copyright regime and why we need
Creative Commons movement, and I strongly recommend everyone to read
it.
This movie (with
IMDB ID tt0019422)
is now available from the Internet Archive. Two copies have been
uploaded so far, one uploaded
2015-11-04
(torrent)
and the other
2023-01-01
(torrent) - see
VLC
bittorrent plugin for streaming the video using the torrent link.
I am very happy to see
the
number of public domain movies increasing. I look forward to
when those are the majority. Perhaps it will reduce the urge of the
copyright industry to control its customers.
A more
comprehensive
list of works entering the public domain in 2024 is available from
the Public Domain Review.
As usual, if you use Bitcoin and want to show your support of my
activities, please send Bitcoin donations to my address
15oWEoG9dUPovwmUL9KWAnYRtNJEkP1u1b.
This post should have marked the beginning of my yearly roundups of the favourite books and movies I read and watched in 2023.
However, due to coming down with a nasty bout of flu recently and other sundry commitments, I wasn't able to undertake writing the necessary four or five blog posts In lieu of this, however, I will simply present my (unordered and unadorned) highlights for now. Do get in touch if this (or any of my previous posts) have spurred you into picking something up yourself
Unenjoyable experiences included Alejandro G mez Monteverde's Sound of Freedom (2023), Alex Garland's Men (2022) and Steven Spielberg's The Fabelmans (2022).
Older releases
(Films released before 2022, and not including rewatches from previous years.)
Debian Public Statement about the EU Cyber Resilience Act and the Product Liability Directive
The European Union is currently preparing a regulation "on horizontal
cybersecurity requirements for products with digital elements" known as the
Cyber Resilience Act (CRA). It is currently in the final "trilogue" phase of
the legislative process. The act includes a set of essential cybersecurity and
vulnerability handling requirements for manufacturers. It will require products
to be accompanied by information and instructions to the user. Manufacturers
will need to perform risk assessments and produce technical documentation and,
for critical components, have third-party audits conducted. Discovered security
issues will have to be reported to European authorities within 25 hours (1).
The CRA will be followed up by the Product Liability Directive (PLD) which will
introduce compulsory liability for software.
While a lot of these regulations seem reasonable, the Debian project believes
that there are grave problems for Free Software projects attached to them.
Therefore, the Debian project issues the following statement:
Free Software has always been a gift, freely given to society, to take and
to use as seen fit, for whatever purpose. Free Software has proven to be an
asset in our digital age and the proposed EU Cyber Resilience Act is going to
be detrimental to it.
a. As the Debian Social Contract states, our goal is "make the best system
we can, so that free works will be widely distributed and used." Imposing
requirements such as those proposed in the act makes it legally perilous for
others to redistribute our work and endangers our commitment to "provide an
integrated system of high-quality materials with no legal restrictions that
would prevent such uses of the system". (2)
b. Knowing whether software is commercial or not isn't feasible,
neither in Debian nor in most free software projects - we don't track people's
employment status or history, nor do we check who finances upstream projects
(the original projects that we integrate in our operating system).
c. If upstream projects stop making available their code for fear of being
in the scope of CRA and its financial consequences, system security will
actually get worse rather than better.
d. Having to get legal advice before giving a gift to society will
discourage many developers, especially those without a company or other
organisation supporting them.
Debian is well known for its security track record through practices of
responsible disclosure and coordination with upstream developers and other
Free Software projects. We aim to live up to the commitment made in the Debian
Social Contract: "We will not hide problems." (3)
a.The Free Software community has developed a fine-tuned, tried-and-tested
system of responsible disclosure in case of security issues which will be
overturned by the mandatory reporting to European authorities within 24 hours
(Art. 11 CRA).
b. Debian spends a lot of volunteering time on security issues, provides
quick security updates and works closely together with upstream projects and
in coordination with other vendors. To protect its users, Debian regularly
participates in limited embargos to coordinate fixes to security issues so that
all other major Linux distributions can also have a complete fix when the
vulnerability is disclosed.
c. Security issue tracking and remediation is intentionally decentralized
and distributed. The reporting of security issues to ENISA and the intended
propagation to other authorities and national administrations would collect all
software vulnerabilities in one place. This greatly increases the risk of
leaking information about vulnerabilities to threat actors, representing a
threat for all the users around the world, including European citizens.
d. Activists use Debian (e.g. through derivatives such as Tails), among
other reasons, to protect themselves from authoritarian governments; handing
threat actors exploits they can use for oppression is against what Debian
stands for.
e. Developers and companies will downplay security issues because a
"security" issue now comes with legal implications. Less clarity on what is
truly a security issue will hurt users by leaving them vulnerable.
While proprietary software is developed behind closed doors, Free Software
development is done in the open, transparent for everyone. To retain parity
with proprietary software the open development process needs to be entirely
exempt from CRA requirements, just as the development of software in private
is. A "making available on the market" can only be considered after development
is finished and the software is released.
Even if only "commercial activities" are in the scope of CRA, the Free
Software community - and as a consequence, everybody - will lose a lot of
small projects. CRA will force many small enterprises and most probably all
self employed developers out of business because they simply cannot fulfill
the requirements imposed by CRA. Debian and other Linux distributions depend
on their work. If accepted as it is, CRA will undermine not only an established
community but also a thriving market. CRA needs an exemption for small
businesses and, at the very least, solo-entrepreneurs.
Information about the voting process:
Debian uses the Condorcet method for voting. Simplistically, plain Condorcets
method can be stated like so : "Consider all possible two-way races between
candidates. The Condorcet winner, if there is one, is the one candidate who
can beat each other candidate in a two-way race with that candidate." The
problem is that in complex elections, there may well be a circular relationship
in which A beats B, B beats C, and C beats A. Most of the variations on
Condorcet use various means of resolving the tie. Debian's variation is spelled
out in the constitution, specifically, A.5(3)
Sources:
(1)
CRA proposals and links & PLD proposals and links
(2)
Debian Social Contract No. 2, 3, and 4
(3)
Debian Constitution
krb5-strength is a toolkit of plugins and support programs for password
strength checking for Kerberos KDCs, either Heimdal or MIT. It also
includes a password history mechanism for Heimdal KDCs.
This is a maintenance release, since there hadn't been a new release since
2020. It contains the normal sort of build system and portability
updates, and the routine bump in the number of hash iterations used for
the history mechanism to protect against (some) brute force attacks. It
also includes an RPM spec file contributed by Daria Phoebe Brashear, and
some changes to the Perl dependencies to track current community
recommendations.
You can get the latest version from the
krb5-strength distribution page.
This post describes how I m using
semantic-release on
gitlab-ci to manage versioning automatically
for different kinds of projects following a simple workflow (a develop branch
where changes are added or merged to test new versions, a temporary
release/#.#.# to generate the release candidate versions and a main branch
where the final versions are published).
What is semantic-releaseIt is a Node.js application designed to manage project
versioning information on Git Repositories using a
Continuous integration
system (in this post we will use gitlab-ci)
How does it workBy default semantic-release uses semver for versioning
(release versions use the format MAJOR.MINOR.PATCH) and commit messages are
parsed to determine the next version number to publish.
If after analyzing the commits the version number has to be changed, the command
updates the files we tell it to (i.e. the package.json file for nodejs
projects and possibly a CHANGELOG.md file), creates a new commit with the
changed files, creates a tag with the new version and pushes the changes to the
repository.
When running on a CI/CD system we usually generate the artifacts related to a
release (a package, a container image, etc.) from the tag, as it includes the
right version number and usually has passed all the required tests (it is a good
idea to run the tests again in any case, as someone could create a tag manually
or we could run extra jobs when building the final assets if they fail it is
not a big issue anyway, numbers are cheap and infinite, so we can skip releases
if needed).
Commit messages and versioningThe commit messages must follow a known format, the default module used to
analyze them uses the
angular
git commit guidelines, but I prefer the
conventional commits one, mainly because
it s a lot easier to use when you want to update the MAJOR version.
The commit message format used must be:
The system supports three types of branches: release, maintenance and
pre-release, but for now I m not using maintenance ones.
The branches I use and their types are:
main as release branch (final versions are published from there)
develop as pre release branch (used to publish development and testing
versions with the format #.#.#-SNAPSHOT.#)
release/#.#.# as pre release branches (they are created from develop
to publish release candidate versions with the format #.#.#-rc.# and once
they are merged with main they are deleted)
On the release branch (main) the version number is updated as follows:
The MAJOR number is incremented if a commit with a BREAKING CHANGE:
footer or an exclamation (!) after the type/scope is found in the list of
commits found since the last version change (it looks for tags on the same
branch).
The MINOR number is incremented if the MAJOR number is not going to be
changed and there is a commit with type feat in the commits found since
the last version change.
The PATCH number is incremented if neither the MAJOR nor the MINOR numbers
are going to be changed and there is a commit with type fix in the the
commits found since the last version change.
On the pre release branches (develop and release/#.#.#) the version and
pre release numbers are always calculated from the last published version
available on the branch (i. e. if we published version 1.3.2 on main we need
to have the commit with that tag on the develop or release/#.#.# branch
to get right what will be the next version).
The version number is updated as follows:
The MAJOR number is incremented if a commit with a BREAKING CHANGE:
footer or an exclamation (!) after the type/scope is found in the list of
commits found since the last released version.In our example it was 1.3.2 and the version is updated to 2.0.0-SNAPSHOT.1
or 2.0.0-rc.1 depending on the branch.
The MINOR number is incremented if the MAJOR number is not going to be
changed and there is a commit with type feat in the commits found since
the last released version.In our example the release was 1.3.2 and the version is updated to
1.4.0-SNAPSHOT.1 or 1.4.0-rc.1 depending on the branch.
The PATCH number is incremented if neither the MAJOR nor the MINOR numbers
are going to be changed and there is a commit with type fix in the the
commits found since the last version change.In our example the release was 1.3.2 and the version is updated to
1.3.3-SNAPSHOT.1 or 1.3.3-rc.1 depending on the branch.
The pre release number is incremented if the MAJOR, MINOR and PATCH
numbers are not going to be changed but there is a commit that would
otherwise update the version (i.e. a fix on 1.3.3-SNAPSHOT.1 will set the
version to 1.3.3-SNAPSHOT.2, a fix or feat on 1.4.0-rc.1 will set the
version to 1.4.0-rc.2 an so on).
How do we manage its configurationAlthough the system is designed to work with nodejs projects, it can be used
with multiple programming languages and project types.
For nodejs projects the usual place to put the configuration is the project s
package.json, but I prefer to use the .releaserc file instead.
As I use a common set of CI templates, instead of using a .releaserc on each
project I generate it on the fly on the jobs that need it, replacing values
related to the project type and the current branch on a template using the
tmpl command (lately I use a
branch of my own fork while I wait
for some feedback from upstream, as you will see on the Dockerfile).
Container used to run itAs we run the command on a gitlab-ci job we use the image built from the
following Dockerfile:
Dockerfile
How and when is it executedThe job that runs semantic-release is executed when new commits are added
to the develop, release/#.#.# or main branches (basically when something
is merged or pushed) and after all tests have passed (we don t want to create a
new version that does not compile or passes at least the unit tests).
The job is something like the following:
semantic_release:image:$SEMANTIC_RELEASE_IMAGErules:-if:'$CI_COMMIT_BRANCH=~/^(develop main release\/\d+.\d+.\d+)$/'when:alwaysstage:releasebefore_script:-echo "Loading scripts.sh"-. $ASSETS_DIR/scripts.shscript:-sr_gen_releaserc_json-git_push_setup-semantic-release
Where the SEMANTIC_RELEASE_IMAGE variable contains the URI of the image built
using the Dockerfile above and the sr_gen_releaserc_json and
git_push_setup are functions defined on the $ASSETS_DIR/scripts.sh file:
The sr_gen_releaserc_json function generates the .releaserc.json file
using the tmpl command.
The git_push_setup function configures git to allow pushing changes to the
repository with the semantic-release command, optionally signing them with a
SSH key.
The sr_gen_releaserc_json functionThe code for the sr_gen_releaserc_json function is the following:
sr_gen_releaserc_json()# Use nodejs as default project_typeproject_type="$ PROJECT_TYPE:-nodejs"# REGEX to match the rc_branch namerc_branch_regex='^release\/[0-9]\+\.[0-9]\+\.[0-9]\+$'# PATHS on the local ASSETS_DIRassets_dir="$ CI_PROJECT_DIR/$ ASSETS_DIR"sr_local_plugin="$ assets_dir/local-plugin.cjs"releaserc_tmpl="$ assets_dir/releaserc.json.tmpl"pipeline_runtime_values_yaml="/tmp/releaserc_values.yaml"pipeline_values_yaml="$ assets_dir/values_$ project_type_project.yaml"# Destination PATHreleaserc_json=".releaserc.json"# Create an empty pipeline_values_yaml if missingtest-f"$pipeline_values_yaml" : >"$pipeline_values_yaml"# Create the pipeline_runtime_values_yaml fileecho"branch: $ CI_COMMIT_BRANCH">"$pipeline_runtime_values_yaml"echo"gitlab_url: $ CI_SERVER_URL">"$pipeline_runtime_values_yaml"# Add the rc_branch name if we are on an rc_branchif["$(echo"$CI_COMMIT_BRANCH"sed-ne"/$rc_branch_regex/ p ")"];then
echo"rc_branch: $ CI_COMMIT_BRANCH">>"$pipeline_runtime_values_yaml"elif["$(echo"$CI_MERGE_REQUEST_SOURCE_BRANCH_NAME"sed-ne"/$rc_branch_regex/ p ")"];then
echo"rc_branch: $ CI_MERGE_REQUEST_SOURCE_BRANCH_NAME"\>>"$pipeline_runtime_values_yaml"fi
echo"sr_local_plugin: $ sr_local_plugin">>"$pipeline_runtime_values_yaml"# Create the releaserc_json file
tmpl -f"$pipeline_runtime_values_yaml"-f"$pipeline_values_yaml"\"$releaserc_tmpl" jq .>"$releaserc_json"# Remove the pipeline_runtime_values_yaml filerm-f"$pipeline_runtime_values_yaml"# Print the releaserc_json file
print_file_collapsed "$releaserc_json"# --*-- BEG: NOTE --*--# Rename the package.json to ignore it when calling semantic release.# The idea is that the local-plugin renames it back on the first step of the# semantic-release process.# --*-- END: NOTE --*--if[-f"package.json"];then
echo"Renaming 'package.json' to 'package.json_disabled'"mv"package.json""package.json_disabled"fi
Almost all the variables used on the function are defined by gitlab except the
ASSETS_DIR and PROJECT_TYPE; in the complete pipelines the ASSETS_DIR is
defined on a common file included by all the pipelines and the project type is
defined on the .gitlab-ci.yml file of each project.
If you review the code you will see that the file processed by the tmpl
command is named releaserc.json.tmpl, its contents are shown here:
The values used to process the template are defined on a file built on the fly
(releaserc_values.yaml) that includes the following keys and values:
branch: the name of the current branch
gitlab_url: the URL of the gitlab server (the value is taken from the
CI_SERVER_URL variable)
rc_branch: the name of the current rc branch; we only set the value if we
are processing one because semantic-release only allows one branch to match
the rc prefix and if we use a wildcard (i.e. release/*) but the users
keep more than one release/#.#.# branch open at the same time the calls to
semantic-release will fail for sure.
sr_local_plugin: the path to the local plugin we use (shown later)
The template also uses a values_$ project_type _project.yaml file that
includes settings specific to the project type, the one for nodejs is as
follows:
The replacements section is used to update the version field on the relevant
files of the project (in our case the package.json file) and the assets
section includes the files that will be committed to the repository when the
release is published (looking at the template you can see that the
CHANGELOG.md is only updated for the main branch, we do it this way because
if we update the file on other branches it creates a merge nightmare and we are
only interested on it for released versions anyway).
The local plugin adds code to rename the package.json_disabled file to
package.json if present and prints the last and next versions on the logs with
a format that can be easily parsed using sed:
local-plugin.cjs
// Minimal plugin to:// - rename the package.json_disabled file to package.json if present// - log the semantic-release last & next versionsfunctionverifyConditions(pluginConfig,context)varfs=require('fs');if (fs.existsSync('package.json_disabled'))fs.renameSync('package.json_disabled','package.json');context.logger.log( verifyConditions: renamed 'package.json_disabled' to 'package.json' );functionanalyzeCommits(pluginConfig,context)if (context.lastRelease&&context.lastRelease.version)context.logger.log( analyzeCommits: LAST_VERSION=$ context.lastRelease.version);functionverifyRelease(pluginConfig,context)if (context.nextRelease&&context.nextRelease.version)context.logger.log( verifyRelease: NEXT_VERSION=$ context.nextRelease.version);module.exports=verifyConditions,analyzeCommits,verifyRelease
The git_push_setup functionThe code for the git_push_setup function is the following:
git_push_setup()# Update global credentials to allow git clone & push for all the group repos
git config --global credential.helper store
cat>"$HOME/.git-credentials"<<EOF
https://fake-user:$ GITLAB_REPOSITORY_TOKEN@gitlab.com
EOF
# Define user name, mail and signing key for semantic-releaseuser_name="$SR_USER_NAME"user_email="$SR_USER_EMAIL"ssh_signing_key="$SSH_SIGNING_KEY"# Export git user variablesexport GIT_AUTHOR_NAME="$user_name"export GIT_AUTHOR_EMAIL="$user_email"export GIT_COMMITTER_NAME="$user_name"export GIT_COMMITTER_EMAIL="$user_email"# Sign commits with ssh if there is a SSH_SIGNING_KEY variableif["$ssh_signing_key"];then
echo"Configuring GIT to sign commits with SSH"ssh_keyfile="/tmp/.ssh-id"
: >"$ssh_keyfile"chmod 0400 "$ssh_keyfile"echo"$ssh_signing_key"tr-d'\r'>"$ssh_keyfile"
git config gpg.format ssh
git config user.signingkey "$ssh_keyfile"
git config commit.gpgsign true
fi
The function assumes that the GITLAB_REPOSITORY_TOKEN variable (set on the
CI/CD variables section of the project or group we want) contains a token with
read_repository and write_repository permissions on all the projects we are
going to use this function.
The SR_USER_NAME and SR_USER_EMAIL variables can be defined on a common file
or the CI/CD variables section of the project or group we want to work with and
the script assumes that the optional SSH_SIGNING_KEY is exported as a CI/CD
default value of type variable (that is why the keyfile is created on the fly)
and git is configured to use it if the variable is not empty.
Warning: Keep in mind that the variables GITLAB_REPOSITORY_TOKEN and SSH_SIGNING_KEY
contain secrets, so probably is a good idea to make them protected (if you do
that you have to make the develop, main and release/* branches protected
too).
Warning: The semantic-release user has to be able to push to all the projects on those
protected branches, it is a good idea to create a dedicated user and add it as a
MAINTAINER for the projects we want (the MAINTAINERS need to be able to push
to the branches), or, if you are using a Gitlab with a Premium license you can
use the
api
to allow the semantic-release user to push to the protected branches without
allowing it for any other user.
The semantic-release commandOnce we have the .releaserc file and the git configuration ready we run the
semantic-release command.
If the branch we are working with has one or more commits that will increment
the version, the tool does the following (note that the steps are described are
the ones executed if we use the configuration we have generated):
It detects the commits that will increment the version and calculates the
next version number.
Generates the release notes for the version.
Applies the replacements defined on the configuration (in our example updates
the version field on the package.json file).
Updates the CHANGELOG.md file adding the release notes if we are going to
publish the file (when we are on the main branch).
Creates a commit if all or some of the files listed on the assets key have
changed and uses the commit message we have defined, replacing the variables
for their current values.
Creates a tag with the new version number and the release notes.
As we are using the gitlab plugin after tagging it also creates a release
on the project with the tag name and the release notes.
Notes about the git workflows and merges between branchesIt is very important to remember that semantic-release looks at the commits of
a given branch when calculating the next version to publish, that has two
important implications:
On pre release branches we need to have the commit that includes the tag
with the released version, if we don t have it the next version is not
calculated correctly.
It is a bad idea to squash commits when merging a branch to another one, if
we do that we will lose the information semantic-release needs to calculate
the next version and even if we use the right prefix for the squashed commit
(fix, feat, ) we miss all the messages that would otherwise go to the
CHANGELOG.md file.
To make sure that we have the right commits on the pre release branches we
should merge the main branch changes into the develop one after each release
tag is created; in my pipelines the fist job that processes a release tag
creates a branch from the tag and an MR to merge it to develop.
The important thing about that MR is that is must not be squashed, if we do that
the tag commit will probably be lost, so we need to be careful.
To merge the changes directly we can run the following code:
# Set the SR_TAG variable to the tag you want to processSR_TAG="v1.3.2"# Fetch all the changes
git fetch --all--prune# Switch to the main branch
git switch main
# Pull all the changes
git pull
# Switch to the development branch
git switch develop
# Pull all the changes
git pull
# Create followup branch from tag
git switch -c"followup/$SR_TAG""$SR_TAG"# Change files manually & commit the changed files
git commit -a--untracked-files=no -m"ci(followup): $SR_TAG to develop"# Switch to the development branch
git switch develop
# Merge the followup branch into the development one using the --no-ff option
git merge --no-ff"followup/$SR_TAG"# Remove the followup branch
git branch -d"followup/$SR_TAG"# Push the changes
git push
If we can t push directly to develop we can create a MR pushing the followup
branch after committing the changes, but we have to make sure that we don t
squash the commits when merging or it will not work as we want.
Last week marked a major milestone for me:
the AMD driver-specific color management properties
reached the upstream linux-next!
And to celebrate, I m happy to share the
slides
notes from my 2023 XDC talk, The Rainbow Treasure Map along with the
individual recording that just
dropped last week on youtube talk about happy coincidences!
Steam Deck Rainbow: Treasure Map & Magic Frogs
While I may be bubbly and chatty in everyday life, the stage isn t exactly my
comfort zone (hallway talks are more my speed). But the journey of developing
the AMD color management properties was so full of discoveries that I simply
had to share the experience. Witnessing the fantastic work of Jeremy and Joshua
bring it all to life on the Steam Deck OLED was like uncovering magical
ingredients and whipping up something truly enchanting.
For XDC 2023, we split our Rainbow journey into two talks. My focus, The
Rainbow Treasure Map, explored the new color features we added to the Linux
kernel driver, diving deep into the hardware capabilities of AMD/Steam Deck.
Joshua then followed with The Rainbow Frogs and showed the breathtaking color
magic released on Gamescope thanks to the power unlocked by the kernel driver s
Steam Deck color properties.
Packing a Rainbow into 15 Minutes
I had so much to tell, but a half-slot talk meant crafting a concise
presentation. To squeeze everything into 15 minutes (and calm my pre-talk
jitters a bit!), I drafted and practiced those slides and notes countless
times.
So grab your map, and let s embark on the Rainbow journey together!
Intro: Hi, I m Melissa from Igalia and welcome to the Rainbow Treasure Map, a
talk about advanced color management on Linux with AMD/SteamDeck.
Useful links: First of all, if you are not used to the topic, you may find
these links useful.
Context: When we talk about colors in the graphics chain, we should keep in
mind that we have a wide variety of source content colorimetry, a variety of
output display devices and also the internal processing. Users expect
consistent color reproduction across all these devices.
The userspace can use GPU-accelerated color management to get it. But this also
requires an interface with display kernel drivers that is currently missing
from the DRM/KMS framework.
Since April, I ve been bothering the DRM community by sending patchsets from
the work of me and Joshua to add driver-specific color properties to the AMD
display driver. In parallel, discussions on defining a generic color management
interface are still ongoing in the community. Moreover, we are still not clear
about the diversity of color capabilities among hardware vendors.
To bridge this gap, we defined a color pipeline for Gamescope that fits the
latest versions of AMD hardware. It delivers advanced color management features
for gamut mapping, HDR rendering, SDR on HDR, and HDR on SDR.
AMD/Steam Deck hardware: AMD frequently releases new GPU and APU generations.
Each generation comes with a DCN version with display hardware improvements.
Therefore, keep in mind that this work uses the AMD Steam Deck hardware and its
kernel driver. The Steam Deck is an APU with a DCN3.01 display driver, a DCN3
family.
It s important to have this information since newer AMD DCN drivers inherit
implementations from previous families but aldo each generation of AMD hardware
may introduce new color capabilities. Therefore I recommend you to familiarize
yourself with the hardware you are working on.
The AMD display driver in the kernel space: It consists of three layers, (1)
the DRM/KMS framework, (2) the AMD Display Manager, and (3) the AMD Display
Core. We extended the color interface exposed to userspace by leveraging
existing DRM resources and connecting them using driver-specific functions for
color property management.
Bridging DC color capabilities and the DRM API required significant changes in
the color management of AMD Display Manager - the Linux-dependent part that
connects the AMD DC interface to the DRM/KMS framework.
The AMD DC is the OS-agnostic layer. Its code is shared between platforms and
DCN versions. Examining this part helps us understand the AMD color pipeline
and hardware capabilities, since the machinery for hardware settings and
resource management are already there.
The newest architecture for AMD display hardware is the AMD Display Core Next.
In this architecture, two blocks have the capability to manage colors:
Display Pipe and Plane (DPP) - for pre-blending adjustments;
Multiple Pipe/Plane Combined (MPC) - for post-blending color transformations.
Let s see what we have in the DRM API for pre-blending color management.
DRM plane color properties:
This is the DRM color management API before blending.
Nothing!
Except two basic DRM plane properties: color_encoding and color_range for
the input colorspace conversion, that is not covered by this work.
In case you re not familiar with AMD shared code, what we need to do is
basically draw a map and navigate there!
We have some DRM color properties after blending, but nothing before blending
yet. But much of the hardware programming was already implemented in the AMD DC
layer, thanks to the shared code.
Still both the DRM interface and its connection to the shared code were
missing. That s when the search begins!
AMD driver-specific color pipeline:
Looking at the color capabilities of the hardware, we arrive at this initial
set of properties. The path wasn t exactly like that. We had many iterations
and discoveries until reached to this pipeline.
The Plane Degamma is our first driver-specific property before blending. It s
used to linearize the color space from encoded values to light linear values.
We can use a pre-defined transfer function or a user lookup table (in short,
LUT) to linearize the color space.
Pre-defined transfer functions for plane degamma are hardcoded curves that go
to a specific hardware block called DPP Degamma ROM. It supports the following
transfer functions: sRGB EOTF, BT.709 inverse OETF, PQ EOTF, and pure power
curves Gamma 2.2, Gamma 2.4 and Gamma 2.6.
We also have a one-dimensional LUT. This 1D LUT has four thousand ninety six
(4096) entries, the usual 1D LUT size in the DRM/KMS. It s an array of
drm_color_lut that goes to the DPP Gamma Correction block.
We also have now a color transformation matrix (CTM) for color space
conversion.
It s a 3x4 matrix of fixed points that goes to the DPP Gamut Remap Block.
Both pre- and post-blending matrices were previously gone to the same color
block. We worked on detaching them to clear both paths.
Now each CTM goes on its own way.
Next, the HDR Multiplier. HDR Multiplier is a factor applied to the color
values of an image to increase their overall brightness.
This is useful for converting images from a standard dynamic range (SDR) to a
high dynamic range (HDR). As it can range beyond [0.0, 1.0] subsequent
transforms need to use the PQ(HDR) transfer functions.
And we need a 3D LUT. But 3D LUT has a limited number of entries in each
dimension, so we want to use it in a colorspace that is optimized for human
vision. It means in a non-linear space. To deliver it, userspace may need one
1D LUT before 3D LUT to delinearize content and another one after to linearize
content again for blending.
The pre-3D-LUT curve is called Shaper curve. Unlike Degamma TF, there are no
hardcoded curves for shaper TF, but we can use the AMD color module in the
driver to build the following shaper curves from pre-defined coefficients. The
color module combines the TF and the user LUT values into the LUT that goes to
the DPP Shaper RAM block.
Finally, our rockstar, the 3D LUT. 3D LUT is perfect for complex color
transformations and adjustments between color channels.
3D LUT is also more complex to manage and requires more computational
resources, as a consequence, its number of entries is usually limited. To
overcome this restriction, the array contains samples from the approximated
function and values between samples are estimated by tetrahedral interpolation.
AMD supports 17 and 9 as the size of a single-dimension. Blue is the outermost
dimension, red the innermost.
As mentioned, we need a post-3D-LUT curve to linearize the color space before
blending. This is done by Blend TF and LUT.
Similar to shaper TF, there are no hardcoded curves for Blend TF. The
pre-defined curves are the same as the Degamma block, but calculated by the
color module. The resulting LUT goes to the DPP Blend RAM block.
Now we have everything connected before blending. As a conflict between plane
and CRTC Degamma was inevitable, our approach doesn t accept that both are set
at the same time.
We also optimized the conversion of the framebuffer to wire encoding by adding
support to pre-defined CRTC Gamma TF.
Again, there are no hardcoded curves and TF and LUT are combined by the AMD
color module. The same types of shaper curves are supported. The resulting LUT
goes to the MPC Gamma RAM block.
Finally, we arrived in the final version of DRM/AMD driver-specific color
management pipeline. With this knowledge, you re ready to better enjoy the
rainbow treasure of AMD display hardware and the world of graphics computing.
With this work, Gamescope/Steam Deck embraces the color capabilities of the AMD
GPU. We highlight here how we map the Gamescope color pipeline to each AMD
color block.
Future works:
The search for the rainbow treasure is not over! The Linux DRM subsystem
contains many hidden treasures from different vendors. We want more complex
color transformations and adjustments available on Linux. We also want to
expose all GPU color capabilities from all hardware vendors to the Linux
userspace.
Thanks Joshua and Harry for this joint work and the Linux DRI community for all feedback and reviews.
The amazing part of this work comes in the next talk with Joshua and The Rainbow Frogs!
Any questions?
References:
Some years ago a customer needed a live ISO containing a customized
FAI environment (not for installing but for extended hardware stress
tests), but on an USB stick with the possibility to store the logs of
the tests on the USB stick. But an ISO file system (iso9660) remains
read-only, even when put onto an USB stick.
I had the idea to add another partition onto the USB stick after
the ISO was written to it (using cp or dd).
You can use fdisk with an ISO file, add a new partition, loop mount
the ISO and format this partition. That's all. This worked perfect for my customer.
I forgot this idea for a while but a few weeks ago I remembered it.
What could be possible when my FAI (Fully Automatic Installation)
image would also provide such a partition? Which things could be
provided on this partition?
Could I provide a FAI ISO and my users would be able to easily put
their own .deb package onto it without remastering the ISO or building
an ISO on their own?
Now here's the shell script, that extends an ISO or an USB stick with an
ext4 or exFAT partition and set the file system label to MY-DATA.
https://github.com/faiproject/fai/blob/master/bin/mk-data-partition
Examples how to use mk-data-partition
Add a data partition of size 1G to the Debian installer ISO using an ext4 partition
# mk-data-partition -s 1G debian-12.2.0-amd64-netinst.iso
Create the data partition using an exFAT file system on USB named /dev/sdb.
First copy (or dd) the ISO onto the USB stick. Then add the data partition
to the USB stick.
# cp faicd64-large_6.0.3.iso /dev/sdb
# mk-data-partition -F /dev/sdb
Create the data partition and copy directories A and B to it
# mk-data-partition -c debian-12.2.0-amd64-netinst.iso A B
The next FAI version will use this in different parts of an
installation. A blog post about this will follow.
A new idea for our Debian installer ISO
Here are my ideas how the Debian installer could use such a partition
if it automatically detects and mounts it (by it's file system label):
Look for a preseed file and use this (without explicitly specifying
it via boot parameters)
User could provide its own set of packages that the installer will install
d-i could show a menu (like tasksel) and the user can select
packages from the data partition
Save installation logs onto this partition
Provide a postinst script, that is run during the first boot of the
newly installed system
The advantage of this approach is that there's no need for the user to
remaster the official Debian installer ISO, which is not easy for end
users. We only have to extend the installer to use files from this
data partition in some portions of the installation. Additional
udebs, packages or firmware could automatically be used by the
installer. Companies could easily create an OEM installer of Debian.
What do you think about this idea?
Please send feedback to lange@debian.org
A self-help guide for examining and debugging the AMD display driver within the
Linux kernel/DRM subsystem.
It s based on my experience as an external developer working on the driver, and
are shared with the goal of helping others navigate the driver code.
Acknowledgments: These tips were gathered thanks to the countless help
received from AMD developers during the driver development process. The list
below was obtained by examining open source code, reviewing public
documentation, playing with tools, asking in public forums and also with the
help of my former GSoC mentor, Rodrigo Siqueira.
Pre-Debugging Steps:
Before diving into an issue, it s crucial to perform two essential steps:
1) Check the latest changes: Ensure you re working with the latest AMD
driver modifications located in the
amd-staging-drm-next branch
maintained by Alex Deucher. You may also find bug fixes for newer kernel
versions on branches that have the name pattern drm-fixes-<date>.
2) Examine the issue tracker: Confirm that your issue isn t already
documented and addressed in the AMD display driver issue tracker. If you find a
similar issue, you can team up with others and speed up the debugging process.
Understanding the issue:
Do you really need to change this? Where should you start looking for changes?
3) Is the issue in the AMD kernel driver or in the userspace?: Identifying
the source of the issue is essential regardless of the GPU vendor. Sometimes
this can be challenging so here are some helpful tips:
Record the screen: Capture the screen using a recording app while
experiencing the issue. If the bug appears in the capture, it s likely a
userspace issue, not the kernel display driver.
Analyze the dmesg log: Look for error messages related to the display
driver in the dmesg log. If the error message appears before the message
[drm] Display Core v... , it s not likely a display driver issue. If this
message doesn t appear in your log, the display driver wasn t fully loaded and
you will see a notification that something went wrong here.
4) AMD Display Manager vs. AMD Display Core: The AMD display driver
consists of two components:
Display Manager (DM): This component interacts directly with the Linux DRM
infrastructure. Occasionally, issues can arise from misinterpretations of DRM
properties or features. If the issue doesn t occur on other platforms with the
same AMD hardware - for example, only happens on Linux but not on Windows -
it s more likely related to the AMD DM code.
Display Core (DC): This is the platform-agnostic part responsible for setting
and programming hardware features. Modifications to the DC usually require
validation on other platforms, like Windows, to avoid regressions.
5) Identify the DC HW family: Each AMD GPU has variations in its hardware
architecture. Features and helpers differ between families, so determining the
relevant code for your specific hardware is crucial.
Check the dmesg log for the Display Core version (since this commit
in Linux kernel 6.3v). For example:
[drm] Display Core v3.2.241 initialized on DCN 2.1
[drm] Display Core v3.2.237 initialized on DCN 3.0.1
Investigating the relevant driver code:
Keep from letting unrelated driver code to affect your investigation.
6) Narrow the code inspection down to one DC HW family: the relevant code
resides in a directory named after the DC number. For example, the DCN 3.0.1
driver code is located at drivers/gpu/drm/amd/display/dc/dcn301. We all know
that the AMD s shared code is huge and you can use these boundaries to rule out
codes unrelated to your issue.
7) Newer families may inherit code from older ones: you can find dcn301
using code from dcn30, dcn20, dcn10 files. It s crucial to verify which hooks
and helpers your driver utilizes to investigate the right portion. You can
leverage ftrace for supplemental validation. To give an example, it was
useful when I was updating DCN3 color mapping to correctly use their new
post-blending color capabilities, such as:
Additionally, you can use two different HW families to compare behaviours.
If you see the issue in one but not in the other, you can compare the code and
understand what has changed and if the implementation from a previous family
doesn t fit well the new HW resources or design. You can also count on the help
of the community on the
Linux AMD issue tracker
to validate your code on other hardware and/or systems.
This approach helped me debug
a 2-year-old issue
where the cursor gamma adjustment was incorrect in DCN3 hardware, but working
correctly for DCN2 family. I solved the issue in two steps, thanks for
community feedback and validation:
8) Check the hardware capability screening in the driver: You can currently find a
list of display hardware capabilities in the
drivers/gpu/drm/amd/display/dc/dcn*/dcn*_resource.c file. More precisely in
the dcn*_resource_construct() function.
Using DCN301 for illustration, here is the list of its hardware caps:
Understanding the development history:
What has brought us to the current state?
9) Pinpoint relevant commits: Use git log and git blame to identify commits
targeting the code section you re interested in.
10) Track regressions: If you re examining the amd-staging-drm-next
branch, check for regressions between DC release versions. These are defined by
DC_VER in the drivers/gpu/drm/amd/display/dc/dc.h file. Alternatively,
find a commit with this format drm/amd/display: 3.2.221 that determines a
display release. It s useful for bisecting. This information helps you
understand how outdated your branch is and identify potential regressions. You
can consider each DC_VER takes around one week to be bumped. Finally, check
testing log of each release in the report provided on the amd-gfx mailing
list, such as this one Tested-by: Daniel Wheeler:
Reducing the inspection area:
Focus on what really matters.
11) Identify involved HW blocks: This helps isolate the issue. You can find
more information about DCN HW blocks in the
DCN Overview documentation.
In summary:
Plane issues are closer to HUBP and DPP.
Blending/Stream issues are closer to MPC, OPP and OPTC. They are related
to DRM CRTC subjects.
12) Issues around bandwidth (glitches) and clocks: May be affected by
calculations done in these HW blocks and HW specific values. The
recalculation equations are found in the DML folder.
DML stands for Display Mode Library. It s in charge of all required
configuration parameters supported by the hardware for multiple scenarios. See
more in the AMD DC Overview kernel docs.
It s a math library that optimally configures hardware to find the best
balance between power efficiency and performance in a given scenario.
Finding some clk variables that affect device behavior may be a sign of it.
It s hard for a external developer to debug this part, since it involves
information from HW specs and firmware programming that we don t have access.
The best option is to provide all relevant debugging information you have and
ask AMD developers to check the values from your suspicions.
Do a trick: If you suspect the power setup is degrading performance, try
setting the amount of power supplied to the GPU to the maximum and see if
it affects the system behavior with this command:
sudo bash -c "echo high > /sys/class/drm/card0/device/power_dpm_force_performance_level"
Checking implicit programming and hardware limitations:
Bring implicit programming to the level of consciousness and recognize hardware
limitations.
13) Implicit update types: Check if the selected type for atomic update may
affect your issue. The update type depends on the mode settings, since
programming some modes demands more time for hardware processing. More details
in the
source code:
/* Surface update type is used by dc_update_surfaces_and_stream
 * The update type is determined at the very beginning of the function based
 * on parameters passed in and decides how much programming (or updating) is
 * going to be done during the call.
 *
 * UPDATE_TYPE_FAST is used for really fast updates that do not require much
 * logical calculations or hardware register programming. This update MUST be
 * ISR safe on windows. Currently fast update will only be used to flip surface
 * address.
 *
 * UPDATE_TYPE_MED is used for slower updates which require significant hw
 * re-programming however do not affect bandwidth consumption or clock
 * requirements. At present, this is the level at which front end updates
 * that do not require us to run bw_calcs happen. These are in/out transfer func
 * updates, viewport offset changes, recout size changes and pixel
depth changes.
 * This update can be done at ISR, but we want to minimize how often
this happens.
 *
 * UPDATE_TYPE_FULL is slow. Really slow. This requires us to recalculate our
 * bandwidth and clocks, possibly rearrange some pipes and reprogram
anything front
 * end related. Any time viewport dimensions, recout dimensions,
scaling ratios or
 * gamma need to be adjusted or pipe needs to be turned on (or
disconnected) we do
 * a full update. This cannot be done at ISR level and should be a rare event.
 * Unless someone is stress testing mpo enter/exit, playing with
colour or adjusting
 * underscan we don't expect to see this call at all.
 */
enum surface_update_type
UPDATE_TYPE_FAST, /* super fast, safe to execute in isr */
UPDATE_TYPE_MED,  /* ISR safe, most of programming needed, no bw/clk change*/
UPDATE_TYPE_FULL, /* may need to shuffle resources */
 ;
Using tools:
Observe the current state, validate your findings, continue improvements.
14) Use AMD tools to check hardware state and driver programming: help on
understanding your driver settings and checking the behavior when changing
those settings.
DTN logs:
Check display hardware state, including rotation, size, format, underflow,
blocks in use, color block values, etc.
UMR:
Check ASIC info, register values, KMS state - links and elements (framebuffers,
planes, CRTCs, connectors).
Source: UMR project documentation
15) Use generic DRM/KMS tools:
IGT test tools: Use
generic KMS tests or develop your own to isolate the issue in the kernel
space. Compare results across different GPU vendors to understand their
implementations and find potential solutions. Here AMD also has specific IGT
tests for its GPUs that is expect to work without failures on any AMD GPU. You
can check results of HW-specific tests using different display hardware
families or you can compare expected differences between the generic workflow
and AMD workflow.
drm_info: This tool summarizes the
current state of a display driver (capabilities, properties and formats) per
element of the DRM/KMS workflow. Output can be helpful when reporting bugs.
Don t give up!
Debugging issues in the AMD display driver can be challenging, but by following
these tips and leveraging available resources, you can significantly improve
your chances of success.
Worth mentioning: This blog post builds upon my talk,
I m not an AMD expert, but
presented at the 2022 XDC. It shares guidelines that helped me debug AMD
display issues as an external developer of the driver.
Open Source Display Driver: The Linux kernel/AMD display driver is open
source, allowing you to actively contribute by addressing issues listed in the
official tracker. Tackling existing
issues or resolving your own can be a rewarding learning experience and a
valuable contribution to the community. Additionally, the tracker serves as a
valuable resource for finding similar bugs, troubleshooting tips, and
suggestions from AMD developers. Finally, it s a platform for seeking help when
needed.
Remember, contributing to the open source community through issue resolution
and collaboration is mutually beneficial for everyone involved.
Nextcloud is a popular self-hosted solution for file sync and share as well as cloud apps such as document editing, chat and talk, calendar, photo gallery etc. This guide will walk you through setting up Nextcloud AIO using Docker Compose. This blog post would not be possible without immense help from Sahil Dhiman a.k.a. sahilisterThere are various ways in which the installation could be done, in our setup here are the pre-requisites.
A server with docker-compose installed
An existing setup of nginx reverse proxy
A domain name pointing to your server.
Step 1 : The docker-compose file for nextcloud AIOThe original compose.yml file is present in nextcloud AIO&aposs git repo here . By taking a reference of that file, we have own compose.yml here.
services:
  nextcloud-aio-mastercontainer:
    image: nextcloud/all-in-one:latest
    init: true
    restart: always
    container_name: nextcloud-aio-mastercontainer # This line is not allowed to be changed as otherwise AIO will not work correctly
    volumes:
      - nextcloud_aio_mastercontainer:/mnt/docker-aio-config # This line is not allowed to be changed as otherwise the built-in backup solution will not work
      - /var/run/docker.sock:/var/run/docker.sock:ro # May be changed on macOS, Windows or docker rootless. See the applicable documentation. If adjusting, don&apost forget to also set &aposWATCHTOWER_DOCKER_SOCKET_PATH&apos!
    ports:
      - 8080:8080
    environment: # Is needed when using any of the options below
      # - AIO_DISABLE_BACKUP_SECTION=false # Setting this to true allows to hide the backup section in the AIO interface. See https://github.com/nextcloud/all-in-one#how-to-disable-the-backup-section
      - APACHE_PORT=32323 # Is needed when running behind a web server or reverse proxy (like Apache, Nginx, Cloudflare Tunnel and else). See https://github.com/nextcloud/all-in-one/blob/main/reverse-proxy.md
      - APACHE_IP_BINDING=127.0.0.1 # Should be set when running behind a web server or reverse proxy (like Apache, Nginx, Cloudflare Tunnel and else) that is running on the same host. See https://github.com/nextcloud/all-in-one/blob/main/reverse-proxy.md
      # - BORG_RETENTION_POLICY=--keep-within=7d --keep-weekly=4 --keep-monthly=6 # Allows to adjust borgs retention policy. See https://github.com/nextcloud/all-in-one#how-to-adjust-borgs-retention-policy
      # - COLLABORA_SECCOMP_DISABLED=false # Setting this to true allows to disable Collabora&aposs Seccomp feature. See https://github.com/nextcloud/all-in-one#how-to-disable-collaboras-seccomp-feature
      - NEXTCLOUD_DATADIR=/opt/docker/cloud.raju.dev/nextcloud # Allows to set the host directory for Nextcloud&aposs datadir.   Warning: do not set or adjust this value after the initial Nextcloud installation is done! See https://github.com/nextcloud/all-in-one#how-to-change-the-default-location-of-nextclouds-datadir
      # - NEXTCLOUD_MOUNT=/mnt/ # Allows the Nextcloud container to access the chosen directory on the host. See https://github.com/nextcloud/all-in-one#how-to-allow-the-nextcloud-container-to-access-directories-on-the-host
      # - NEXTCLOUD_UPLOAD_LIMIT=10G # Can be adjusted if you need more. See https://github.com/nextcloud/all-in-one#how-to-adjust-the-upload-limit-for-nextcloud
      # - NEXTCLOUD_MAX_TIME=3600 # Can be adjusted if you need more. See https://github.com/nextcloud/all-in-one#how-to-adjust-the-max-execution-time-for-nextcloud
      # - NEXTCLOUD_MEMORY_LIMIT=512M # Can be adjusted if you need more. See https://github.com/nextcloud/all-in-one#how-to-adjust-the-php-memory-limit-for-nextcloud
      # - NEXTCLOUD_TRUSTED_CACERTS_DIR=/path/to/my/cacerts # CA certificates in this directory will be trusted by the OS of the nexcloud container (Useful e.g. for LDAPS) See See https://github.com/nextcloud/all-in-one#how-to-trust-user-defined-certification-authorities-ca
      # - NEXTCLOUD_STARTUP_APPS=deck twofactor_totp tasks calendar contacts notes # Allows to modify the Nextcloud apps that are installed on starting AIO the first time. See https://github.com/nextcloud/all-in-one#how-to-change-the-nextcloud-apps-that-are-installed-on-the-first-startup
      # - NEXTCLOUD_ADDITIONAL_APKS=imagemagick # This allows to add additional packages to the Nextcloud container permanently. Default is imagemagick but can be overwritten by modifying this value. See https://github.com/nextcloud/all-in-one#how-to-add-os-packages-permanently-to-the-nextcloud-container
      # - NEXTCLOUD_ADDITIONAL_PHP_EXTENSIONS=imagick # This allows to add additional php extensions to the Nextcloud container permanently. Default is imagick but can be overwritten by modifying this value. See https://github.com/nextcloud/all-in-one#how-to-add-php-extensions-permanently-to-the-nextcloud-container
      # - NEXTCLOUD_ENABLE_DRI_DEVICE=true # This allows to enable the /dev/dri device in the Nextcloud container.   Warning: this only works if the &apos/dev/dri&apos device is present on the host! If it should not exist on your host, don&apost set this to true as otherwise the Nextcloud container will fail to start! See https://github.com/nextcloud/all-in-one#how-to-enable-hardware-transcoding-for-nextcloud
      # - NEXTCLOUD_KEEP_DISABLED_APPS=false # Setting this to true will keep Nextcloud apps that are disabled in the AIO interface and not uninstall them if they should be installed. See https://github.com/nextcloud/all-in-one#how-to-keep-disabled-apps
      # - TALK_PORT=3478 # This allows to adjust the port that the talk container is using. See https://github.com/nextcloud/all-in-one#how-to-adjust-the-talk-port
      # - WATCHTOWER_DOCKER_SOCKET_PATH=/var/run/docker.sock # Needs to be specified if the docker socket on the host is not located in the default &apos/var/run/docker.sock&apos. Otherwise mastercontainer updates will fail. For macos it needs to be &apos/var/run/docker.sock&apos
    # networks: # Is needed when you want to create the nextcloud-aio network with ipv6-support using this file, see the network config at the bottom of the file
      # - nextcloud-aio # Is needed when you want to create the nextcloud-aio network with ipv6-support using this file, see the network config at the bottom of the file
      # - SKIP_DOMAIN_VALIDATION=true
    # # Uncomment the following line when using SELinux
    # security_opt: ["label:disable"]
volumes: # If you want to store the data on a different drive, see https://github.com/nextcloud/all-in-one#how-to-store-the-filesinstallation-on-a-separate-drive
  nextcloud_aio_mastercontainer:
    name: nextcloud_aio_mastercontainer # This line is not allowed to be changed as otherwise the built-in backup solution will not work
I have not removed many of the commented options in the compose file, for a possibility of me using them in the future.If you want a smaller cleaner compose with the extra options, you can refer to
I am using a separate directory to store nextcloud data. As per nextcloud documentation you should be using a separate partition if you want to use this feature, however I did not have that option on my server, so I used a separate directory instead. Also we use a custom port on which nextcloud listens for operations, we have set it up as 32323 above, but you can use any in the permissible port range. The 8080 port is used the setup the AIO management interface. Both 8080 and the APACHE_PORT do not need to be open on the host machine, as we will be using reverse proxy setup with nginx to direct requests. once you have your preferred compose.yml file, you can start the containers using
$ docker-compose -f compose.yml up -d
Creating network "clouddev_default" with the default driver
Creating volume "nextcloud_aio_mastercontainer" with default driver
Creating nextcloud-aio-mastercontainer ... done
once your container&aposs are running, we can do the nginx setup.
Step 2: Configuring nginx reverse proxy for our domain on host. A reference nginx configuration for nextcloud AIO is given in the nextcloud git repository here . You can modify the configuration file according to your needs and setup. Here is configuration that we are using
map $http_upgrade $connection_upgrade
    default upgrade;
    &apos&apos close;

server
    listen 80;
    #listen [::]:80;            # comment to disable IPv6
    if ($scheme = "http")
        return 301 https://$host$request_uri;

    listen 443 ssl http2;      # for nginx versions below v1.25.1
    #listen [::]:443 ssl http2; # for nginx versions below v1.25.1 - comment to disable IPv6
    # listen 443 ssl;      # for nginx v1.25.1+
    # listen [::]:443 ssl; # for nginx v1.25.1+ - keep comment to disable IPv6
    # http2 on;                                 # uncomment to enable HTTP/2        - supported on nginx v1.25.1+
    # http3 on;                                 # uncomment to enable HTTP/3 / QUIC - supported on nginx v1.25.0+
    # quic_retry on;                            # uncomment to enable HTTP/3 / QUIC - supported on nginx v1.25.0+
    # add_header Alt-Svc &aposh3=":443"; ma=86400' # uncomment to enable HTTP/3 / QUIC - supported on nginx v1.25.0+
    # listen 443 quic reuseport;       # uncomment to enable HTTP/3 / QUIC - supported on nginx v1.25.0+ - please remove "reuseport" if there is already another quic listener on port 443 with enabled reuseport
    # listen [::]:443 quic reuseport;  # uncomment to enable HTTP/3 / QUIC - supported on nginx v1.25.0+ - please remove "reuseport" if there is already another quic listener on port 443 with enabled reuseport - keep comment to disable IPv6
    server_name cloud.example.com;
    location /
        proxy_pass http://127.0.0.1:32323$request_uri;
        proxy_set_header X-Forwarded-For $proxy_add_x_forwarded_for;
        proxy_set_header X-Forwarded-Port $server_port;
        proxy_set_header X-Forwarded-Scheme $scheme;
        proxy_set_header X-Forwarded-Proto $scheme;
        proxy_set_header X-Real-IP $remote_addr;
        proxy_set_header Accept-Encoding "";
        proxy_set_header Host $host;

        client_body_buffer_size 512k;
        proxy_read_timeout 86400s;
        client_max_body_size 0;
        # Websocket
        proxy_http_version 1.1;
        proxy_set_header Upgrade $http_upgrade;
        proxy_set_header Connection $connection_upgrade;

    ssl_certificate /etc/letsencrypt/live/cloud.example.com/fullchain.pem; # managed by Certbot
    ssl_certificate_key /etc/letsencrypt/live/cloud.example.com/privkey.pem; # managed by Certbot
    ssl_session_timeout 1d;
    ssl_session_cache shared:MozSSL:10m; # about 40000 sessions
    ssl_session_tickets off;
    ssl_protocols TLSv1.2 TLSv1.3;
    ssl_ciphers ECDHE-ECDSA-AES128-GCM-SHA256:ECDHE-RSA-AES128-GCM-SHA256:ECDHE-ECDSA-AES256-GCM-SHA384:ECDHE-RSA-AES256-GCM-SHA384:ECDHE-ECDSA-CHACHA20-POLY1305:ECDHE-RSA-CHACHA20-POLY1305:DHE-RSA-AES128-GCM-SHA256:DHE-RSA-AES256-GCM-SHA384:DHE-RSA-CHACHA20-POLY1305;
    ssl_prefer_server_ciphers on;
    # Optional settings:
    # OCSP stapling
    # ssl_stapling on;
    # ssl_stapling_verify on;
    # ssl_trusted_certificate /etc/letsencrypt/live/<your-nc-domain>/chain.pem;
    # replace with the IP address of your resolver
    # resolver 127.0.0.1; # needed for oscp stapling: e.g. use 94.140.15.15 for adguard / 1.1.1.1 for cloudflared or 8.8.8.8 for google - you can use the same nameserver as listed in your /etc/resolv.conf file
Please note that you need to have valid SSL certificates for your domain for this configuration to work. Steps on getting valid SSL certificates for your domain are beyond the scope of this article. You can give a web search on getting SSL certificates with letsencrypt and you will get several resources on that, or may write a blog post on it separately in the future.once your configuration for nginx is done, you can test the nginx configuration using
$ sudo nginx -t
nginx: the configuration file /etc/nginx/nginx.conf syntax is ok
nginx: configuration file /etc/nginx/nginx.conf test is successful
and then reload nginx with
$ sudo nginx -s reload
Step 3: Setup of Nextcloud AIO from the browser.To setup nextcloud AIO, we need to access it using the web browser on URL of our domain.tld:8080, however we do not want to open the 8080 port publicly to do this, so to complete the setup, here is a neat hack from sahilister
ssh -L 8080:127.0.0.1:8080 username:<server-ip>
you can bind the 8080 port of your server to the 8080 of your localhost using Unix socket forwarding over SSH.The port forwarding only last for the duration of your SSH session, if the SSH session breaks, your port forwarding will to. So, once you have the port forwarded, you can open the nextcloud AIO instance in your web browser at 127.0.0.1:8080you will get this error because you are trying to access a page on localhost over HTTPS. You can click on advanced and then continue to proceed to the next page. Your data is encrypted over SSH for this session as we are binding the port over SSH. Depending on your choice of browser, the above page might look different.once you have proceeded, the nextcloud AIO interface will open and will look something like this. nextcloud AIO initial screen with capsicums as passwordIt will show an auto generated passphrase, you need to save this passphrase and make sure to not loose it. For the purposes of security, I have masked the passwords with capsicums. once you have noted down your password, you can proceed to the Nextcloud AIO login, enter your password and then login. After login you will be greeted with a screen like this. now you can put the domain that you want to use in the Submit domain field. Once the domain check is done, you will proceed to the next step and see another screen like thishere you can select any optional containers for the features that you might want. IMPORTANT: Please make sure to also change the time zone at the bottom of the page according to the time zone you wish to operate in. The timezone setup is also important because the data base will get initialized according to the set time zone. This could result in wrong initialization of database and you ending up in a startup loop for nextcloud. I faced this issue and could only resolve it after getting help from sahilister . Once you are done changing the timezone, and selecting any additional features you want, you can click on Download and start the containersIt will take some time for this process to finish, take a break and look at the farthest object in your room and take a sip of water. Once you are done, and the process has finished you will see a page similar to the following one. wait patiently for everything to turn green. once all the containers have started properly, you can open the nextcloud login interface on your configured domain, the initial login details are auto generated as you can see from the above screenshot. Again you will see a password that you need to note down or save to enter the nextcloud interface. Capsicums will not work as passwords. I have masked the auto generated passwords using capsicums.Now you can click on Open your Nextcloud button or go to your configured domain to access the login screen. You can use the login details from the previous step to login to the administrator account of your Nextcloud instance. There you have it, your very own cloud!
Additional Notes:
How to properly reset Nextcloud setup?While following the above steps, or while following steps from some other tutorial, you may have made a mistake, and want to start everything again from scratch. The instructions for it are present in the Nextcloud documentation here . Here is the TLDR for a docker-compose setup. These steps will delete all data, do not use these steps on an existing nextcloud setup unless you know what you are doing.
Stop your master container.
docker-compose -f compose.yml down -v
The above command will also remove the volume associated with the master container
Stop all the child containers that has been started by the master container.
Preparing for Python 3.12 by Stefano Rivera
Stefano uploaded a few packages in preparation for Python 3.12, including
pycxx and cython. Cython has a major new version (Cython 3), adding support
for 3.12, but also bringing changes that many packages in Debian aren t ready
to build with, yet. Stefano uploaded it to Debian experimental and did
an archive rebuild of affected packages, and some analysis of the result.
Matthias Klose has since filed bugs for all of these issues.
debian-printing, by Thorsten Alteholz
This month Thorsten invested some of the previously obtained money to build
his own printlab. At the moment it only consists of a dedicated computer with
an USB printer attached. Due to its 64GB RAM and an SSD, building of
debian-printing packages is much faster now. Over time other printers will be
added and understanding bugs should be a lot easier now.
Also Thorsten again adopted two packages, namely mink and ink, and moved them
to the debian-printing team.
Merged-/usr transition by Helmut Grohne, et al
The dumat analysis tool has been
improved in quite some aspects. Beyond fixing false negative diagnostics, it
now recognizes protective diversions used for mitigating Multi-Arch: same
file loss. It was found that the proposed
mitigation for ineffective diversions does
not work as expected. Trying to fix it up resulted in more problems, some of
which remain unsolved as of this writing.
Initial work on moving shared libraries in the essential set has been done.
Meanwhile, the wider Debian community worked on fixing all known
Multi-Arch: same file loss scenarios. This work is now being driven by
Christian Hofstaedler and during the Mini DebConf in Cambridge, Chris Boot,
tienne Mollier, Miguel Landaeta, Samuel Henrique, and Utkarsh Gupta sent
the other half of the necessary patches.
Miscellaneous contributions
Stefano merged patches to support loong64 and hurd-amd64 in re2.
For the Cambridge mini-conf, Stefano
added a web player
to the DebConf video streaming frontend, as the Cambridge miniconf didn t
have its own website to host the player.
Rapha l helped the upstream developers of hamster-time-tracker to prepare a
new upstream release (the first in multiple years) and packaged that new
release in Debian unstable.
Enrico joined Hemut in brainstorming some /usr-merge solutions.
Thorsten took care of RM-bugs to remove no longer needed packages from the
Debian archive and closed about 50 of them.
Helmut ported the feature of mounting a
fuse connection via /dev/fd/N from fuse3 to fuse2.
Helmut sent a number of patches simplifying unprivileged use of piuparts.
Roberto worked with Helmut to prepare the Shorewall package for the ongoing
/usr-move transition.
Utkarsh also helped with the ongoing /usr-merge work by preparing patches
for gitlab, libnfc, and net-tools.
Utkarsh, along with Helmut, brainstormed on fixing
#961138, as this affects the whole archive
and all the suites and not just R packages. Utkarsh intends to follow up on
the bug in December.
Santiago organized a MiniDebConf in Uruguay. In total, nine people attended,
including most of DDs in the surrounding area. Here s a
nicely written blog by Gunnar Wolf.
Santiago also worked on some issues on Salsa CI, fixed with some merge
requests: #462,
#463,
and #466.
dkg's New OpenPGP certificate in December 2023
In December of 2023, I'm moving to a new OpenPGP certificate.
You might know my old OpenPGP certificate, which had an fingerprint of
C29F8A0C01F35E34D816AA5CE092EB3A5CA10DBA.
My new OpenPGP certificate has a fingerprint of:
D477040C70C2156A5C298549BB7E9101495E6BF7.
Both certificates have the same set of User IDs:
-----BEGIN PGP PUBLIC KEY BLOCK-----xjMEZXEJyxYJKwYBBAHaRw8BAQdA5BpbW0bpl5qCng/RiqwhQINrplDMSS5JsO/YO+5Zi7HCwAsEHxYKAH0FgmVxCcsDCwkHCRC7fpEBSV5r90cUAAAAAAAeACBzYWx0QG5vdGF0aW9ucy5zZXF1b2lhLXBncC5vcmfUAgfN9tyTSxpxhmHA1r63GiI4v6NQmrrWVLOBRJYuhQMVCggCmwECHgEWIQTUdwQMcMIValwphUm7fpEBSV5r9wAAmaEA/3MvYJMxQdLhIG4UDNMVd2bsovwdcTrReJhLYyFulBrwAQD/j/RS+AXQIVtkcO9bl6zZTAO9x6yfkOZbv0g3eNyrAs0QPGRrZ0BkZWJpYW4ub3JnPsLACwQTFgoAfQWCZXEJywMLCQcJELt+kQFJXmv3RxQAAAAAAB4AIHNhbHRAbm90YXRpb25zLnNlcXVvaWEtcGdwLm9yZ4l+Z3i19Uwjw3CfTNFCDjRsoufMoPOM7vM8HoOEdn/vAxUKCAKbAQIeARYhBNR3BAxwwhVqXCmFSbt+kQFJXmv3AAALZQEAhJsgouepQVV98BHUH6SvWvcKrb8dQEZOvHFbZQQPNWgA/A/DHkjYKnUkCg8Zc+FonqOS/35sHhNA8CwqSQFrtN4KzRc8ZGtnQGZpZnRoaG9yc2VtYW4ubmV0PsLACgQTFgoAfQWCZXEJywMLCQcJELt+kQFJXmv3RxQAAAAAAB4AIHNhbHRAbm90YXRpb25zLnNlcXVvaWEtcGdwLm9yZxLvwkgnslsAuo+IoSa9rv8+nXpbBdab2Ft7n4H9S+d/AxUKCAKbAQIeARYhBNR3BAxwwhVqXCmFSbt+kQFJXmv3AAAtFgD4wqcUfQl7nGLQOcAEHhx8V0Bg8v9ov8GsY1ei1BEFwAD/cxmxmDSO0/tA+x4pd5yIvzgfGYHSTxKS0Ww3hzjuZA7NE0RhbmllbCBLYWhuIEdpbGxtb3LCwA4EExYKAIAFgmVxCcsDCwkHCRC7fpEBSV5r90cUAAAAAAAeACBzYWx0QG5vdGF0aW9ucy5zZXF1b2lhLXBncC5vcmd7X4TgiINwnzh4jar0Pf/b5hgxFPngCFxJSmtr/f0YiQMVCggCmQECmwECHgEWIQTUdwQMcMIValwphUm7fpEBSV5r9wAAMuwBAPtMonKbhGOhOy+8miAb/knJ1cIPBjLupJbjM+NUE1WyAQD1nyGW+XwwMrprMwc320mdJH9B0jdokJZBiN7++0NoBM4zBGVxCcsWCSsGAQQB2kcPAQEHQI19uRatkPSFBXh8usgciEDwZxTnnRZYrhIgiFMybBDQwsC/BBgWCgExBYJlcQnLCRC7fpEBSV5r90cUAAAAAAAeACBzYWx0QG5vdGF0aW9ucy5zZXF1b2lhLXBncC5vcmfCopazDnq6hZUsgVyztl5wmDCmxI169YLNu+IpDzJEtQKbAr6gBBkWCgBvBYJlcQnLCRB3LRYeNc1LgUcUAAAAAAAeACBzYWx0QG5vdGF0aW9ucy5zZXF1b2lhLXBncC5vcmcQglI7G7DbL9QmaDkzcEuk3QliM4NmleIRUW7VvIBHMxYhBHS8BMQ9hghL6GcsBnctFh41zUuBAACwfwEAqDULksr8PulKRcIP6N9NI/4KoznyIcuOHi8qGk4qxMkBAIeV20SPEnWSw9MWAb0eKEcfupzr/C+8vDvsRMynCWsDFiEE1HcEDHDCFWpcKYVJu36RAUlea/cAAFD1AP0YsE3Eeig1tkWaeyrvvMf5Kl1tt2LekTNWDnB+FUG9SgD+Ka8vfPR8wuV8D3y5Y9Qq9xGO+QkEBCW0U1qNypg65QHOOARlcQnLEgorBgEEAZdVAQUBAQdAWTLEa0WmnhUmDBdWXX0ZlYAa4g1CK/fXg0NPOQSteA4DAQgHwsAABBgWCgByBYJlcQnLCRC7fpEBSV5r90cUAAAAAAAeACBzYWx0QG5vdGF0aW9ucy5zZXF1b2lhLXBncC5vcmexrMBZe0QdQ+ZJOZxFkAiwCw2I7yTSF2Ox9GVFWKmAmAKbDBYhBNR3BAxwwhVqXCmFSbt+kQFJXmv3AABcJQD/f4ltpSvLBOBEh/C2dIYadgSuqkCqq0B4WOhFRkWJZlcA/AxqLWG4o8UrrmwrmM42FhgxKtEXwCSHE00u8wR4Up8G=9Yc8-----END PGP PUBLIC KEY BLOCK-----
When I have some reasonable number of certifications, i'll update the
certificate associated with my e-mail addresses on
https://keys.openpgp.org, in DANE, and in WKD. Until then, those
lookups should continue to provide the old certificate.
Welcome to the November 2023 report from the Reproducible Builds project! In these reports we outline the most important things that we have been up to over the past month. As a rather rapid recap, whilst anyone may inspect the source code of free software for malicious flaws, almost all software is distributed to end users as pre-compiled binaries (more).
Reproducible Builds Summit 2023
Between October 31st and November 2nd, we held our seventh Reproducible Builds Summit in Hamburg, Germany! Amazingly, the agenda and all notes from all sessions are all online many thanks to everyone who wrote notes from the sessions.
As a followup on one idea, started at the summit, Alexander Couzens and Holger Levsen started work on a cache (or tailored front-end) for the snapshot.debian.org service. The general idea is that, when rebuilding Debian, you do not actually need the whole ~140TB of data from snapshot.debian.org; rather, only a very small subset of the packages are ever used for for building. It turns out, for amd64, arm64, armhf, i386, ppc64el, riscv64 and s390 for Debian trixie, unstable and experimental, this is only around 500GB ie. less than 1%. Although the new service not yet ready for usage, it has already provided a promising outlook in this regard. More information is available on https://rebuilder-snapshot.debian.net and we hope that this service becomes usable in the coming weeks.
The adjacent picture shows a sticky note authored by Jan-Benedict Glaw at the summit in Hamburg, confirming Holger Levsen s theory that rebuilding all Debian packages needs a very small subset of packages, the text states that 69,200 packages (in Debian sid) list 24,850 packages in their .buildinfo files, in 8,0200 variations. This little piece of paper was the beginning of rebuilder-snapshot and is a direct outcome of the summit!
The Reproducible Builds team would like to thank our event sponsors who include Mullvad VPN, openSUSE, Debian, Software Freedom Conservancy, Allotropia and Aspiration Tech.
Beyond Trusting FOSS presentation at SeaGL
On November 4th, Vagrant Cascadian presented Beyond Trusting FOSS at SeaGL in Seattle, WA in the United States. Founded in 2013, SeaGL is a free, grassroots technical summit dedicated to spreading awareness and knowledge about free source software, hardware and culture. The summary of Vagrant s talk mentions that it will:
[ ] introduce the concepts of Reproducible Builds, including best practices for developing and releasing software, the tools available to help diagnose issues, and touch on progress towards solving decades-old deeply pervasive fundamental security issues Learn how to verify and demonstrate trust, rather than simply hoping everything is OK!
Germane to the contents of the talk, the slides for Vagrant s talk can be built reproducibly, resulting in a PDF with a SHA1 of cfde2f8a0b7e6ec9b85377eeac0661d728b70f34 when built on Debian bookworm and c21fab273232c550ce822c4b0d9988e6c49aa2c3 on Debian sid at the time of writing.
Human Factors in Software Supply Chain Security
Marcel Fourn , Dominik Wermke, Sascha Fahl and Yasemin Acar have published an article in a Special Issue of the IEEE s Security & Privacy magazine. Entitled A Viewpoint on Human Factors in Software Supply Chain Security: A Research Agenda, the paper justifies the need for reproducible builds to reach developers and end-users specifically, and furthermore points out some under-researched topics that we have seen mentioned in interviews. An author pre-print of the article is available in PDF form.
Bernhard M. Wiedemann posted a positive LibreOffice success story documenting that, after some work:
[ ] today I hold in my hands the first two bit-identical LibreOffice rpm packages. And this is the success I wanted to share with you all today [and] it makes me feel as if we can solve anything.
I chose the esp32c3 [board] because it has good Rust support from the esp-rs project, and you can get a dev board for about 6-8 . To document my build environment I used repro-env together with Arch Linux because its archive is very reliable and contains all the different Rust development tools I needed.
Separate to their work on LibreOffice however, Bernhard M. Wiedemann also requested assistance with a number of packages that so far refuse to build reproducibly. He writes that the common theme around them is that they use scheme or lisp to produce binaries with a dump command and hopes that someone may be able to help.
openSUSE updates
Bernhard M. Wiedemann has created a wiki page outlining an proposal to create a general-purpose Linux distribution which consists of 100% bit-reproducible packages albeit minus the embedded signature within RPM files. It would be based on openSUSE Tumbleweed or, if available, its Slowroll-variant.
In addition, Bernhard posted another monthly update for his work elsewhere in openSUSE.
Reproducibility-related changes in Debian
As recently reported in the most recent Debian Developer News, Paul Gevers has integrated a package s reproducibility status into the way Debian migrates packages into the next stable release. For the amd64, arm64, i386 and armhf architectures, data is collected from the Reproducible Builds testing framework is collected by this migration software even though, at the time of writing, it neither causes nor migration bonuses nor blocks migration. Indeed, the information only results are visible on Britney s excuses as well as on individual packages pages on tracker.debian.org.
Ubuntu Launchpad now supports .buildinfo files
Back in 2017, Steve Langasek filed a bug against Ubuntu s Launchpad code hosting platform to report that .changes files (artifacts of building Ubuntu and Debian packages) reference .buildinfo files that aren t actually exposed by Launchpad itself. This was causing issues when attempting to process .changes files with tools such as Lintian. However, it was noticed last month that, in early August of this year, Simon Quigley had resolved this issue, and .buildinfo files are now available from the Launchpad system.
PHP reproducibility updates
There have been two updates from the PHP programming language this month.
Firstly, the widely-deployed PHPUnit framework for the PHP programming language have recently released version 10.5.0, which introduces the inclusion of a composer.lock file, ensuring total reproducibility of the shipped binary file. Further details and the discussion that went into their particular implementation can be found on the associated GitHub pull request.
In addition, the presentation Leveraging Nix in the PHP ecosystem has been given in late October at the PHP International Conference in Munich by Pol Dellaiera. While the video replay is not yet available, the (reproducible) presentation slides and speaker notes are available.
diffoscope changes
diffoscope is our in-depth and content-aware diff utility that can locate and diagnose reproducibility issues. This month, Chris Lamb made a number of changes, including:
Improving DOS/MBR extraction by adding support for 7z. []
Adding a missing RequiredToolNotFound import. []
As a UI/UX improvement, try and avoid printing an extended traceback if diffoscope runs out of memory. []
Website updates
A huge number of notes were added to our website that were taken at our recent Reproducible Builds Summit held between October 31st and November 2nd in Hamburg, Germany. In particular, a big thanks to Arnout Engelen, Bernhard M. Wiedemann, Daan De Meyer, Evangelos Ribeiro Tzaras, Holger Levsen and Orhun Parmaks z.
In addition to this, a number of other changes were made, including:
Holger Levsen also made a large number of notes pages from our 2022 summit in Venice [], migrated the website s syntax highlighter from [Pygments]https://pygments.org/() to Rouge [], fixed some grammar on our donate page [][][] and did a lot of updates to the Hamburg Summit s general information page [][].
Upstream patches
The Reproducible Builds project detects, dissects and attempts to fix as many currently-unreproducible packages as possible. We endeavour to send all of our patches upstream where appropriate. This month, we wrote a large number of such patches, including:
Reproducibility testing framework
The Reproducible Builds project operates a comprehensive testing framework (available at tests.reproducible-builds.org) in order to check packages and other artifacts for reproducibility. In October, a number of changes were made by Holger Levsen:
Debian-related changes:
Track packages marked as Priority: important in a new package set. [][]
Stop scheduling packages that fail to build from source in bookworm [] and bullseye. [].
Add old releases dashboard link in web navigation. []
Permit re-run of the pool_buildinfos script to be re-run for a specific year. []
Grant jbglaw access to the osuosl4 node [][] along with lynxis [].
Increase RAM on the amd64 Ionos builders from 48 GiB to 64 GiB; thanks IONOS! []
Move buster to archived suites. [][]
Reduce the number of arm64 architecture workers from 24 to 16 in order to improve stability [], reduce the workers for amd64 from 32 to 28 and, for i386, reduce from 12 down to 8 [].
Show the entire build history of each Debian package. []
Stop scheduling already tested package/version combinations in Debian bookworm. []
Other changes were made as well, however, including Mattia Rizzolo fixing rc.local s Bash syntax so it can actually run [], commenting away some file cleanup code that is (potentially) deleting too much [] and fixing the html_brekages page for Debian package builds []. Finally, diagnosed and submitted a patch to add a AddEncoding gzip .gz line to the tests.reproducible-builds.org Apache configuration so that Gzip files aren t re-compressed as Gzip which some clients can t deal with (as well as being a waste of time). []
If you are interested in contributing to the Reproducible Builds project, please visit our Contribute page on our website. However, you can get in touch with us via:
Hello from a snowy Montr al! My life has been pretty busy lately1 so
please forgive this late report.
On November 19th, our local Debian User Group met at Montreal's most
prominent hackerspace, Foulab. We've been there a few times already, but
since our last visit, Foulab has had some membership/financial troubles. Happy
to say things are going well again and a new team has taken over the space.
This meetup wasn't the most productive day for me (something about being
exhausted apparently makes it hard to concentrate), but other people did a
bunch of interesting stuff :)
J r me worked on updating JRuby to the latest upstream version.
I failed to update monitoring-plugins-systemd to the latest upstream
version. It seems the entire test suite has been re-written and I couldn't
make it work in sbuild...
Tiago and Tassia worked on the Debian Contributors website. More
specifically, they added a DSA domains data source and created a scheduler on
dcf.debian.net to make daily updates on the data sources in the
dc-sources repository.
Gerard worked on debugging his broken AirGradient board.
Pictures
Here are a bunch of pictures I took! Foulab is always a great place to snap
quirky things :)
More busy than the typical end of semester rush... At work, we are
currently renegotiating our collective bargaining agreement and things
aren't going so well. We went on strike for a few days already and we're
planning on another 7 days starting on Friday 8th.
Updated the linux-5.10 package in buster and issued
DLA-3512-1
for it.
Together with Aurelien Jarno, I investigated boot failures of
Linux 5.10 and later versions on Debian's MIPS buildds, but I
didn't find the root cause or any solution.
Reviewed and tested the kernel mitigations for the SRSO
(CVE-2023-20569)
issue in AMD CPUs, and added a critical missing patch to the
backports.
Updated the linux (4.19) and linux-5.10 packages in buster, and
the linux (5.10) package in bullseye, to include mitigations for
GDS
(CVE-2022-40982)
on Intel processors and (5.10 only) SRSO on AMD. I issued
DLA-3524-1
and
DLA-3525-1
for buster.
Updated
jinja-vanish to be compatible with Jinja 3.0. I also wired up
its test suite to autopkgtests and added a Salsa CI configuration
to catch any future regressions more quickly.
A new maintenance release 0.1.11 of the RcppSimdJson
package is now on CRAN.
RcppSimdJson
wraps the fantastic and genuinely impressive simdjson library by Daniel Lemire and collaborators. Via
very clever algorithmic engineering to obtain largely branch-free code,
coupled with modern C++ and newer compiler instructions, it results in
parsing gigabytes of JSON parsed per second which is quite
mindboggling. The best-case performance is faster than CPU speed as
use of parallel SIMD instructions and careful branch avoidance can lead
to less than one cpu cycle per byte parsed; see the video of the talk by Daniel Lemire
at QCon.
This release responds to a CRAN request to address issues now
identified by -Wformat -Wformat-security. These are
frequently pretty simple changes as it was here: all it took was an call
to compileAttributes() from an updated Rcpp version which now injects
"%s" as a format string when calling
Rf_error().
The (very short) NEWS entry for this release follows.
Changes in version 0.1.11
(2023-11-28)
RcppExports.cpp has been regenerated under an update
Rcpp to address a print format
warning (Dirk in #88).
 Now copy the ISO image to the newly created instance and extract
its data:
Now copy the ISO image to the newly created instance and extract
its data:
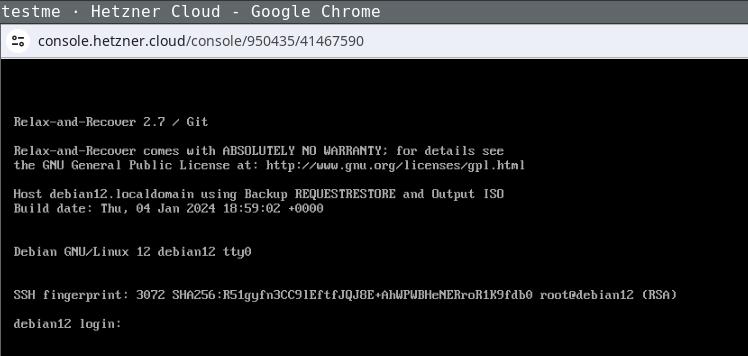 Login the recovery console (root without password) and fix its default route to
make it reachable:
Login the recovery console (root without password) and fix its default route to
make it reachable:
 Being able to use this procedure for complete disaster recovery within Hetzner
cloud VPS (using off-site backups) gives me a better feeling, too.
Being able to use this procedure for complete disaster recovery within Hetzner
cloud VPS (using off-site backups) gives me a better feeling, too.
 Today, the animation figure Mickey Mouse finally was released from
the corporate copyright prison, as the 1928 movie
Today, the animation figure Mickey Mouse finally was released from
the corporate copyright prison, as the 1928 movie
 This post should have marked the beginning of my yearly roundups of the favourite books and movies I read and watched in 2023.
However, due to coming down with a nasty bout of flu recently and other sundry commitments, I wasn't able to undertake writing the necessary four or five blog posts In lieu of this, however, I will simply present my (unordered and unadorned) highlights for now. Do get in touch if this (or any of my previous posts) have spurred you into picking something up yourself
This post should have marked the beginning of my yearly roundups of the favourite books and movies I read and watched in 2023.
However, due to coming down with a nasty bout of flu recently and other sundry commitments, I wasn't able to undertake writing the necessary four or five blog posts In lieu of this, however, I will simply present my (unordered and unadorned) highlights for now. Do get in touch if this (or any of my previous posts) have spurred you into picking something up yourself


 Debian Public Statement about the EU Cyber Resilience Act and the Product Liability Directive
The European Union is currently preparing a regulation "on horizontal
cybersecurity requirements for products with digital elements" known as the
Cyber Resilience Act (CRA). It is currently in the final "trilogue" phase of
the legislative process. The act includes a set of essential cybersecurity and
vulnerability handling requirements for manufacturers. It will require products
to be accompanied by information and instructions to the user. Manufacturers
will need to perform risk assessments and produce technical documentation and,
for critical components, have third-party audits conducted. Discovered security
issues will have to be reported to European authorities within 25 hours (1).
The CRA will be followed up by the Product Liability Directive (PLD) which will
introduce compulsory liability for software.
While a lot of these regulations seem reasonable, the Debian project believes
that there are grave problems for Free Software projects attached to them.
Therefore, the Debian project issues the following statement:
Debian Public Statement about the EU Cyber Resilience Act and the Product Liability Directive
The European Union is currently preparing a regulation "on horizontal
cybersecurity requirements for products with digital elements" known as the
Cyber Resilience Act (CRA). It is currently in the final "trilogue" phase of
the legislative process. The act includes a set of essential cybersecurity and
vulnerability handling requirements for manufacturers. It will require products
to be accompanied by information and instructions to the user. Manufacturers
will need to perform risk assessments and produce technical documentation and,
for critical components, have third-party audits conducted. Discovered security
issues will have to be reported to European authorities within 25 hours (1).
The CRA will be followed up by the Product Liability Directive (PLD) which will
introduce compulsory liability for software.
While a lot of these regulations seem reasonable, the Debian project believes
that there are grave problems for Free Software projects attached to them.
Therefore, the Debian project issues the following statement:
 This post describes how I m using
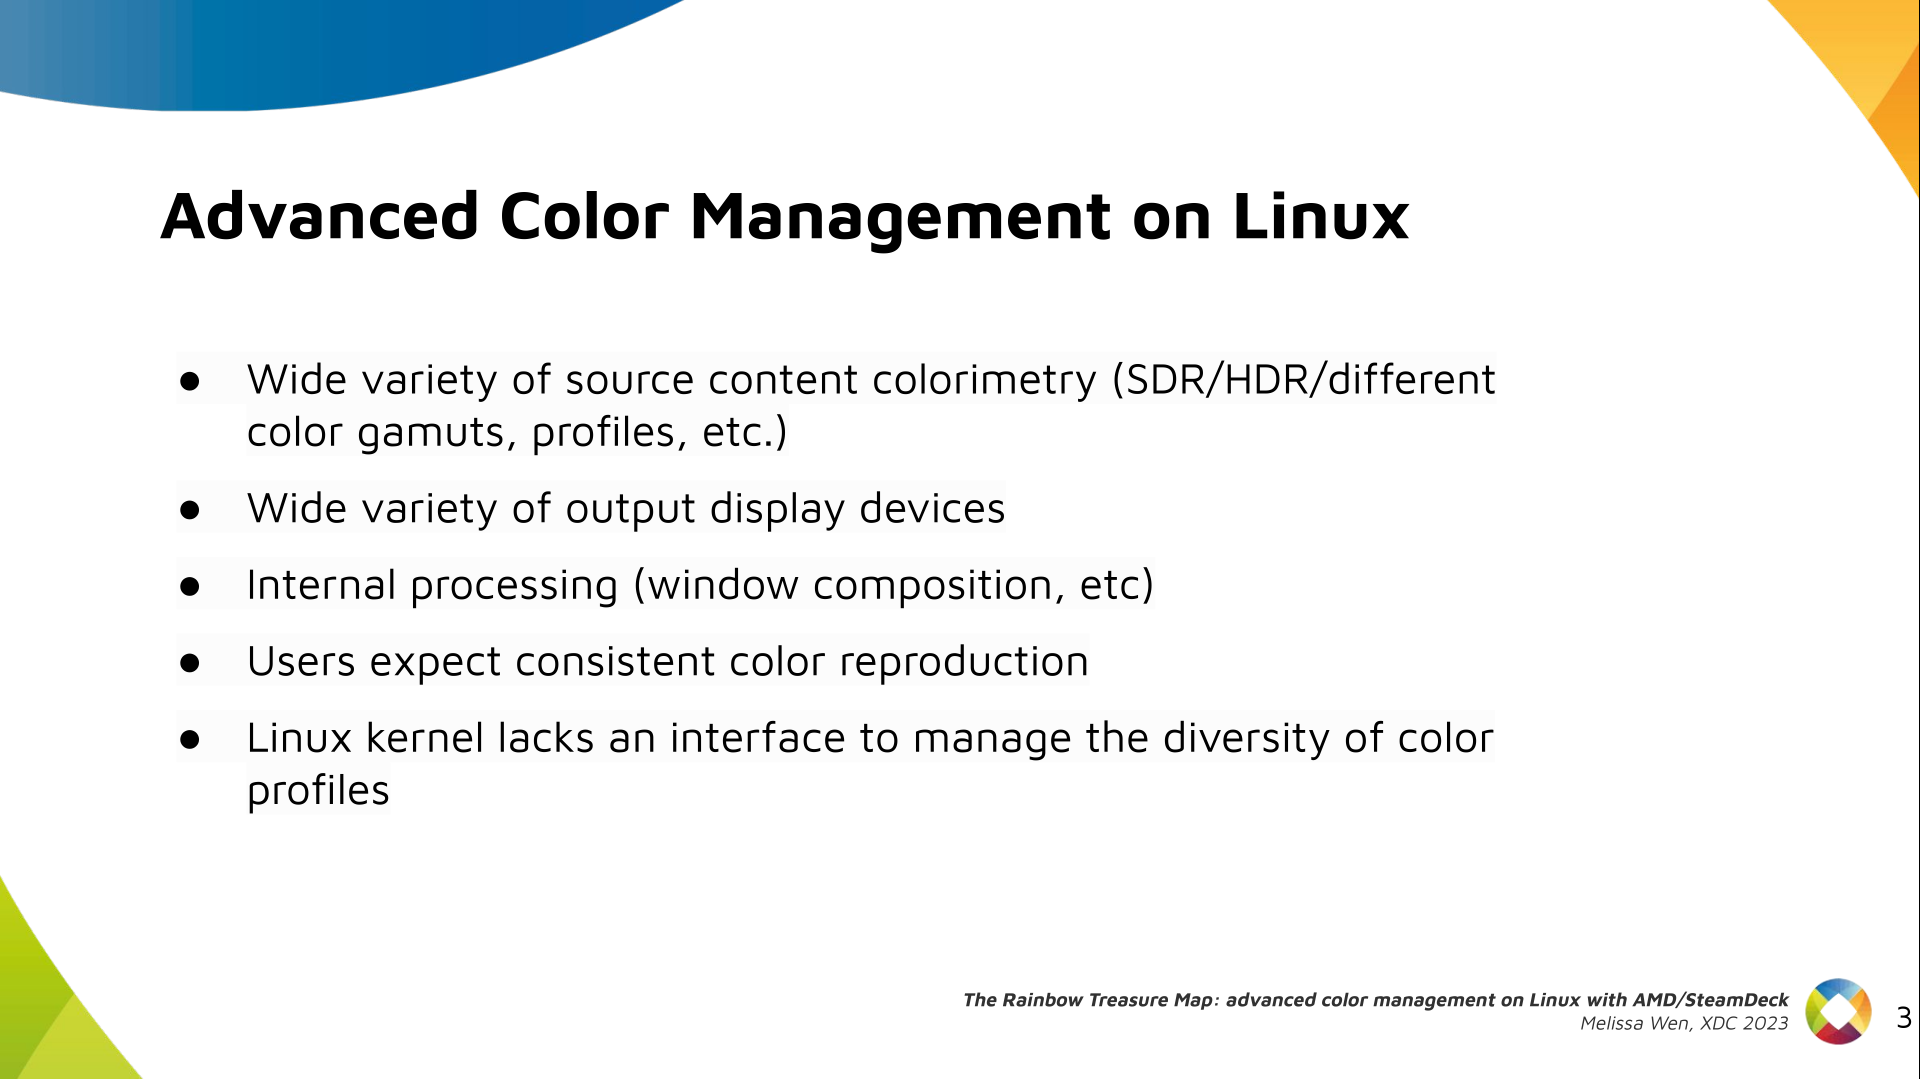
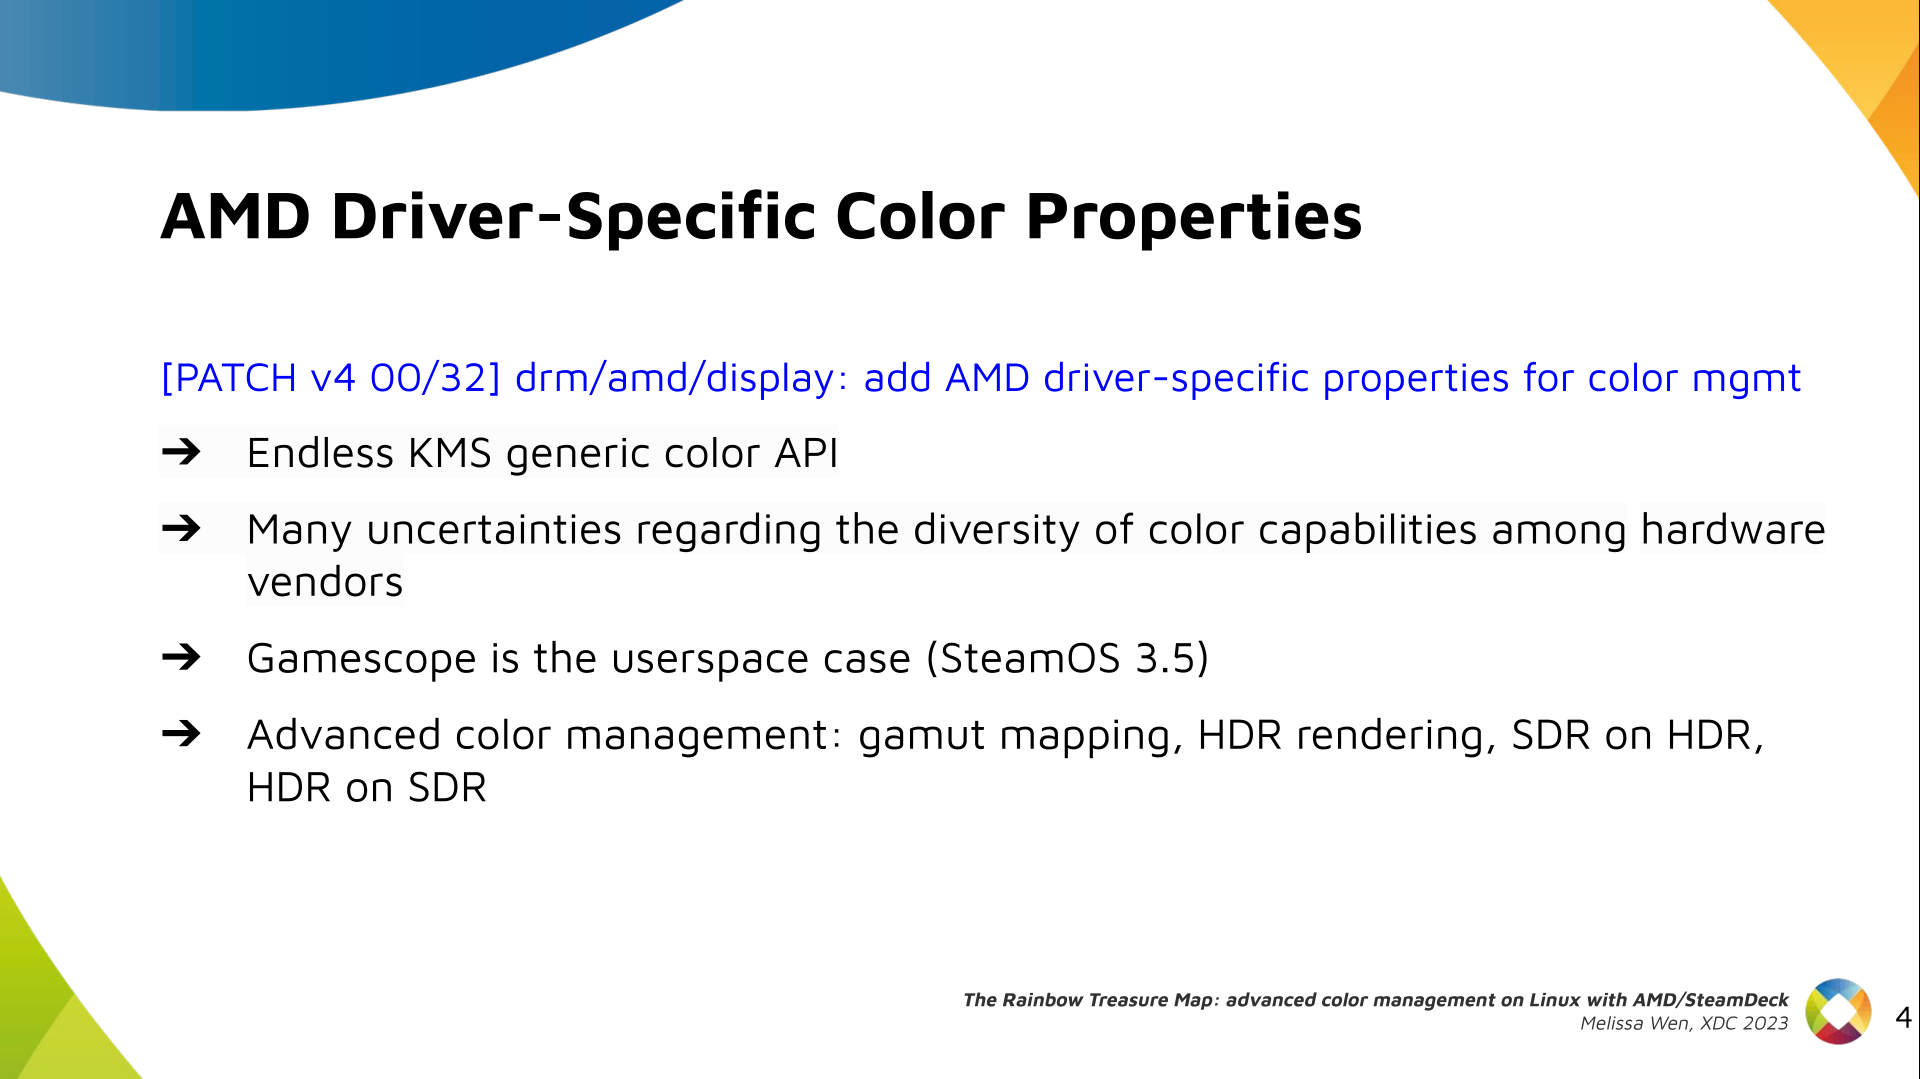
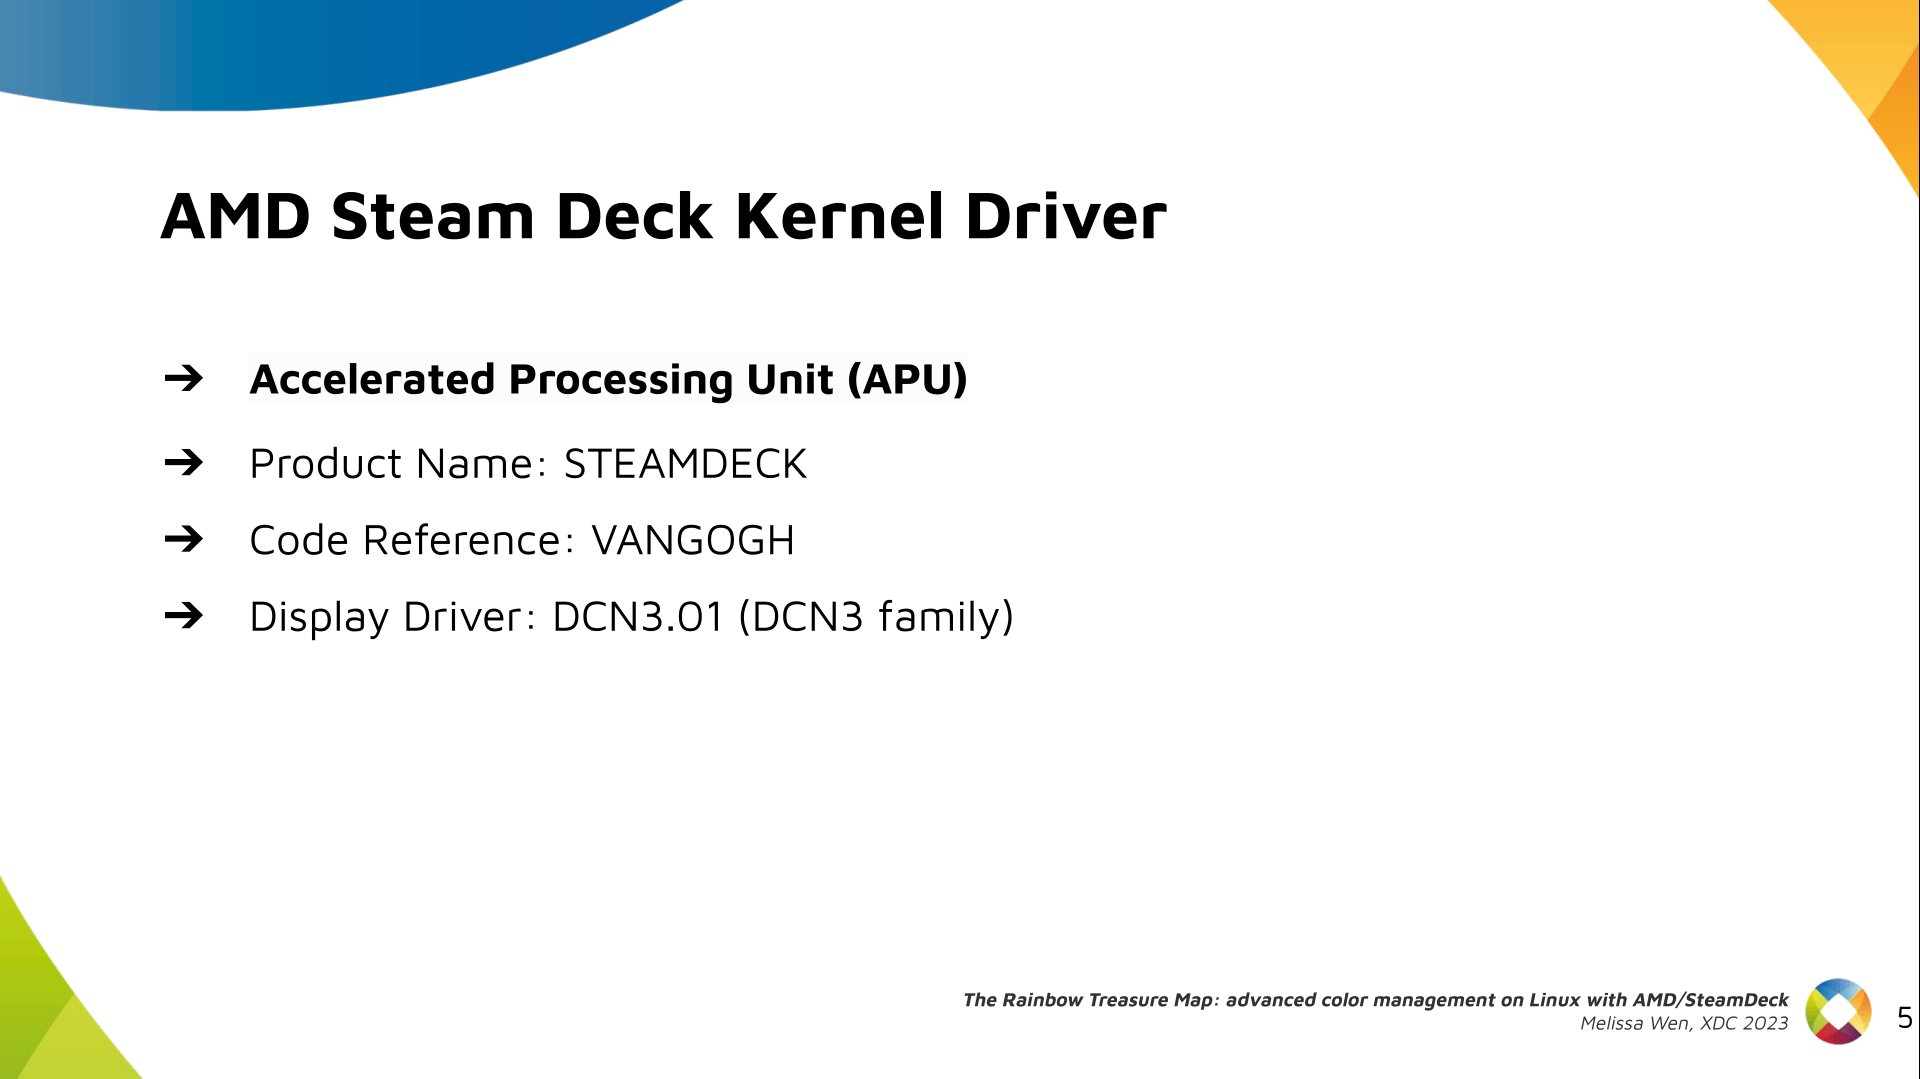
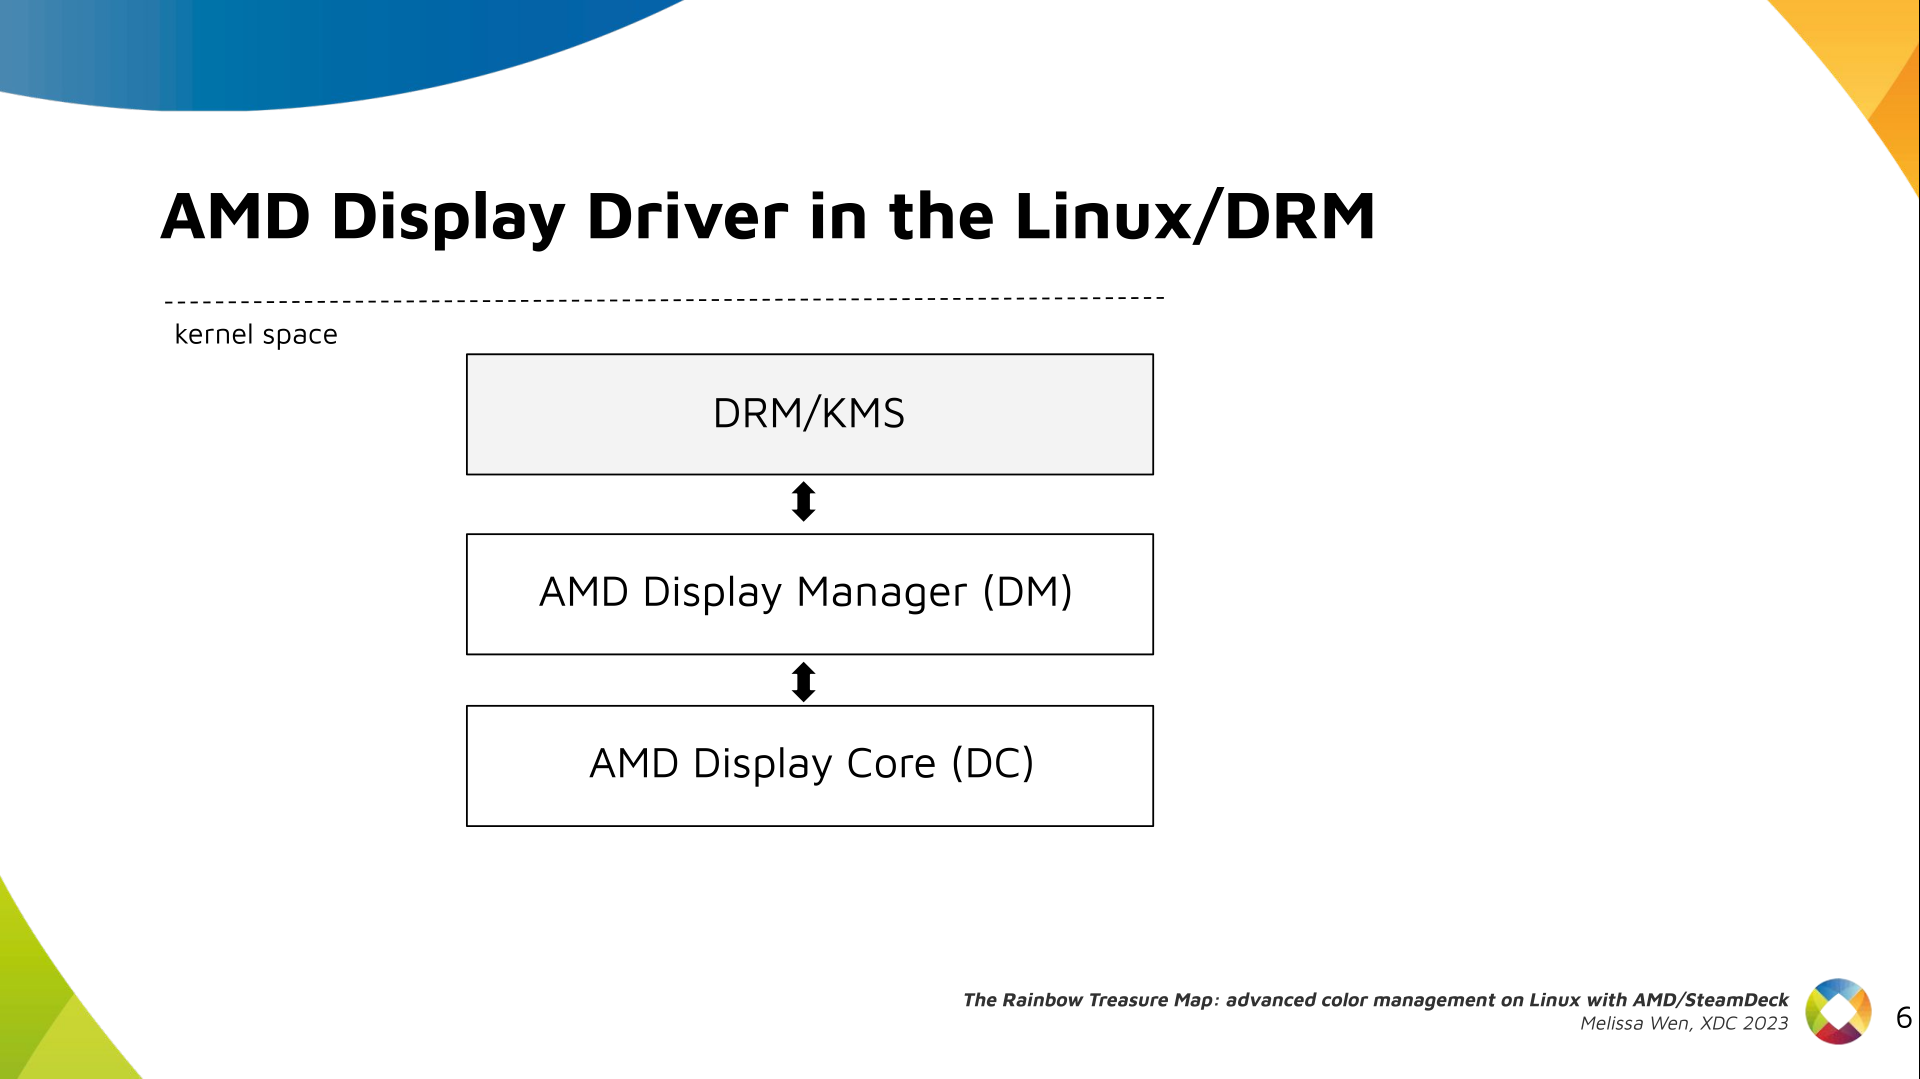
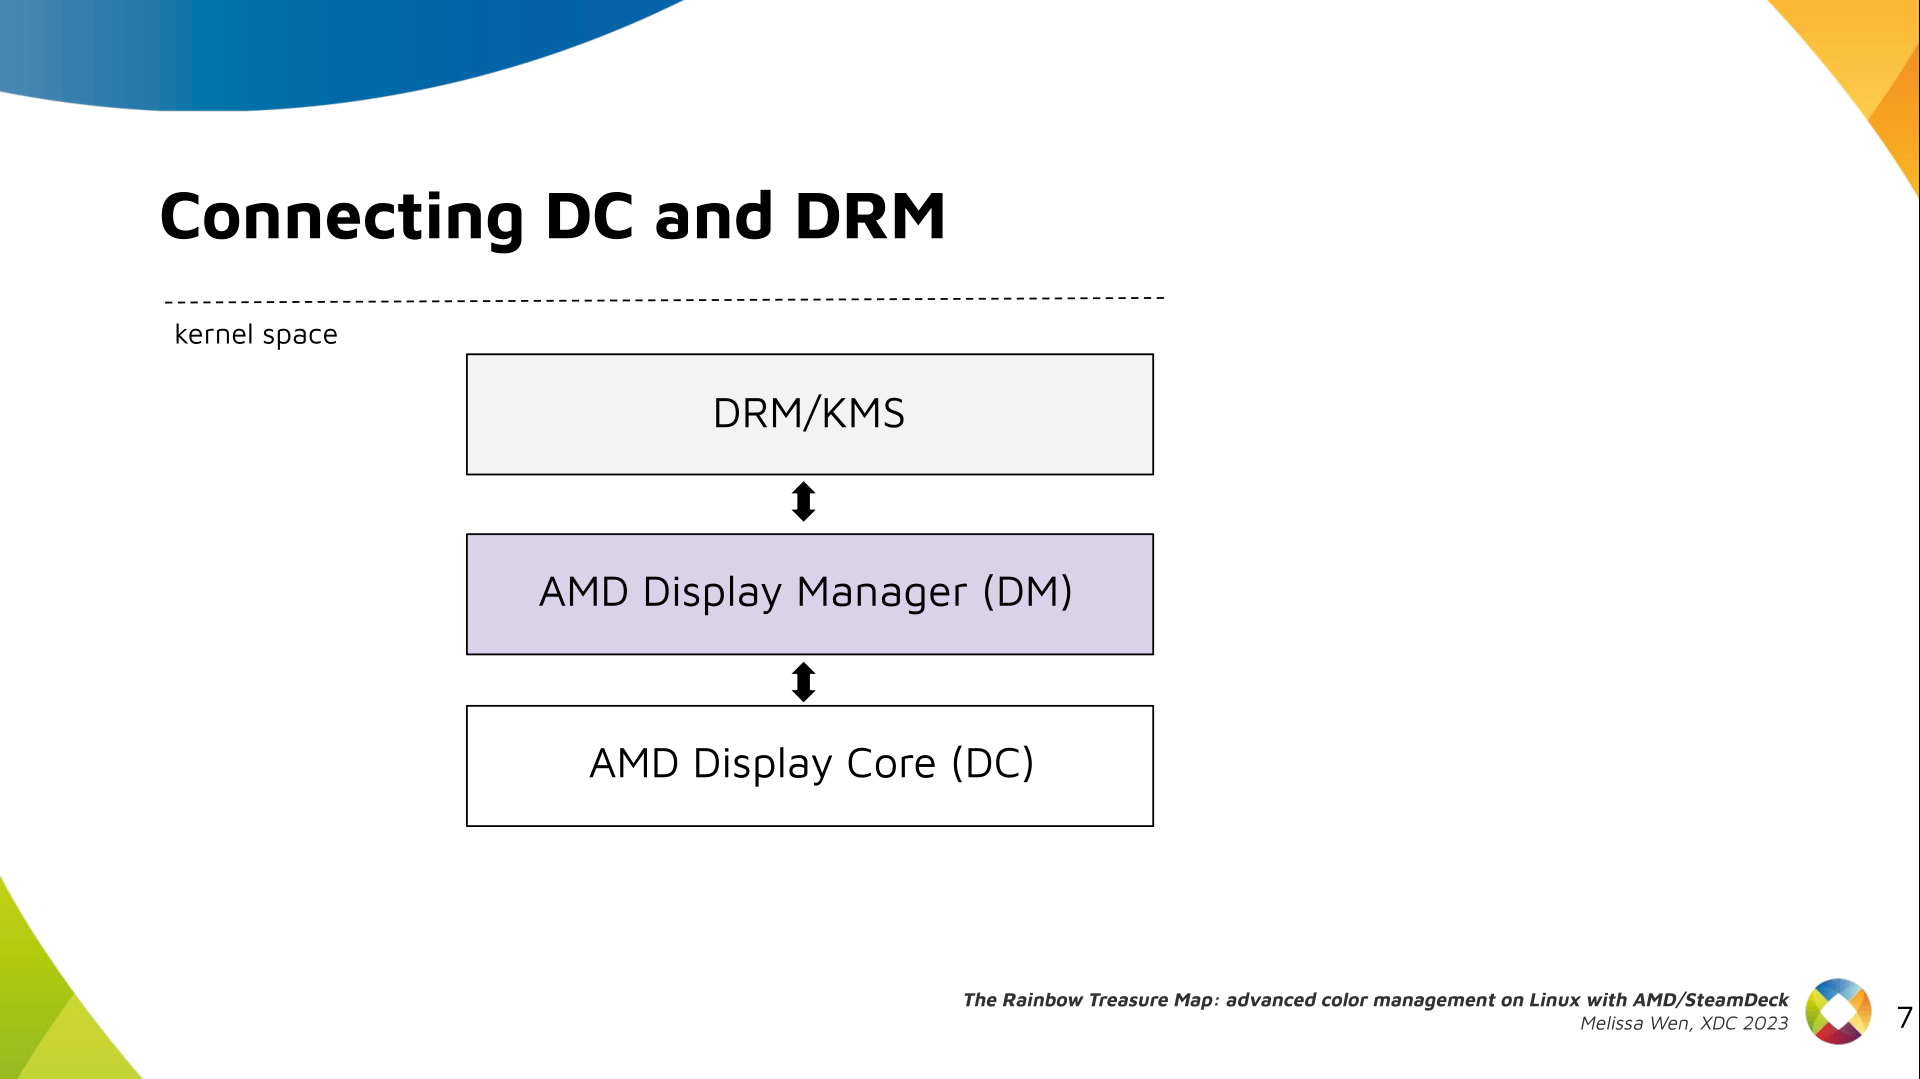
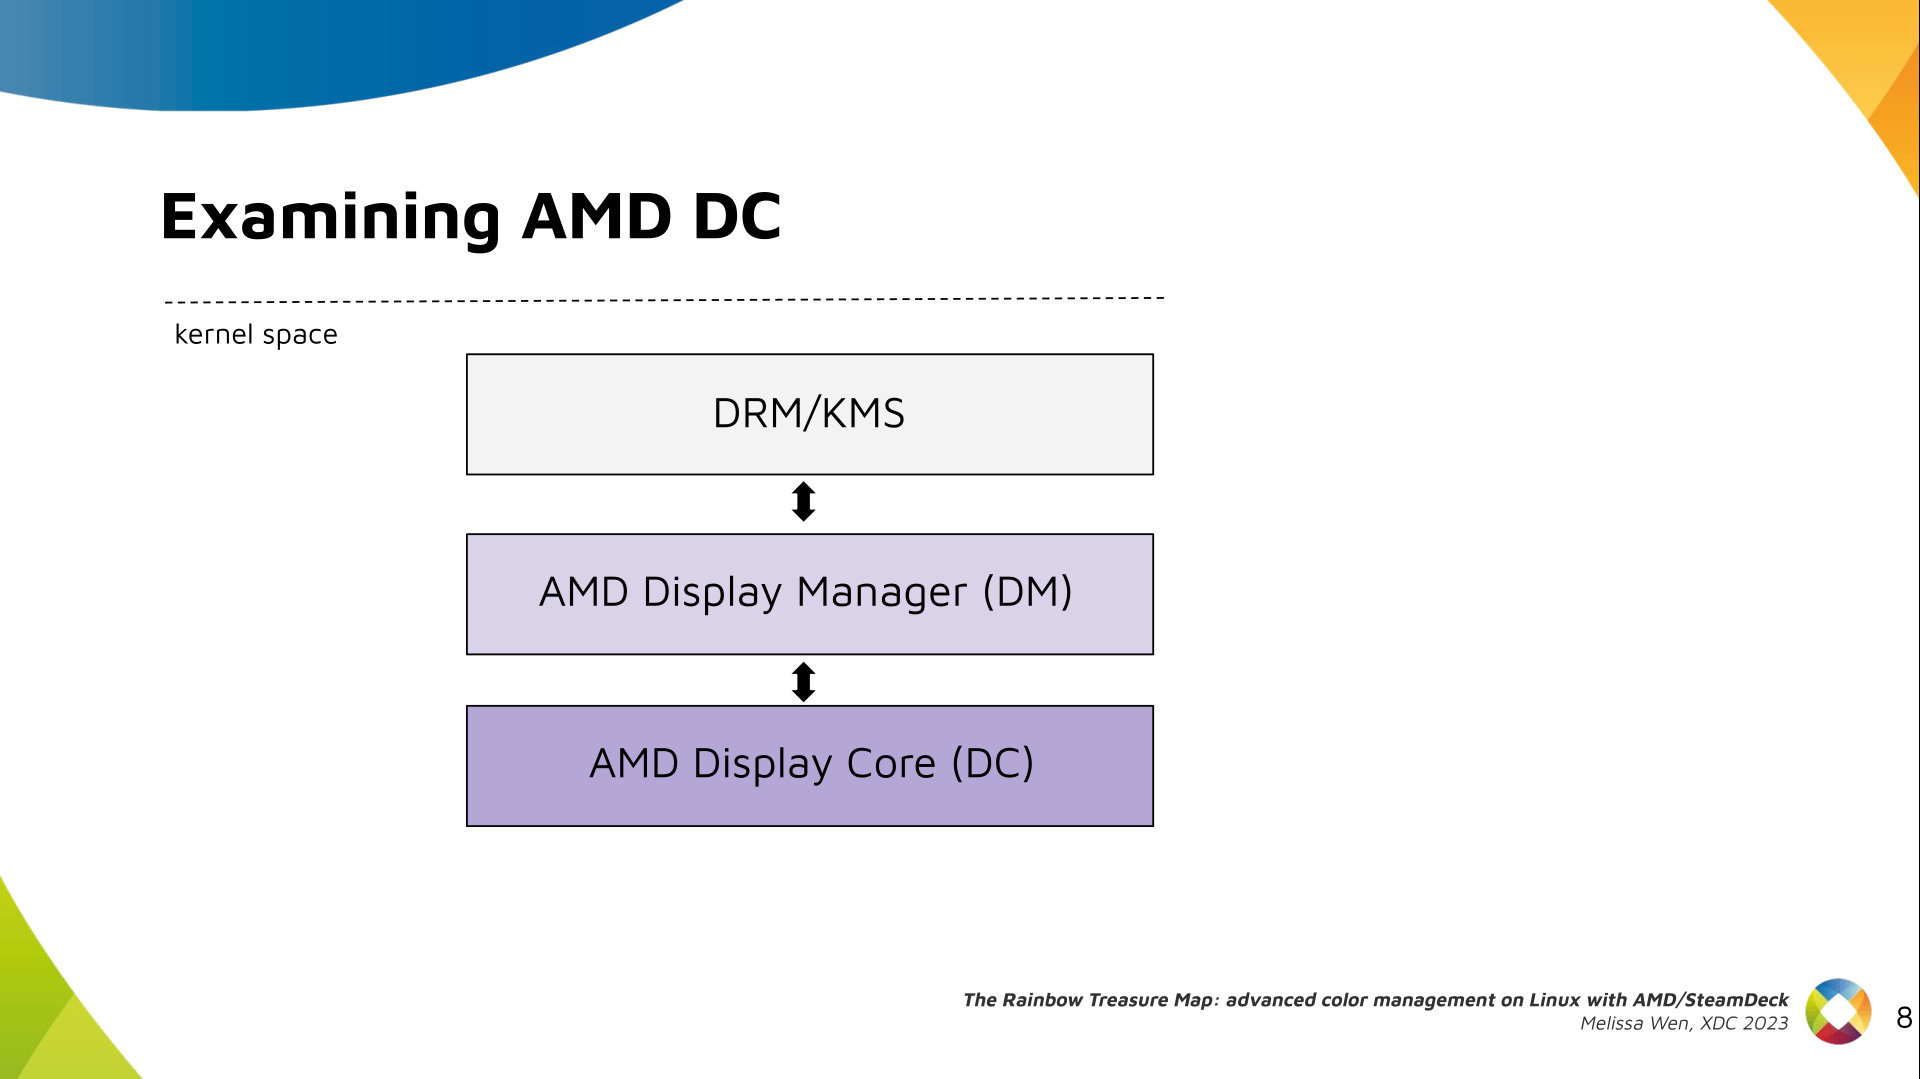
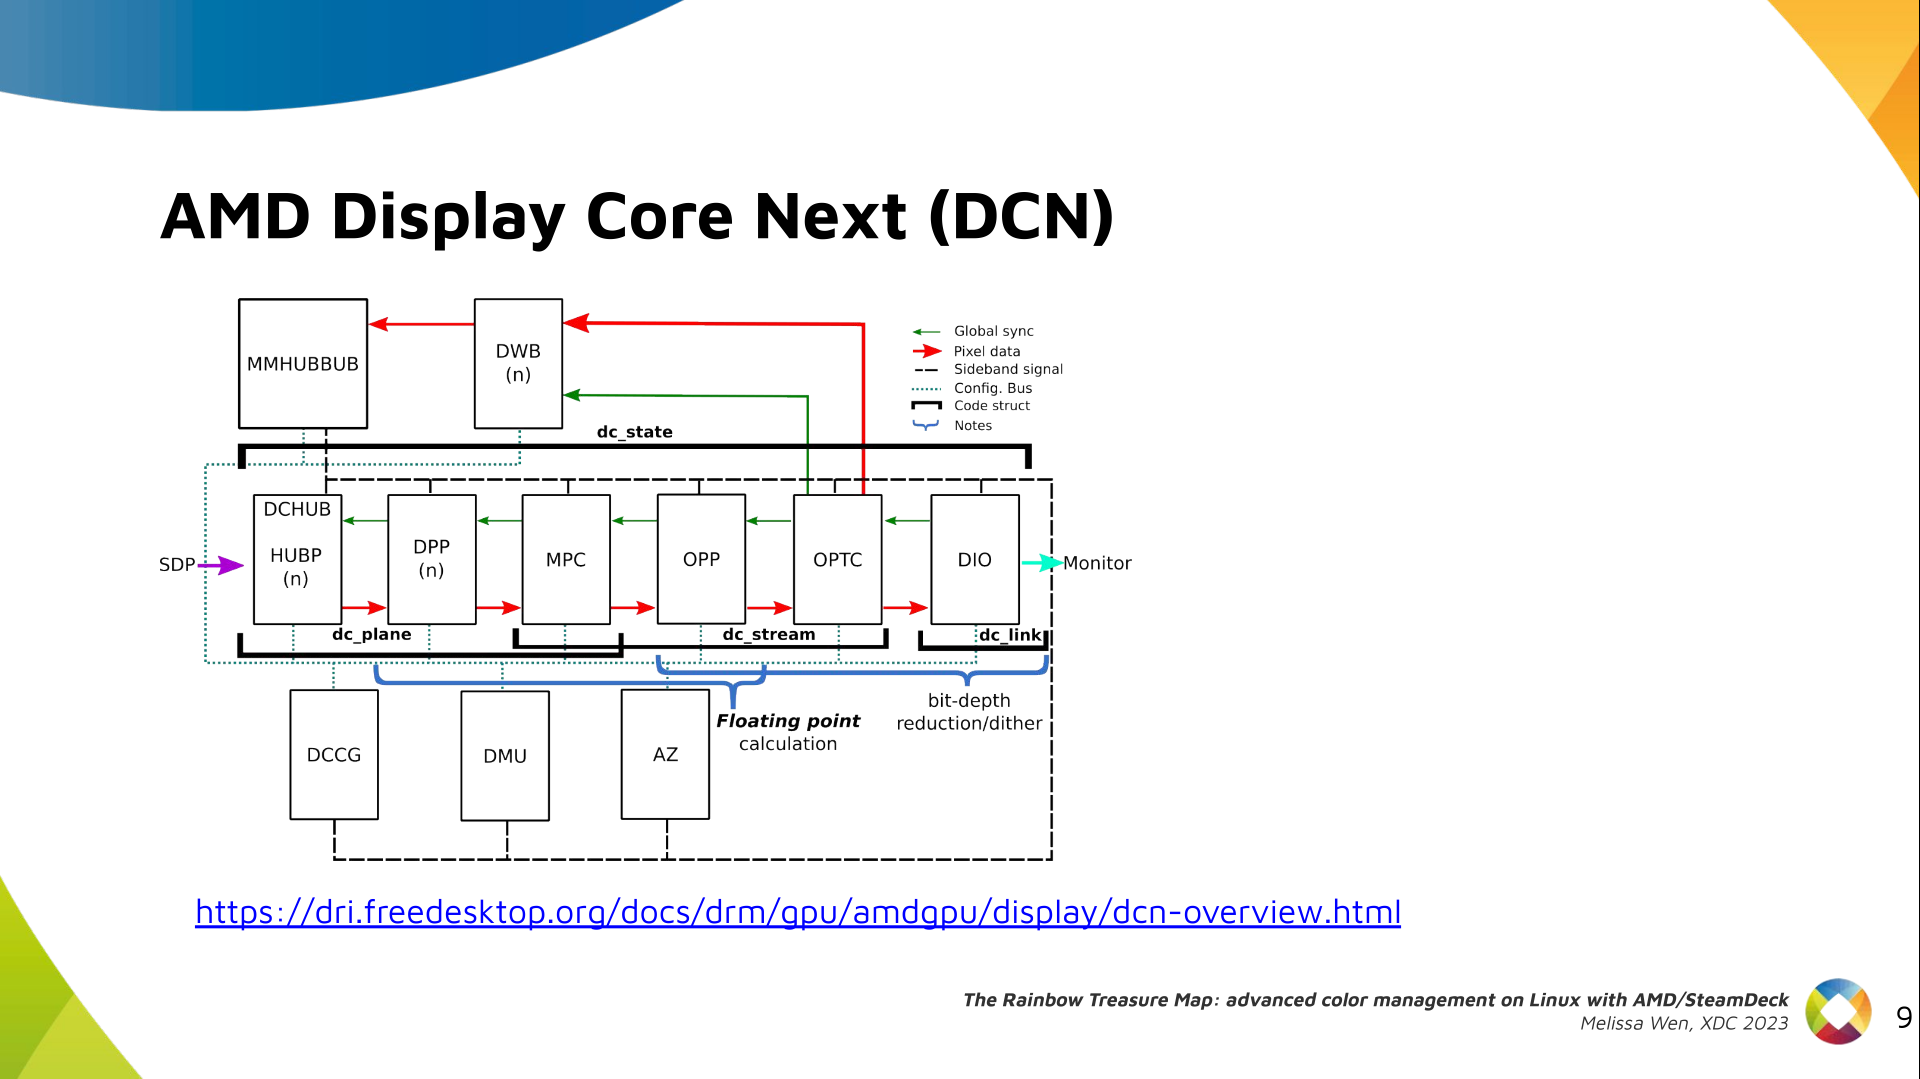
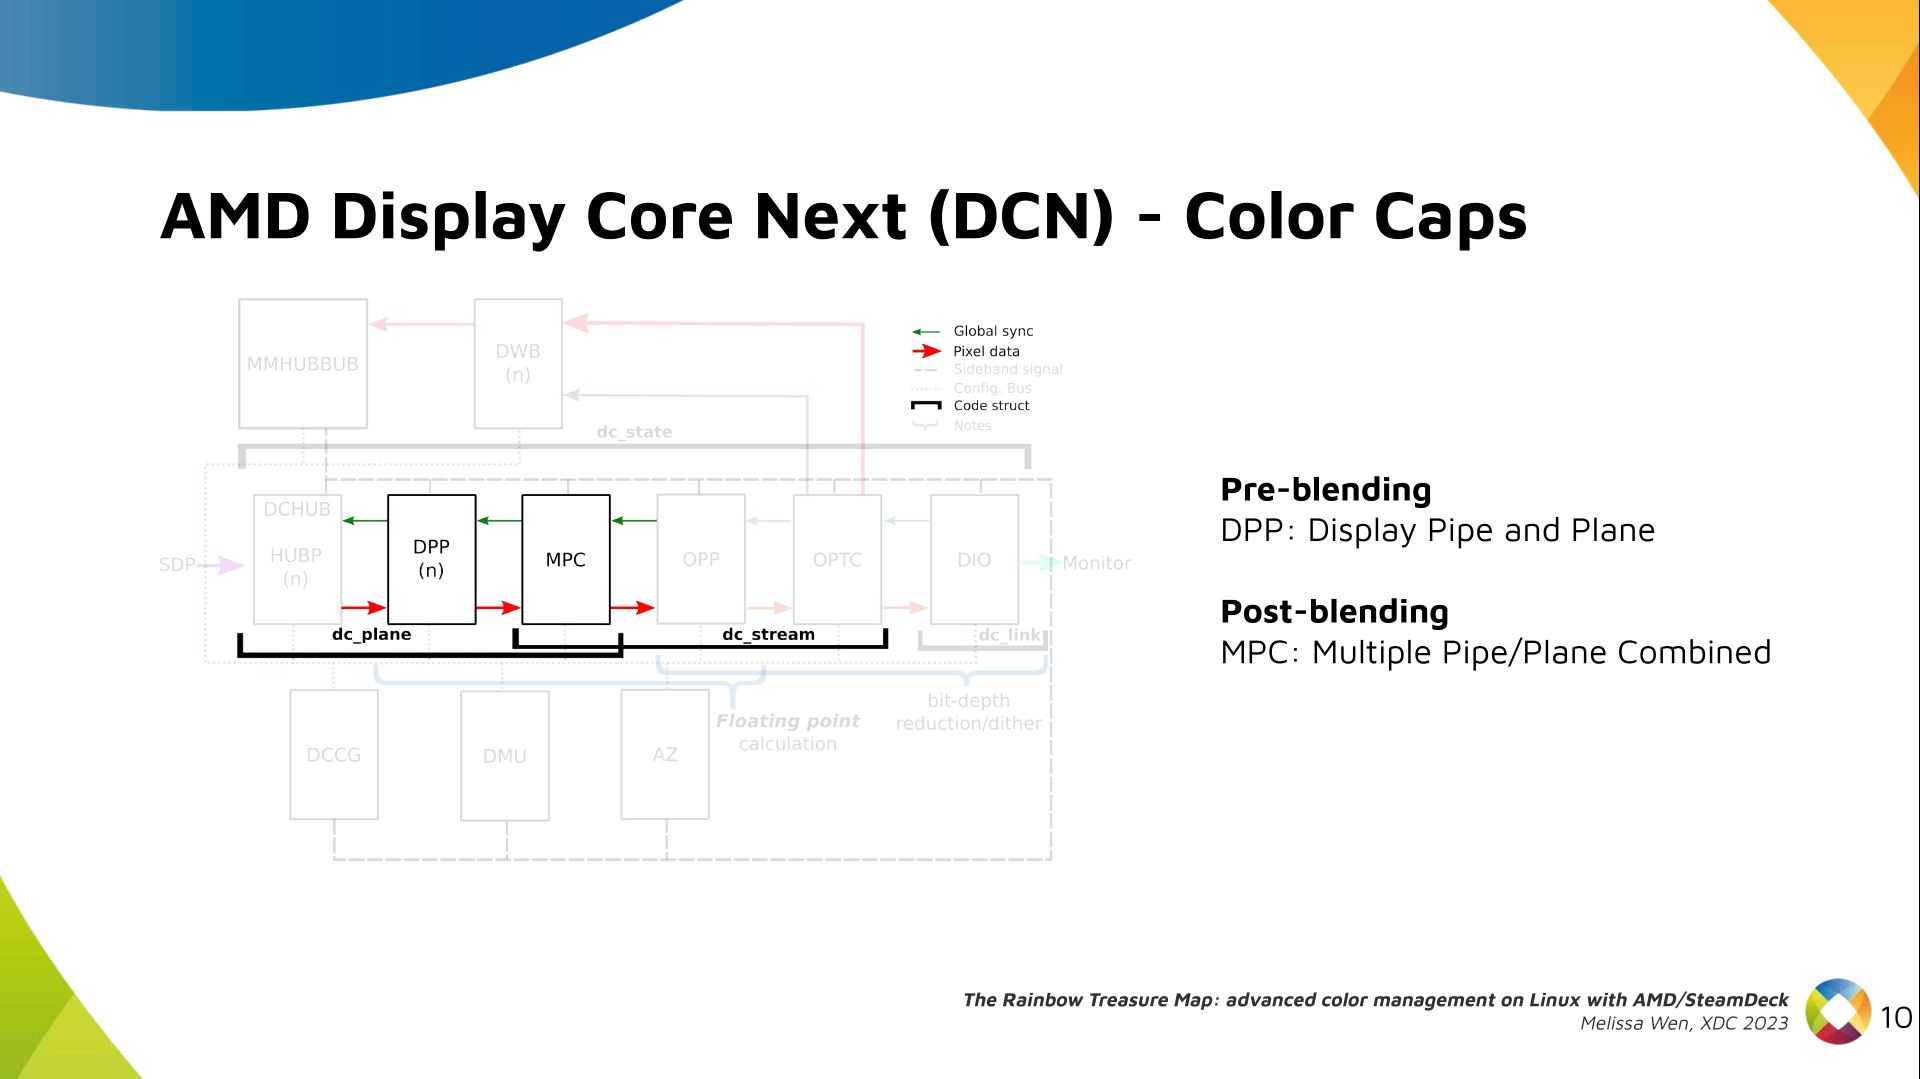
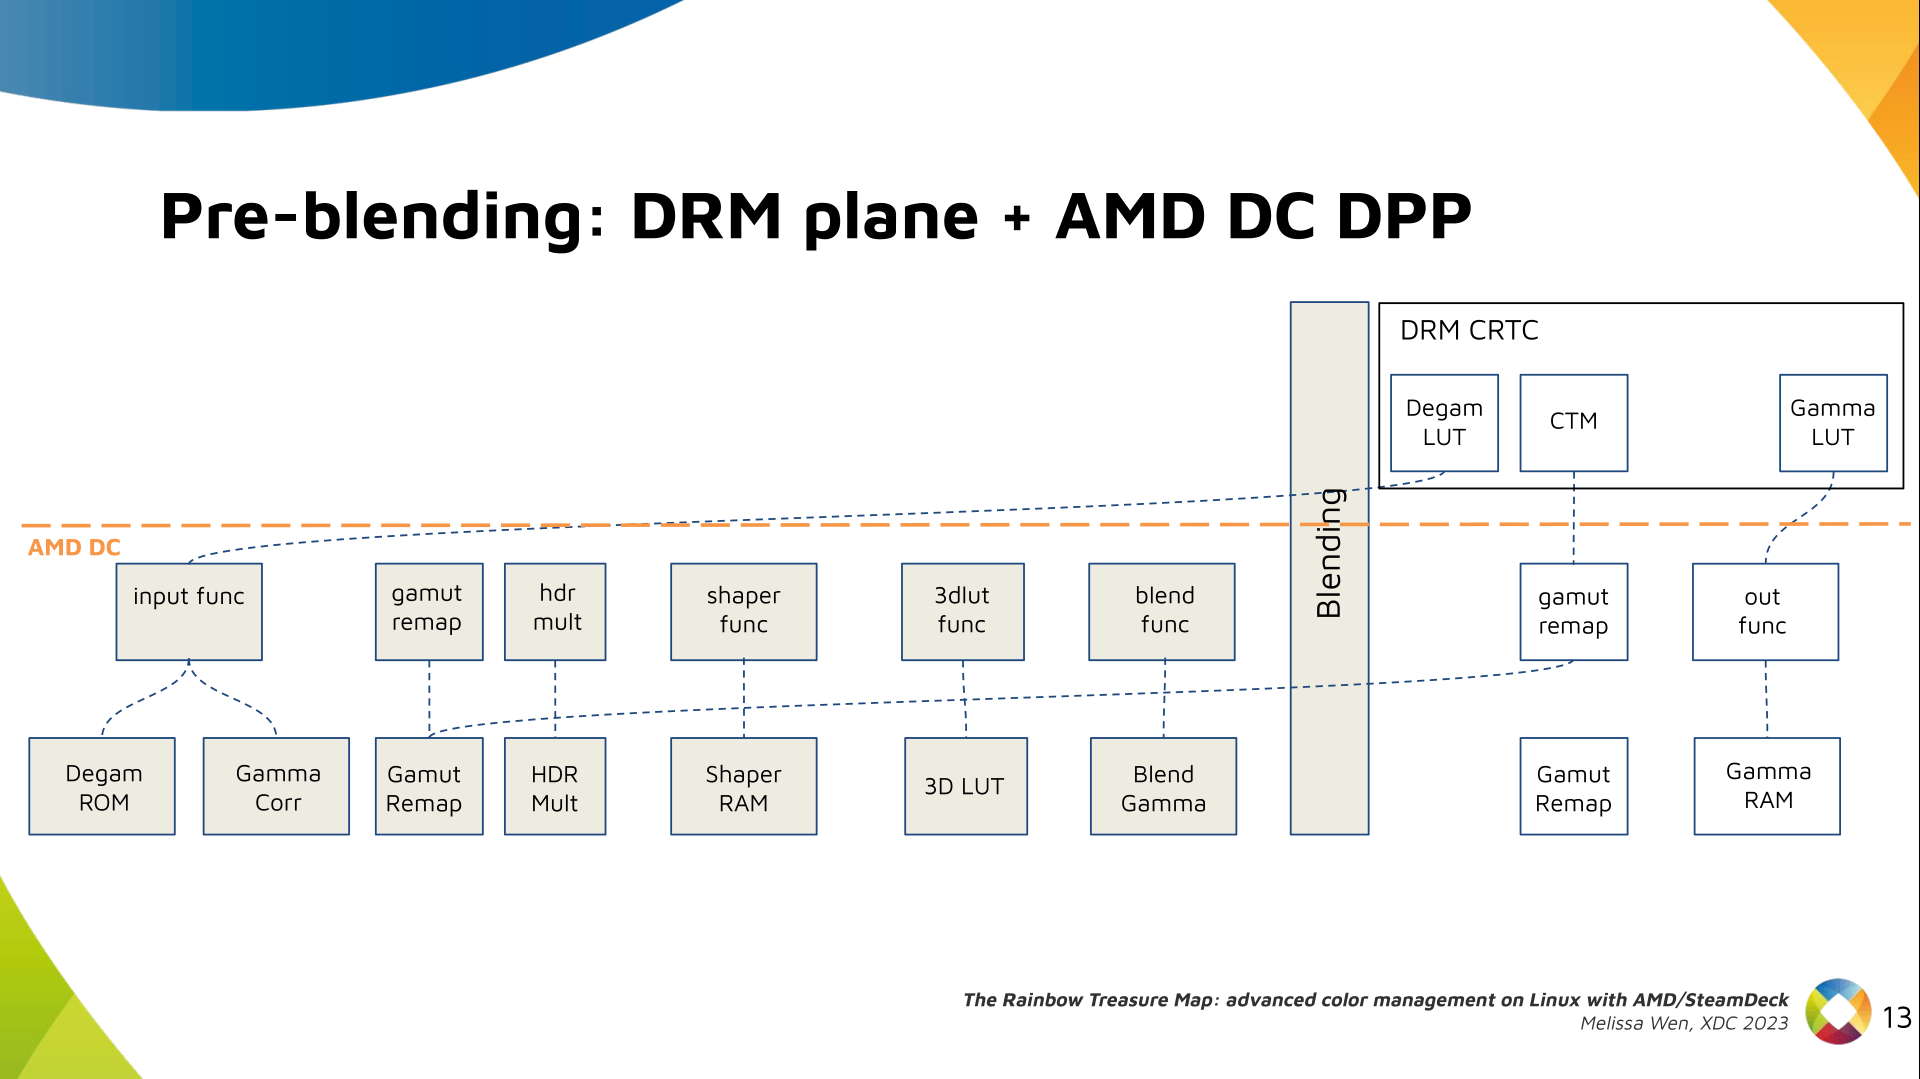

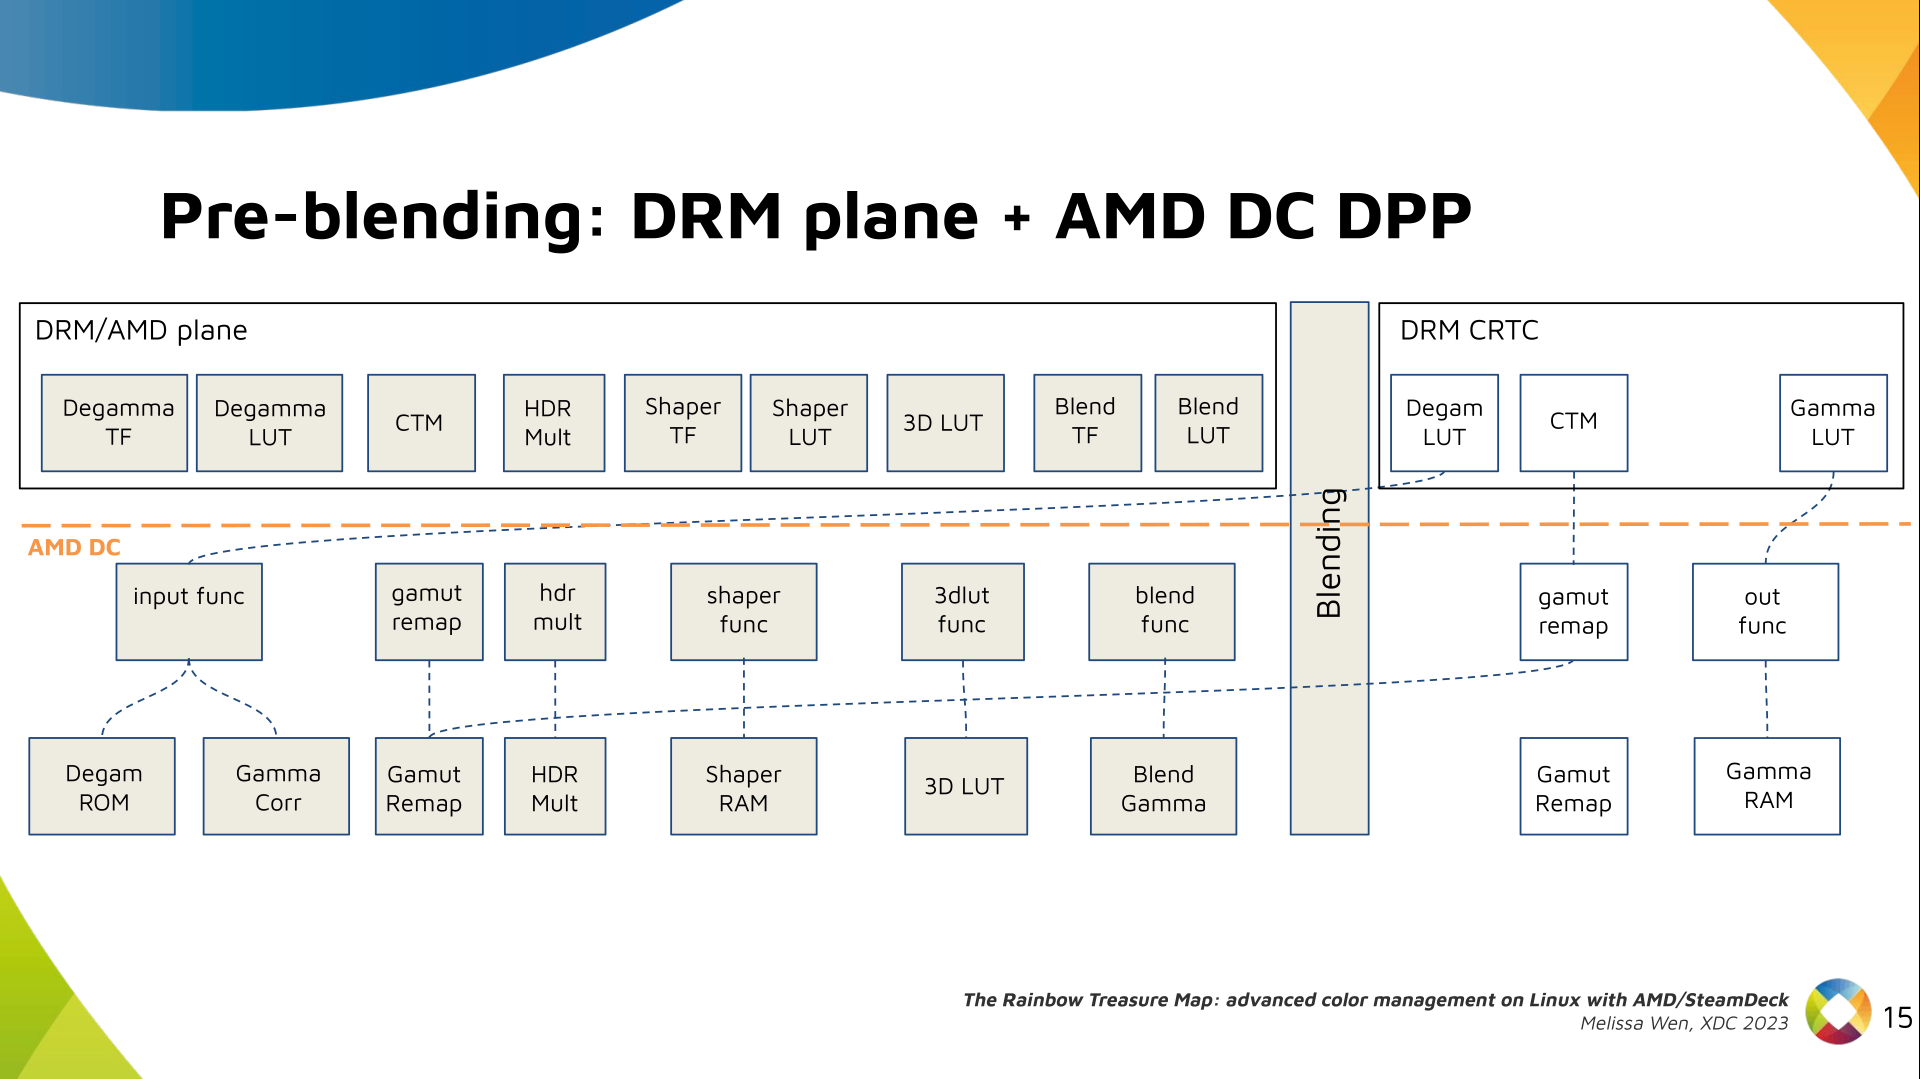


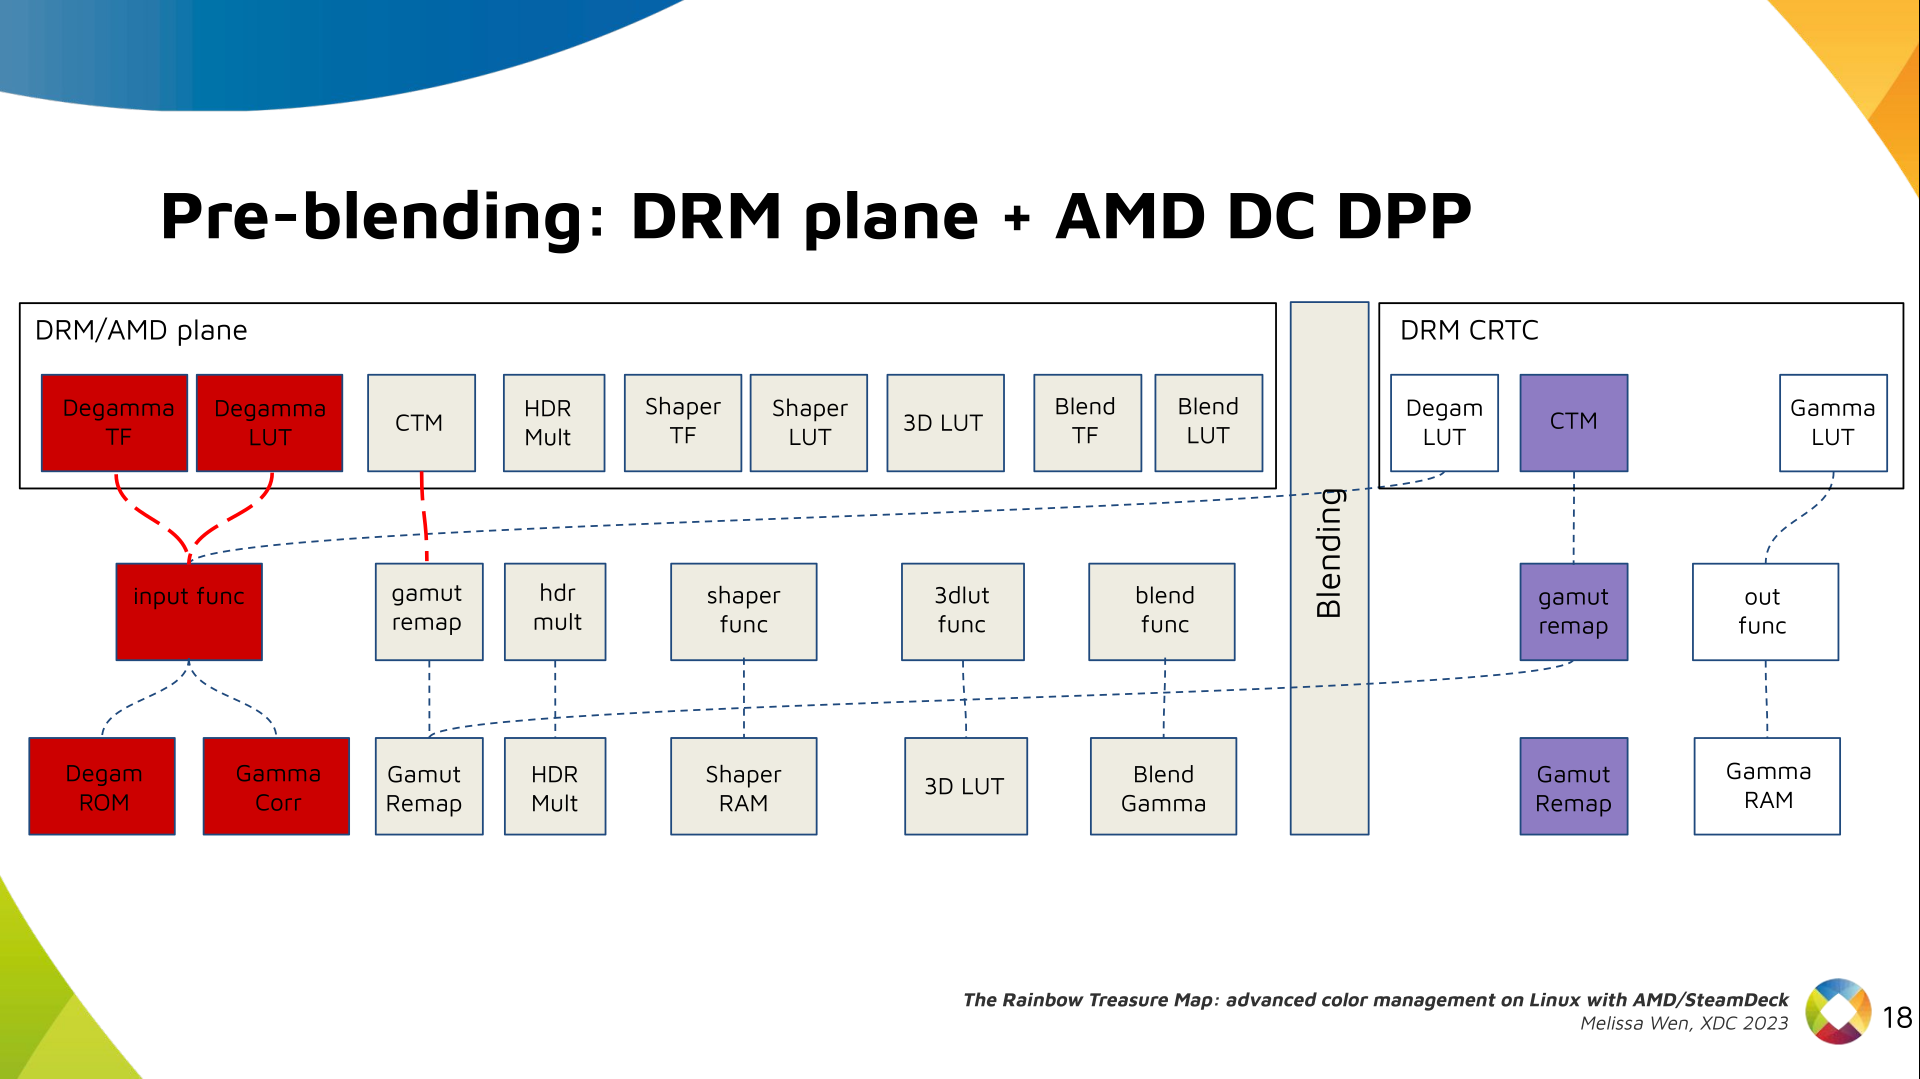
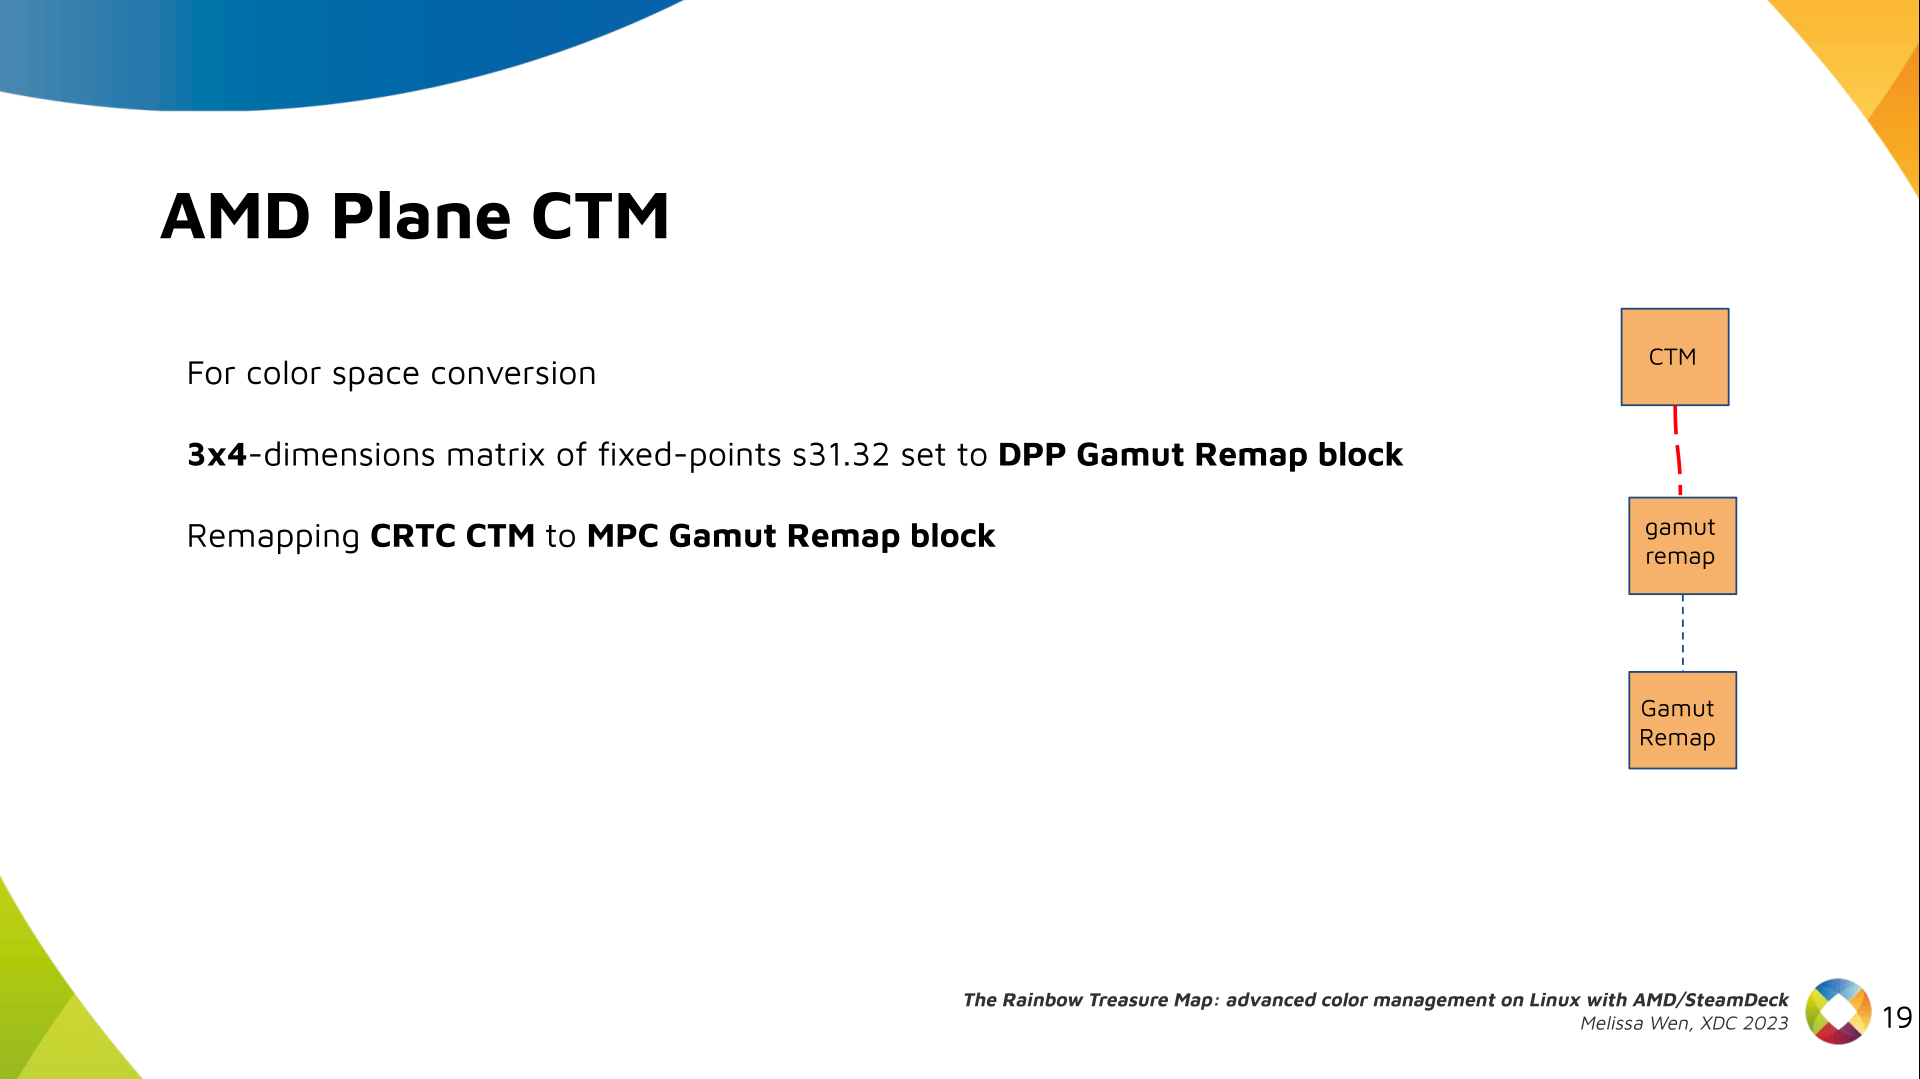
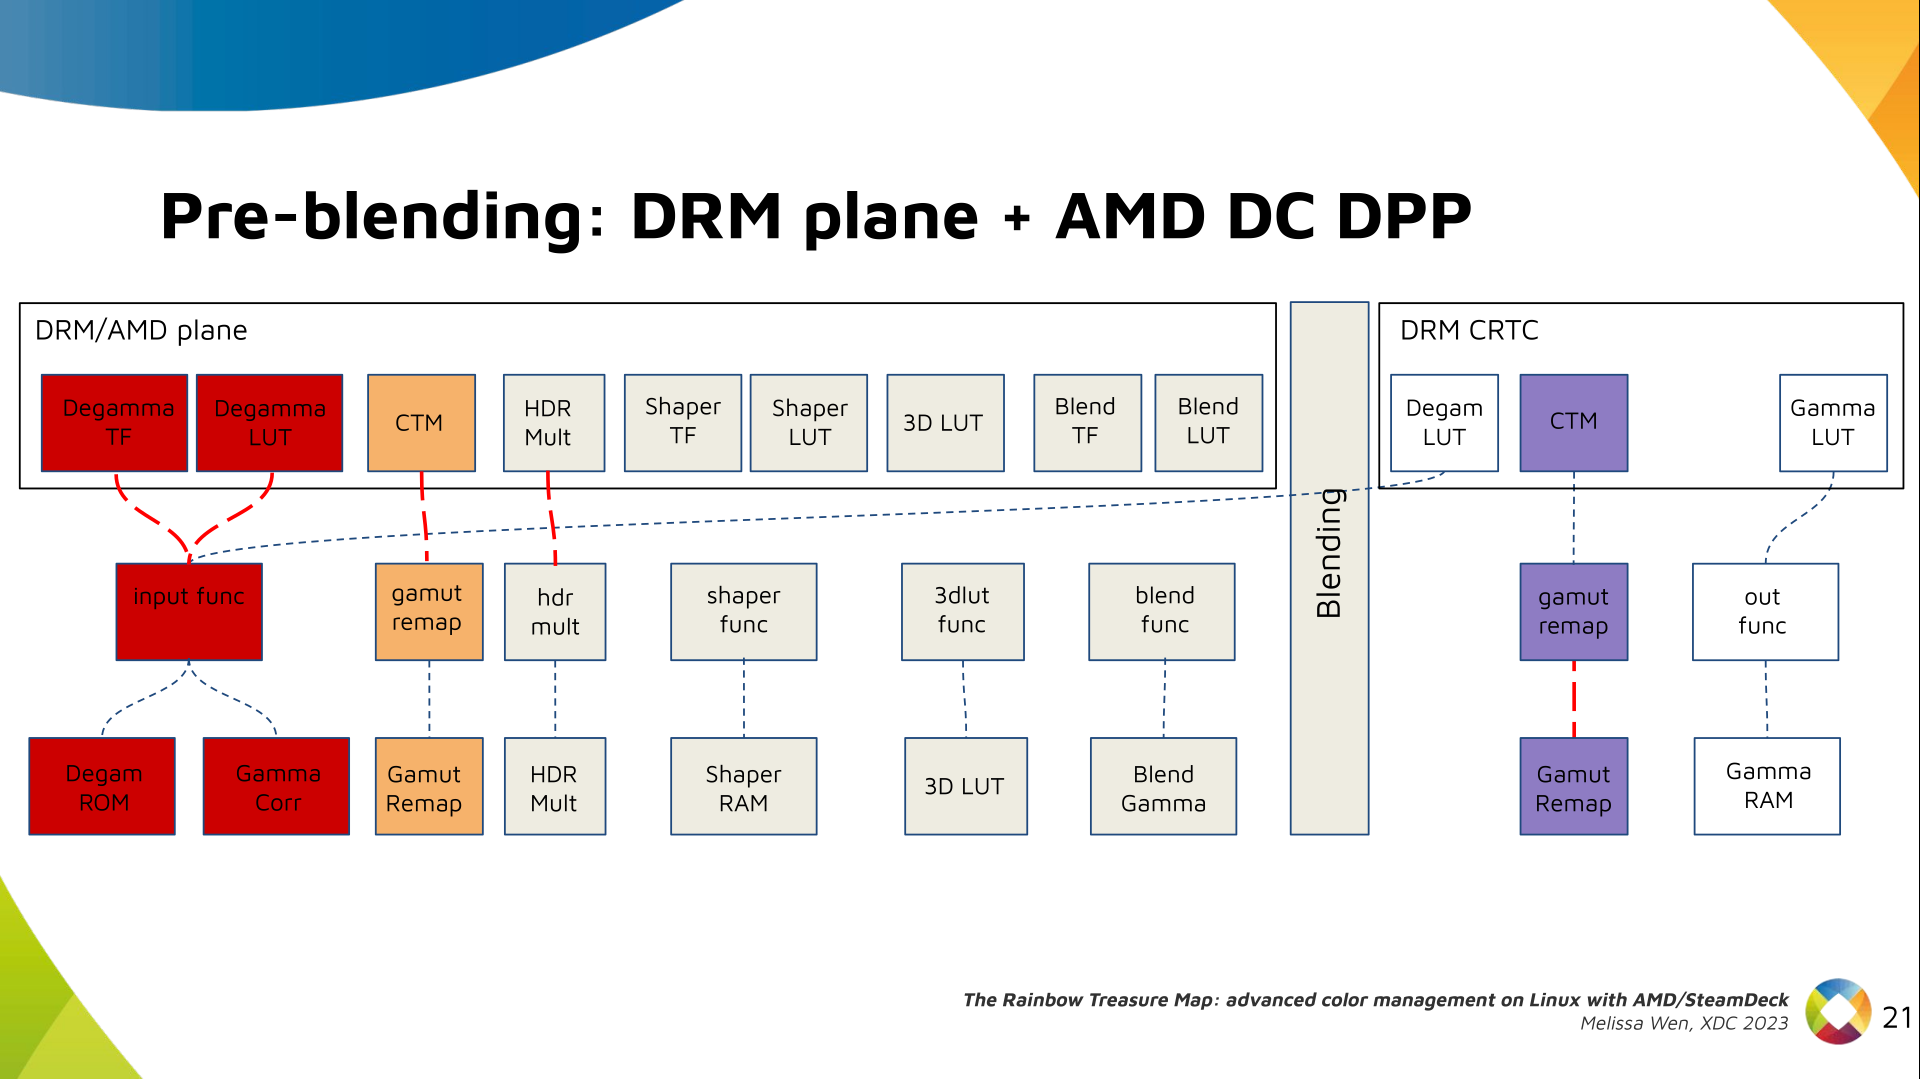
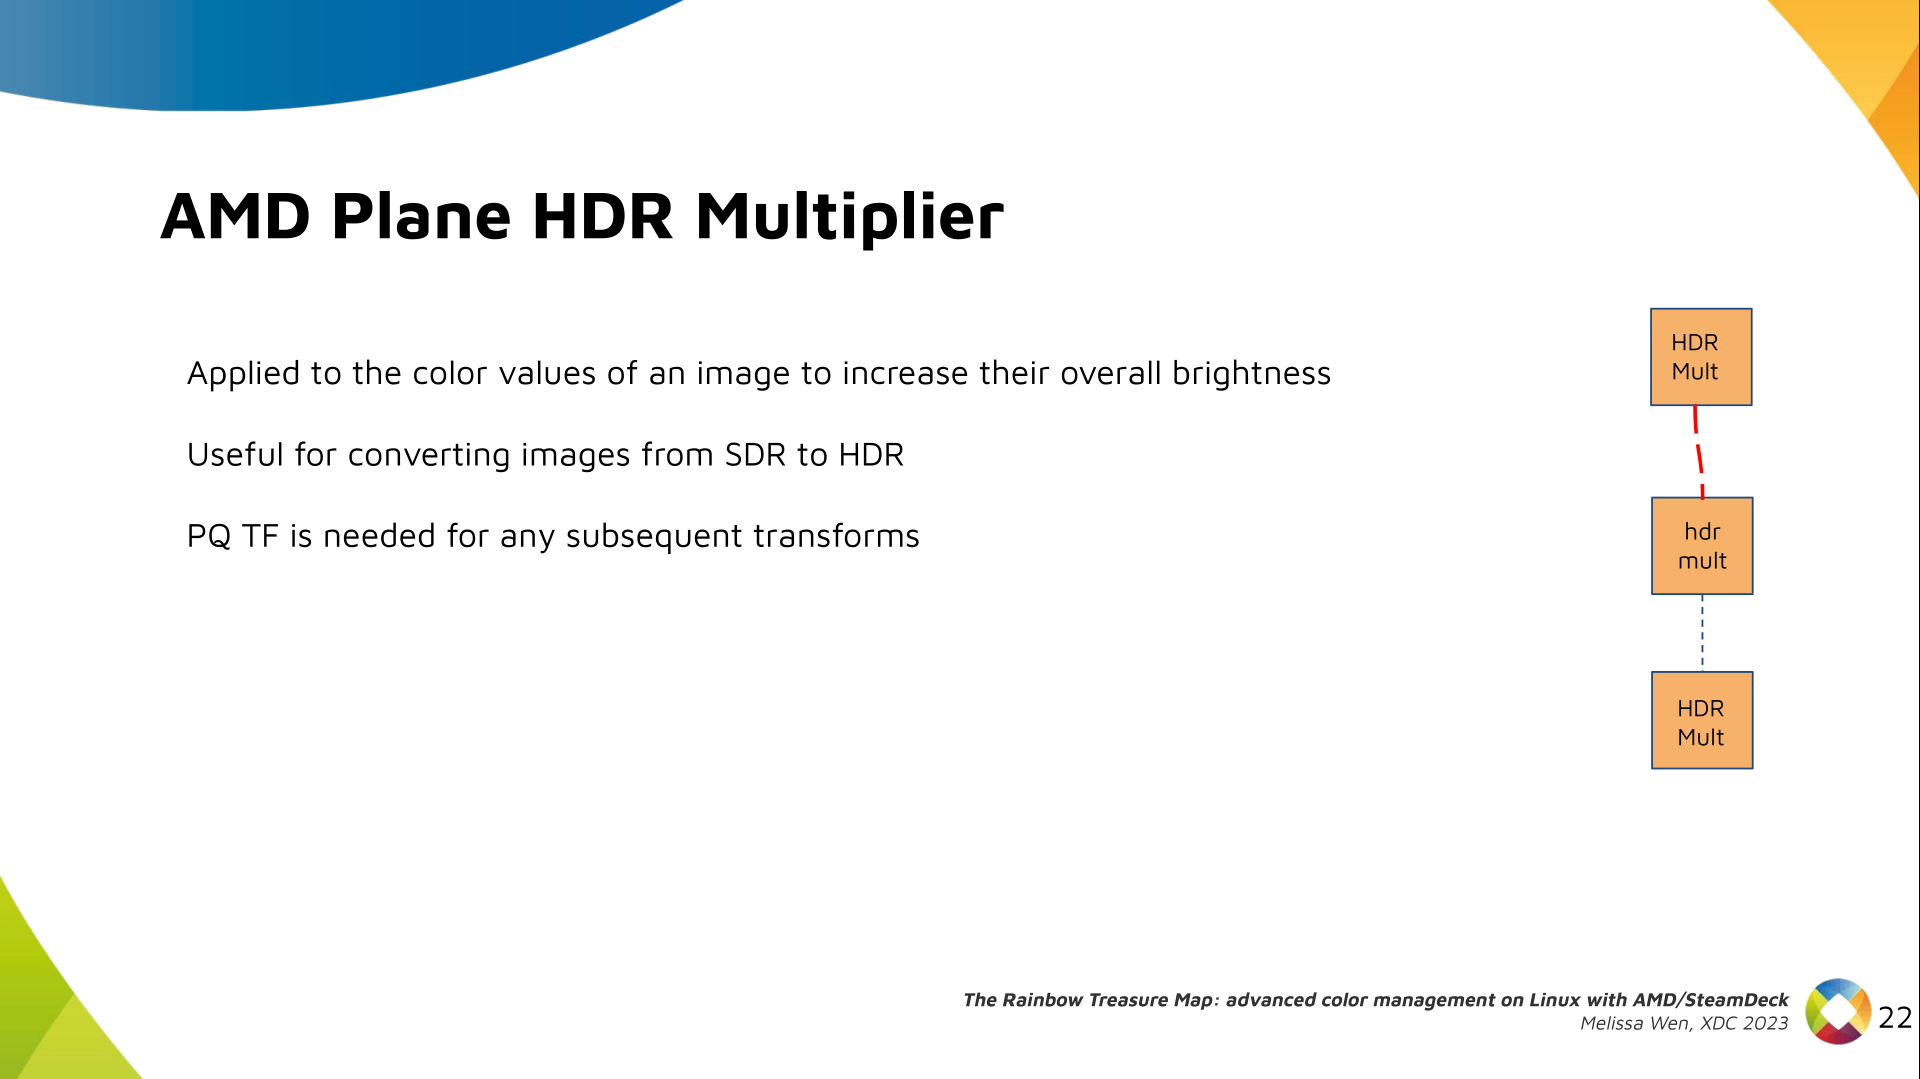

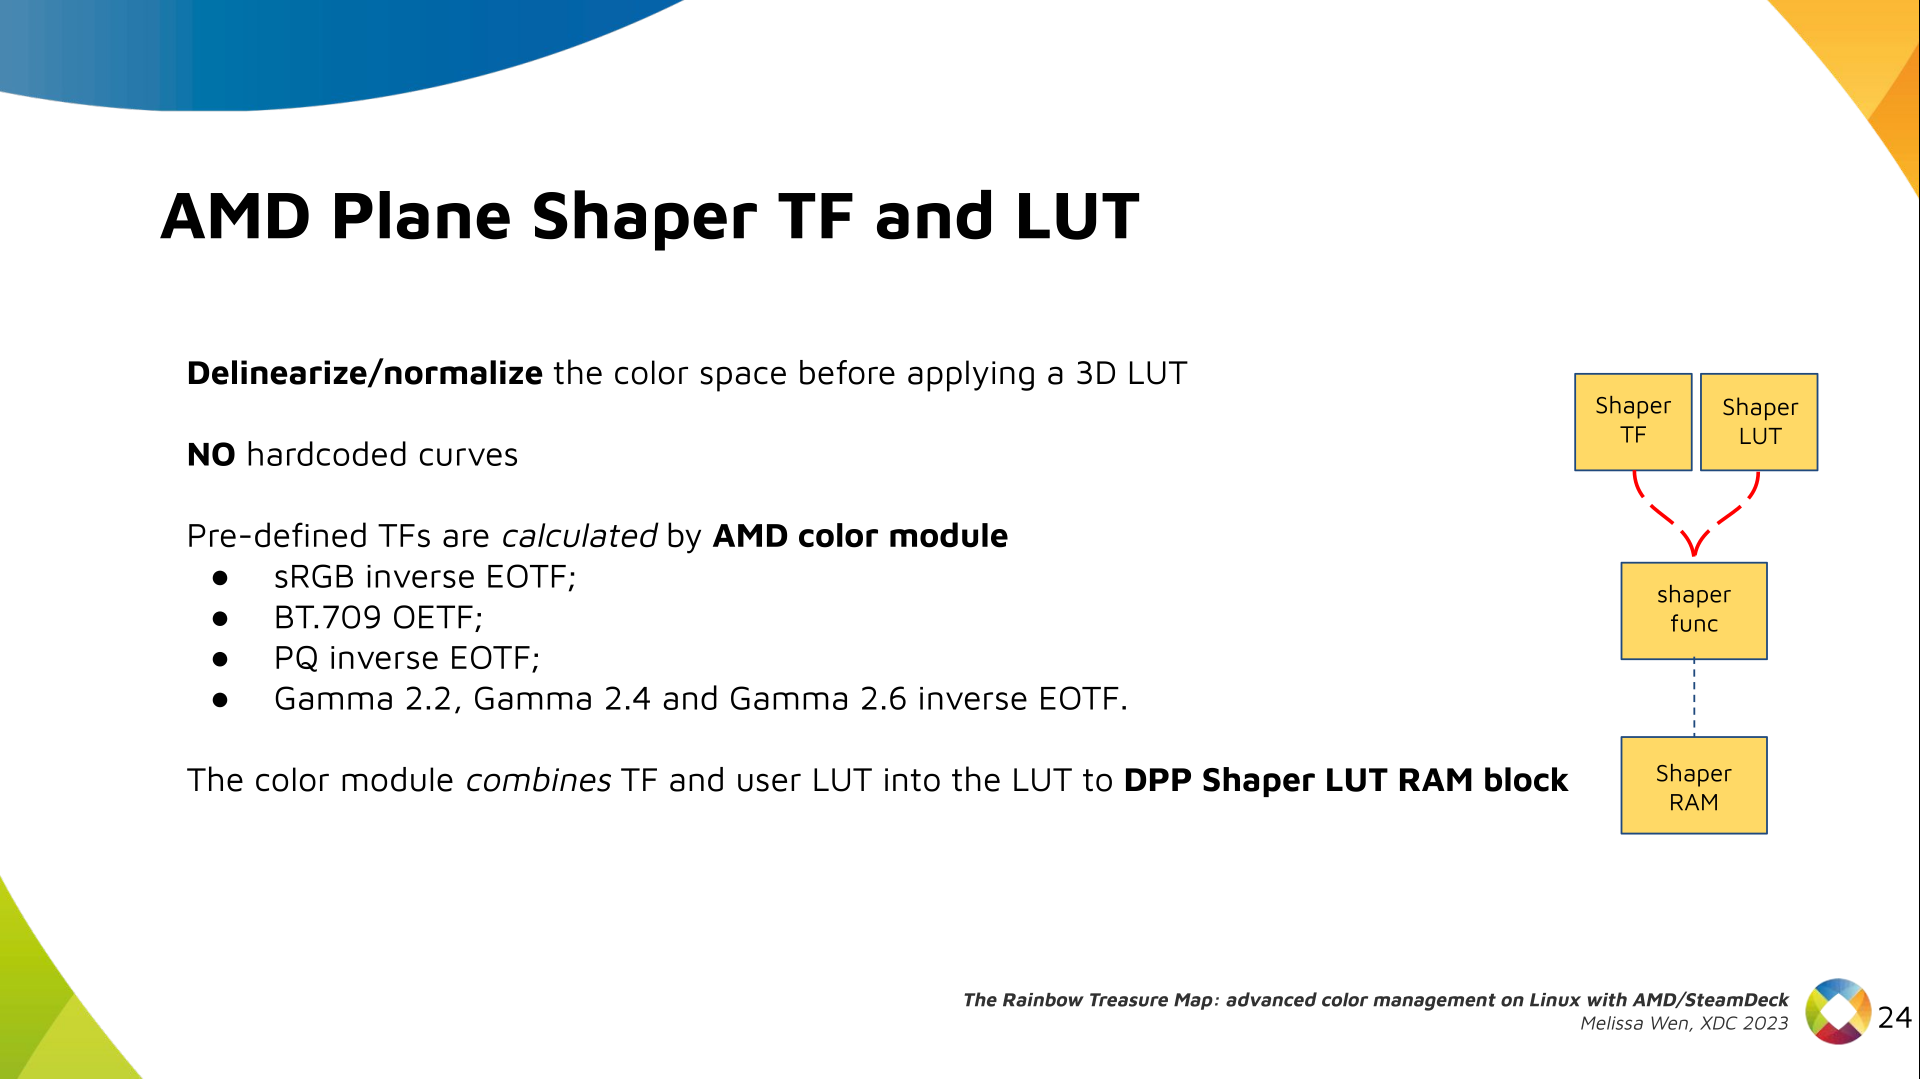
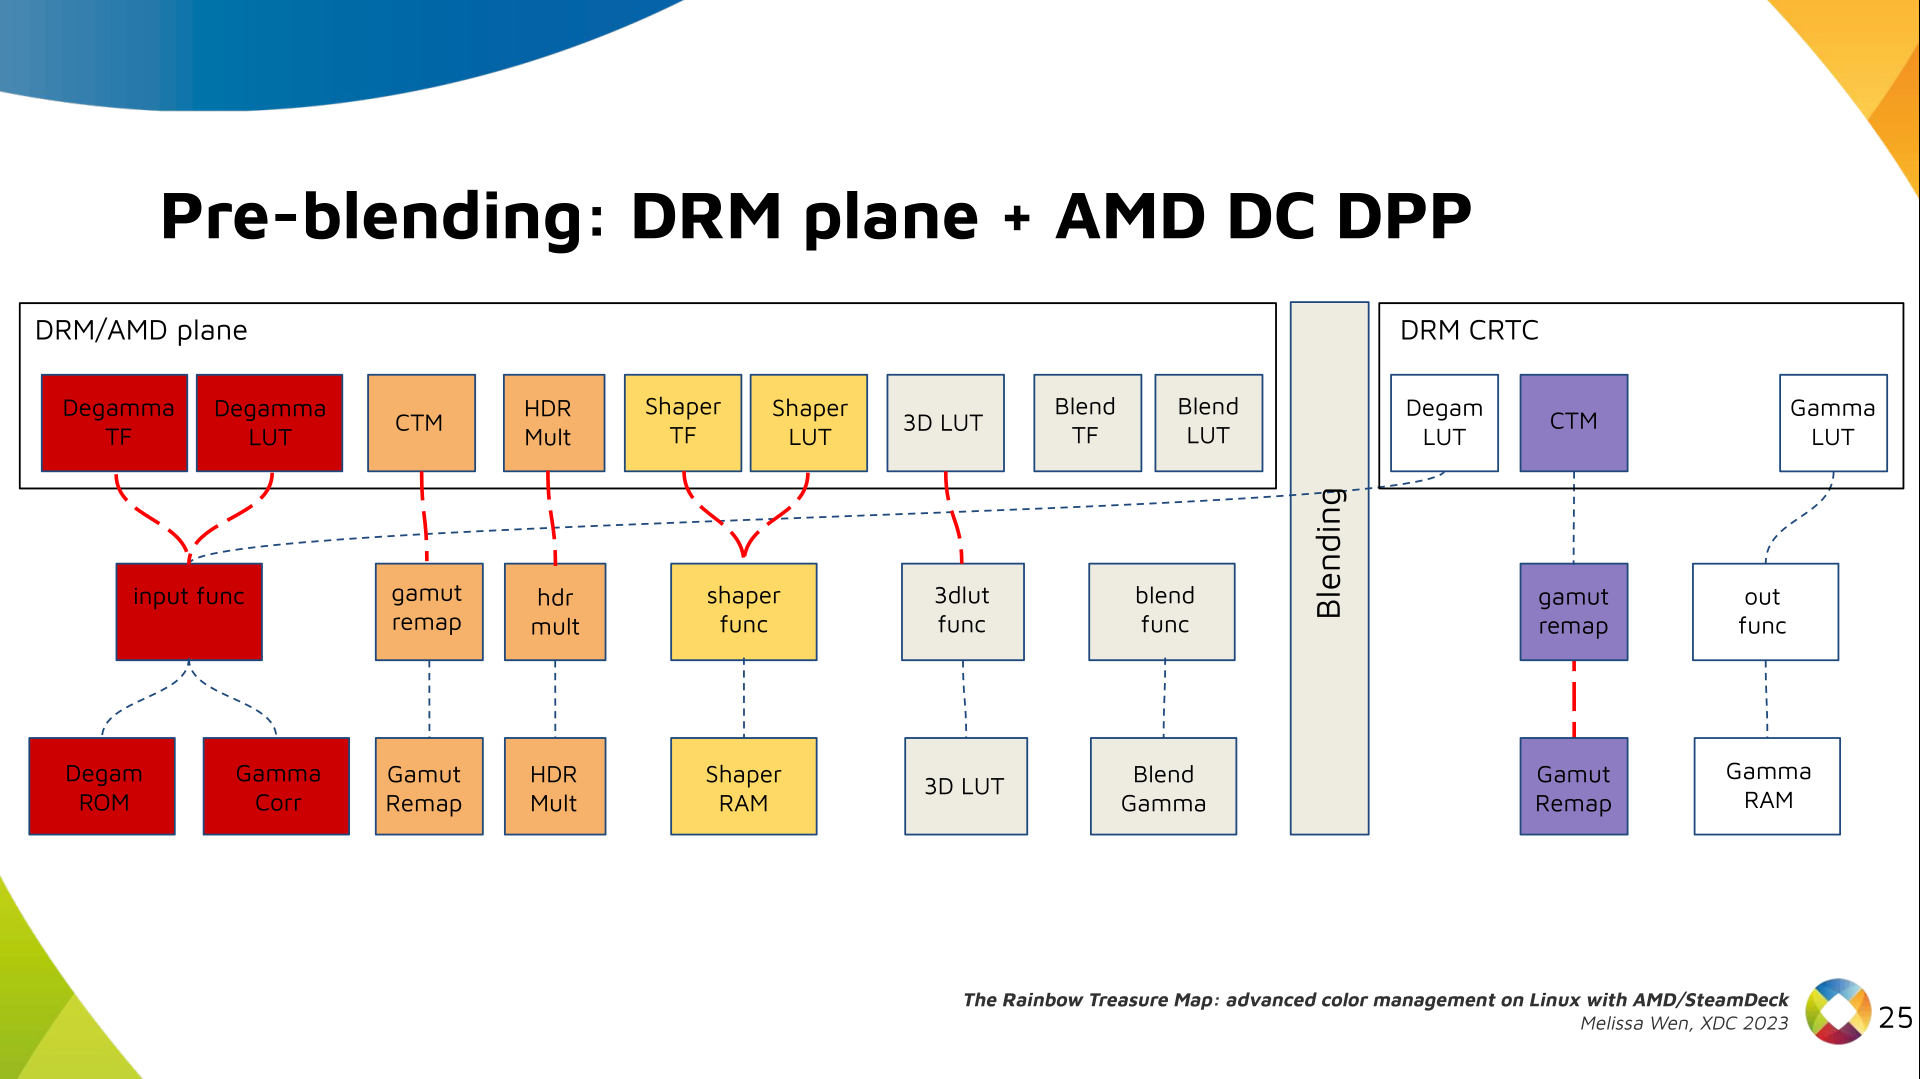
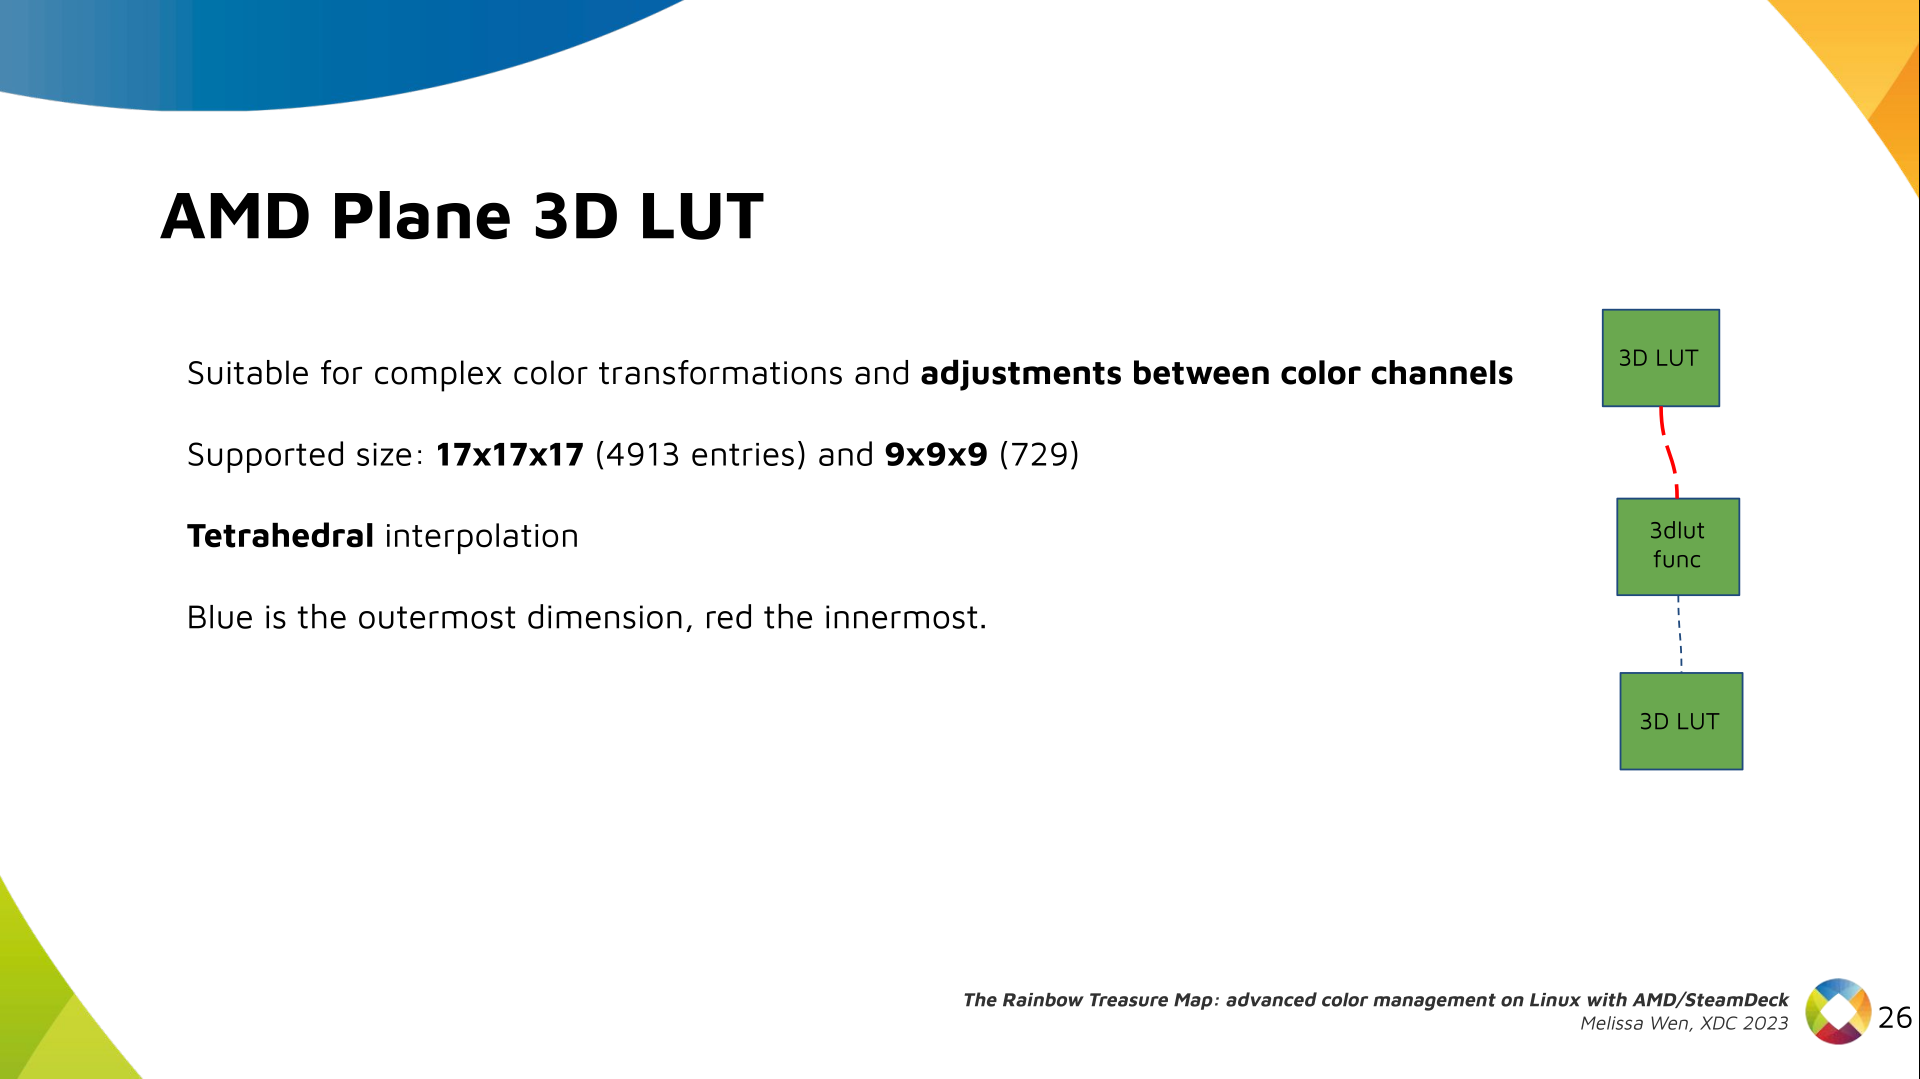
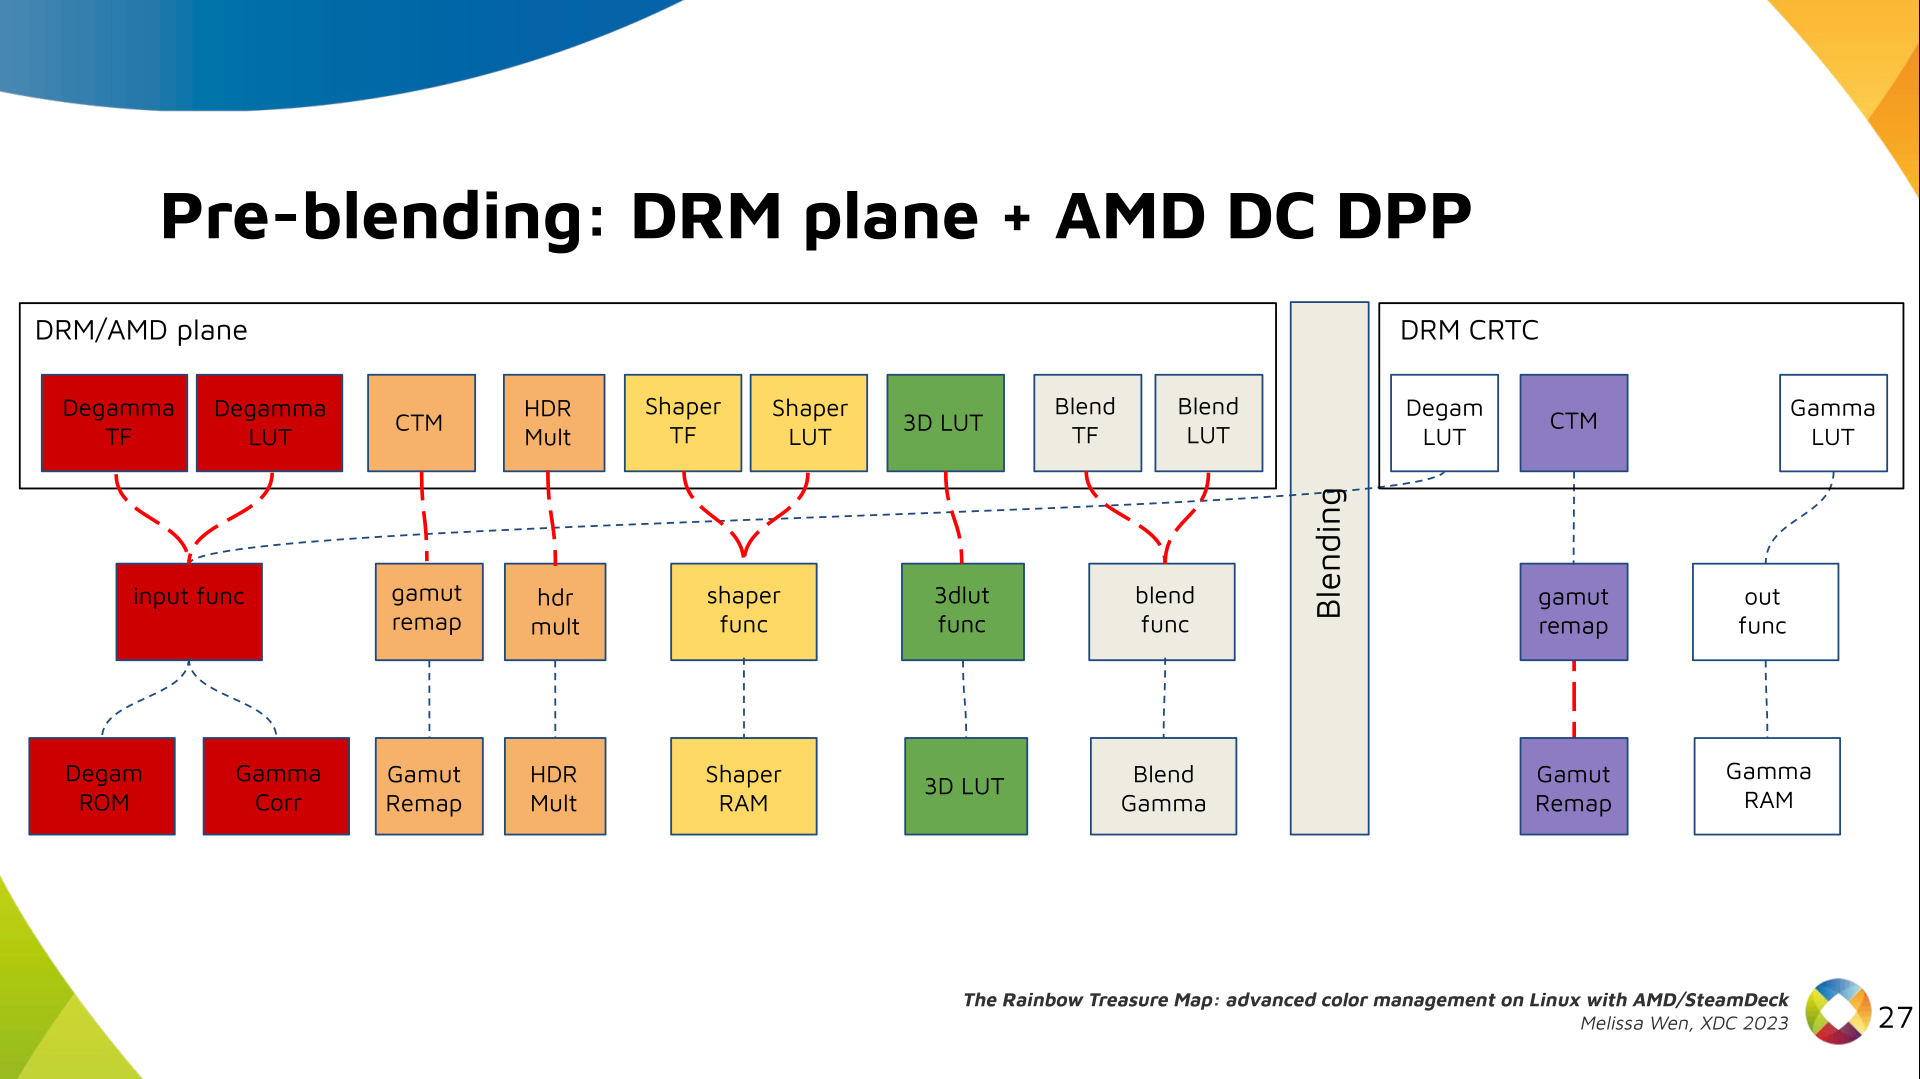
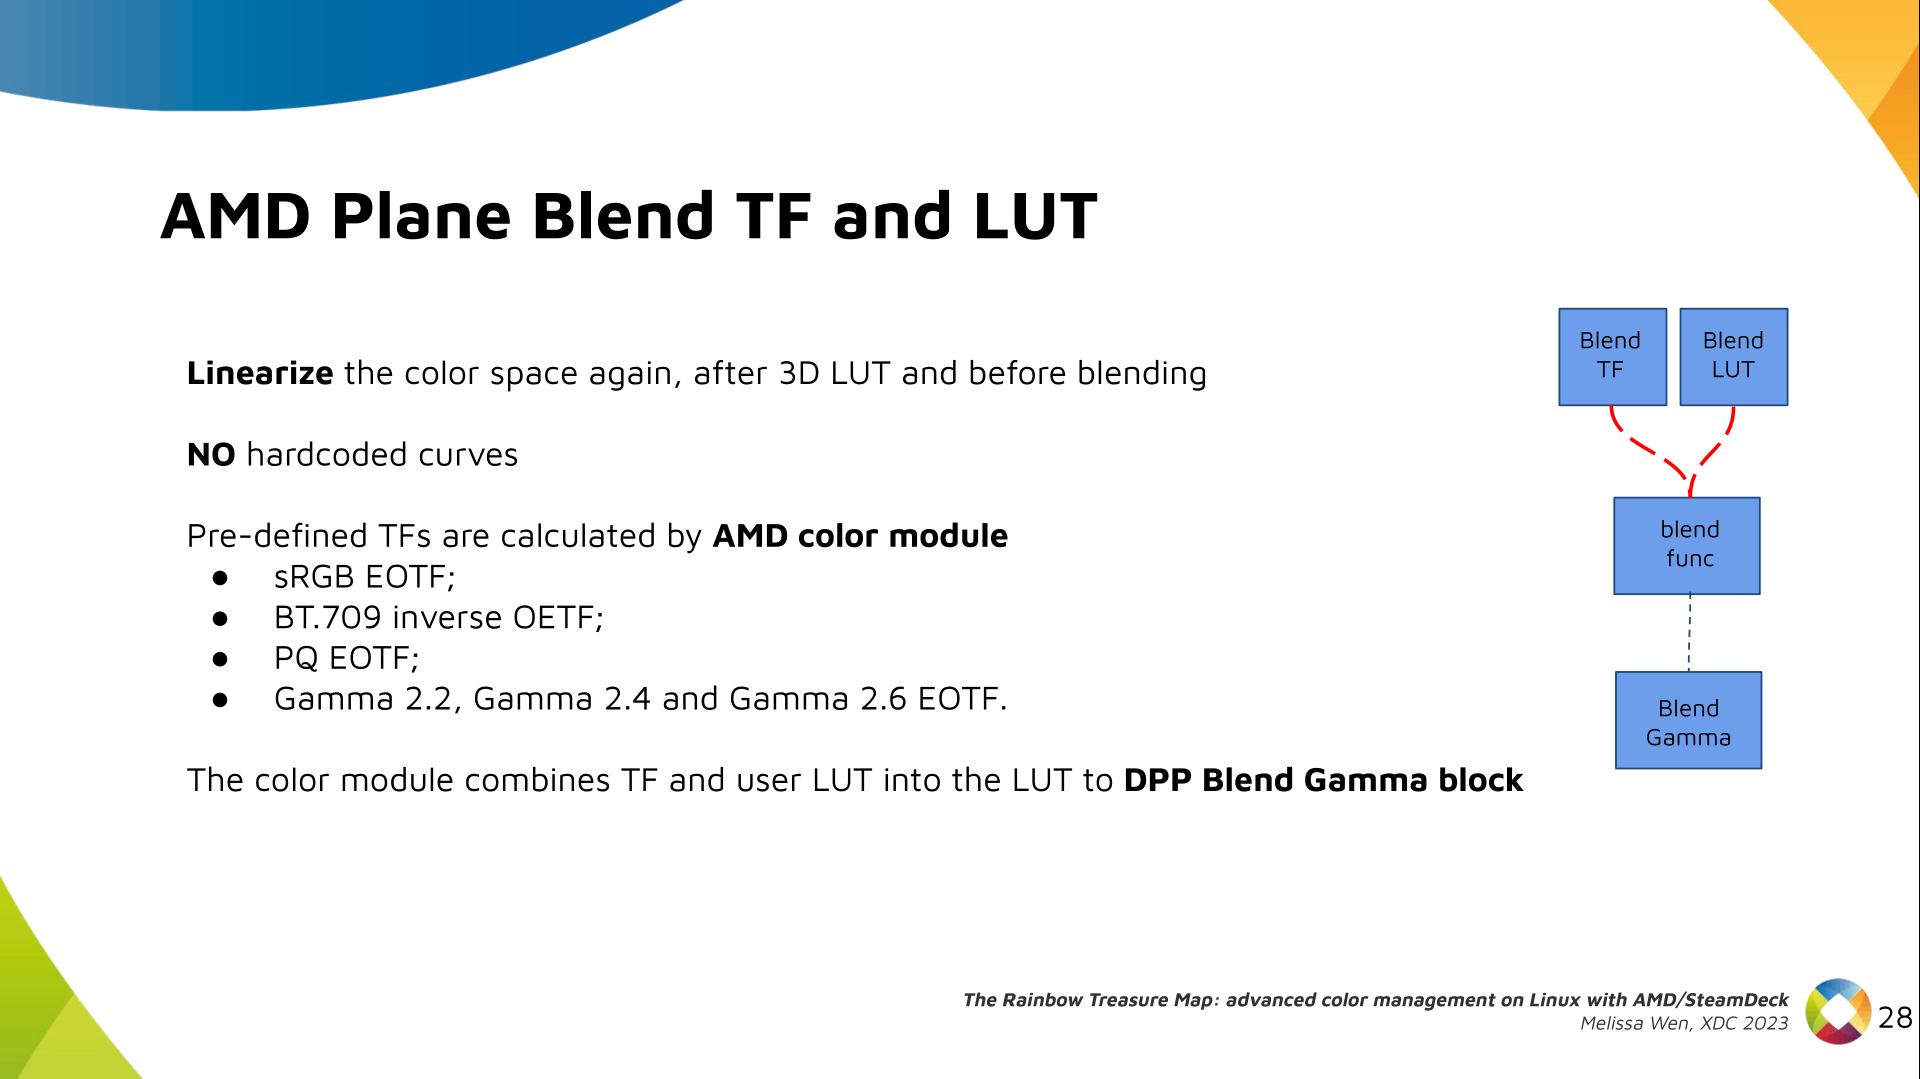

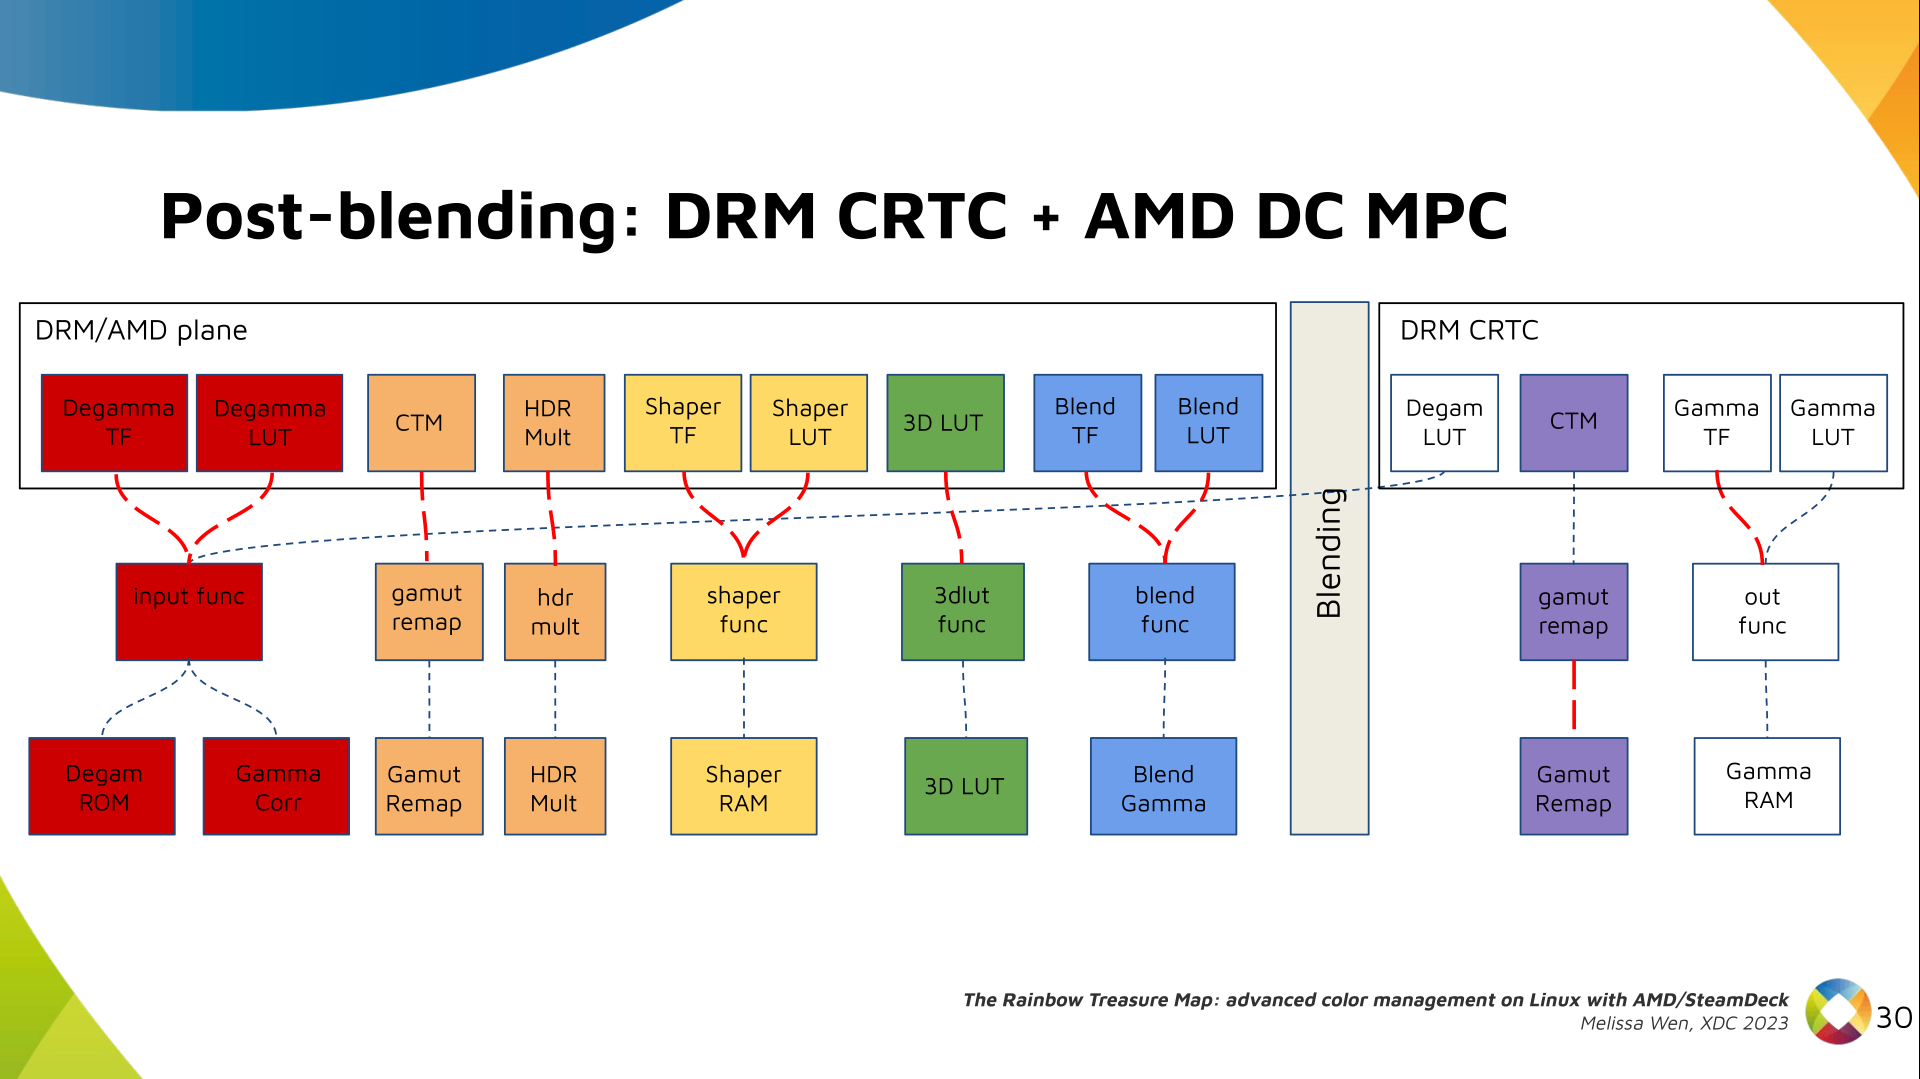
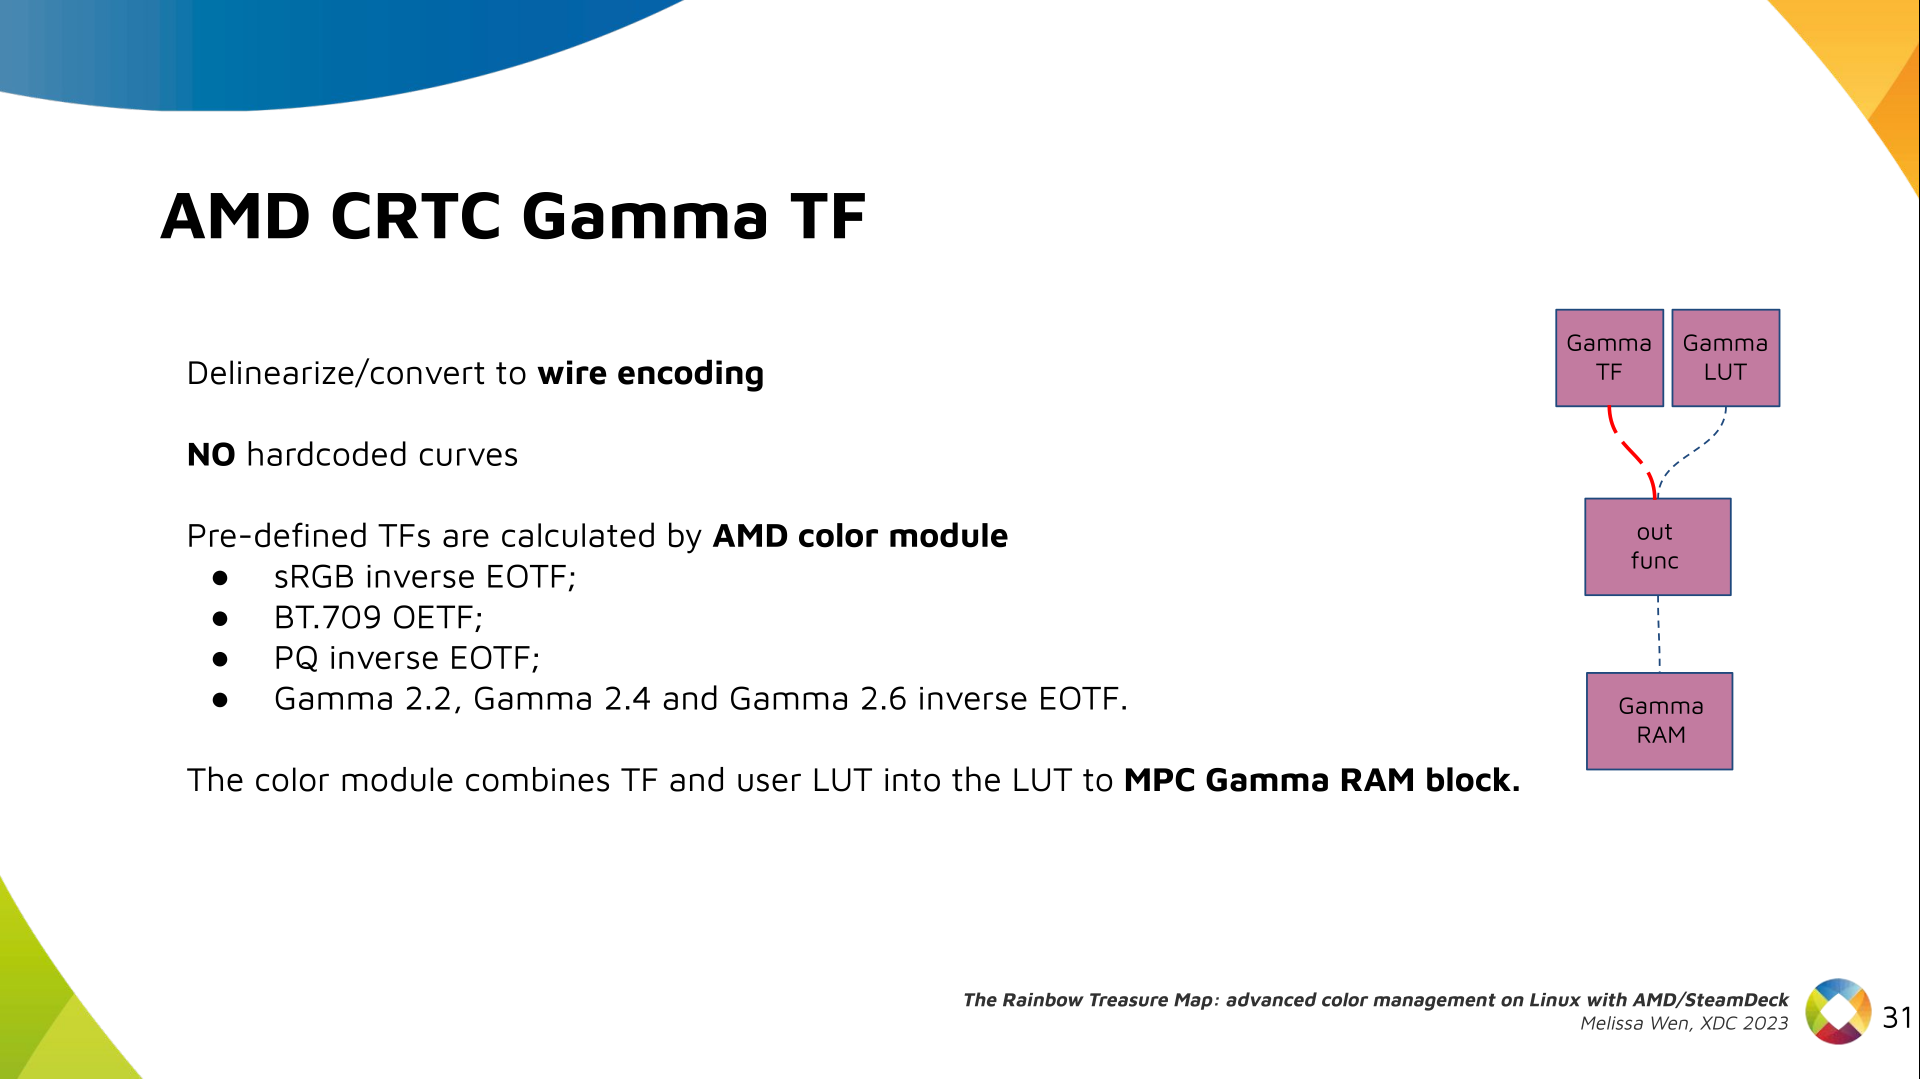
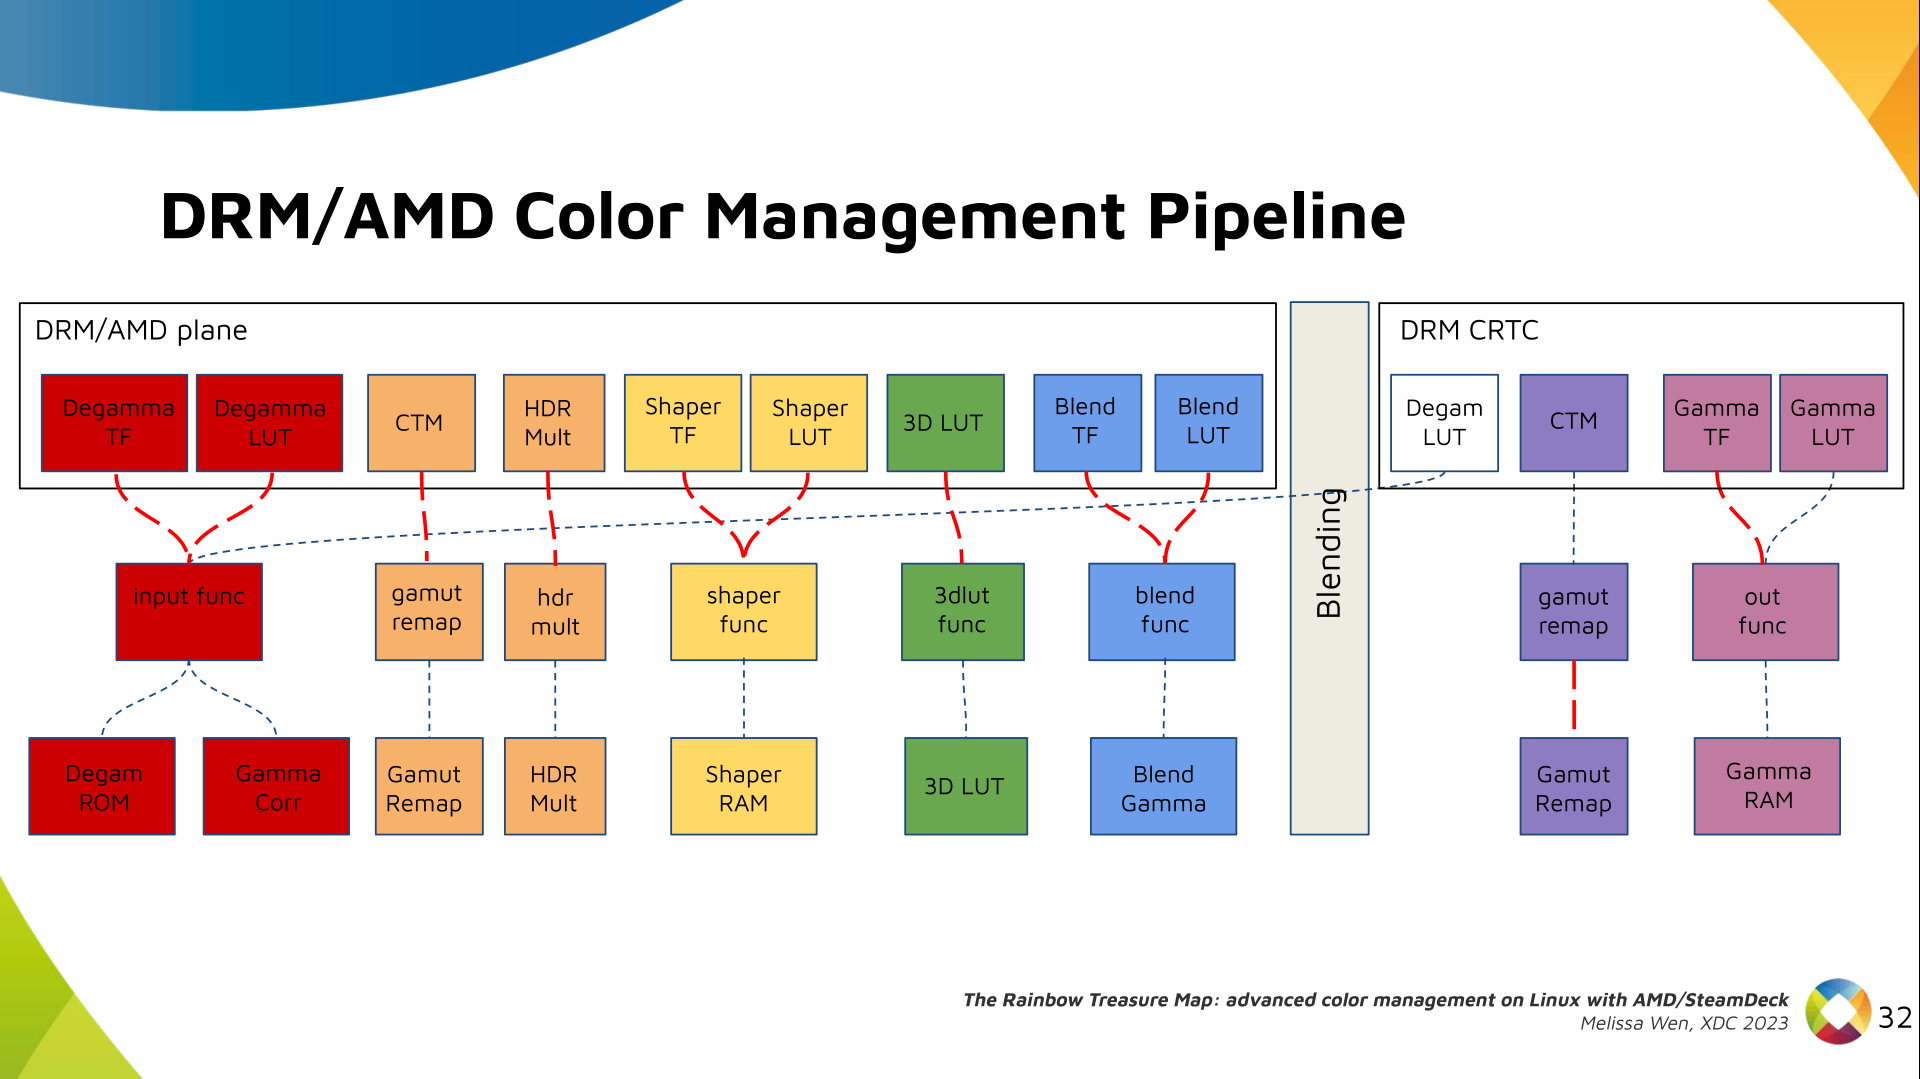
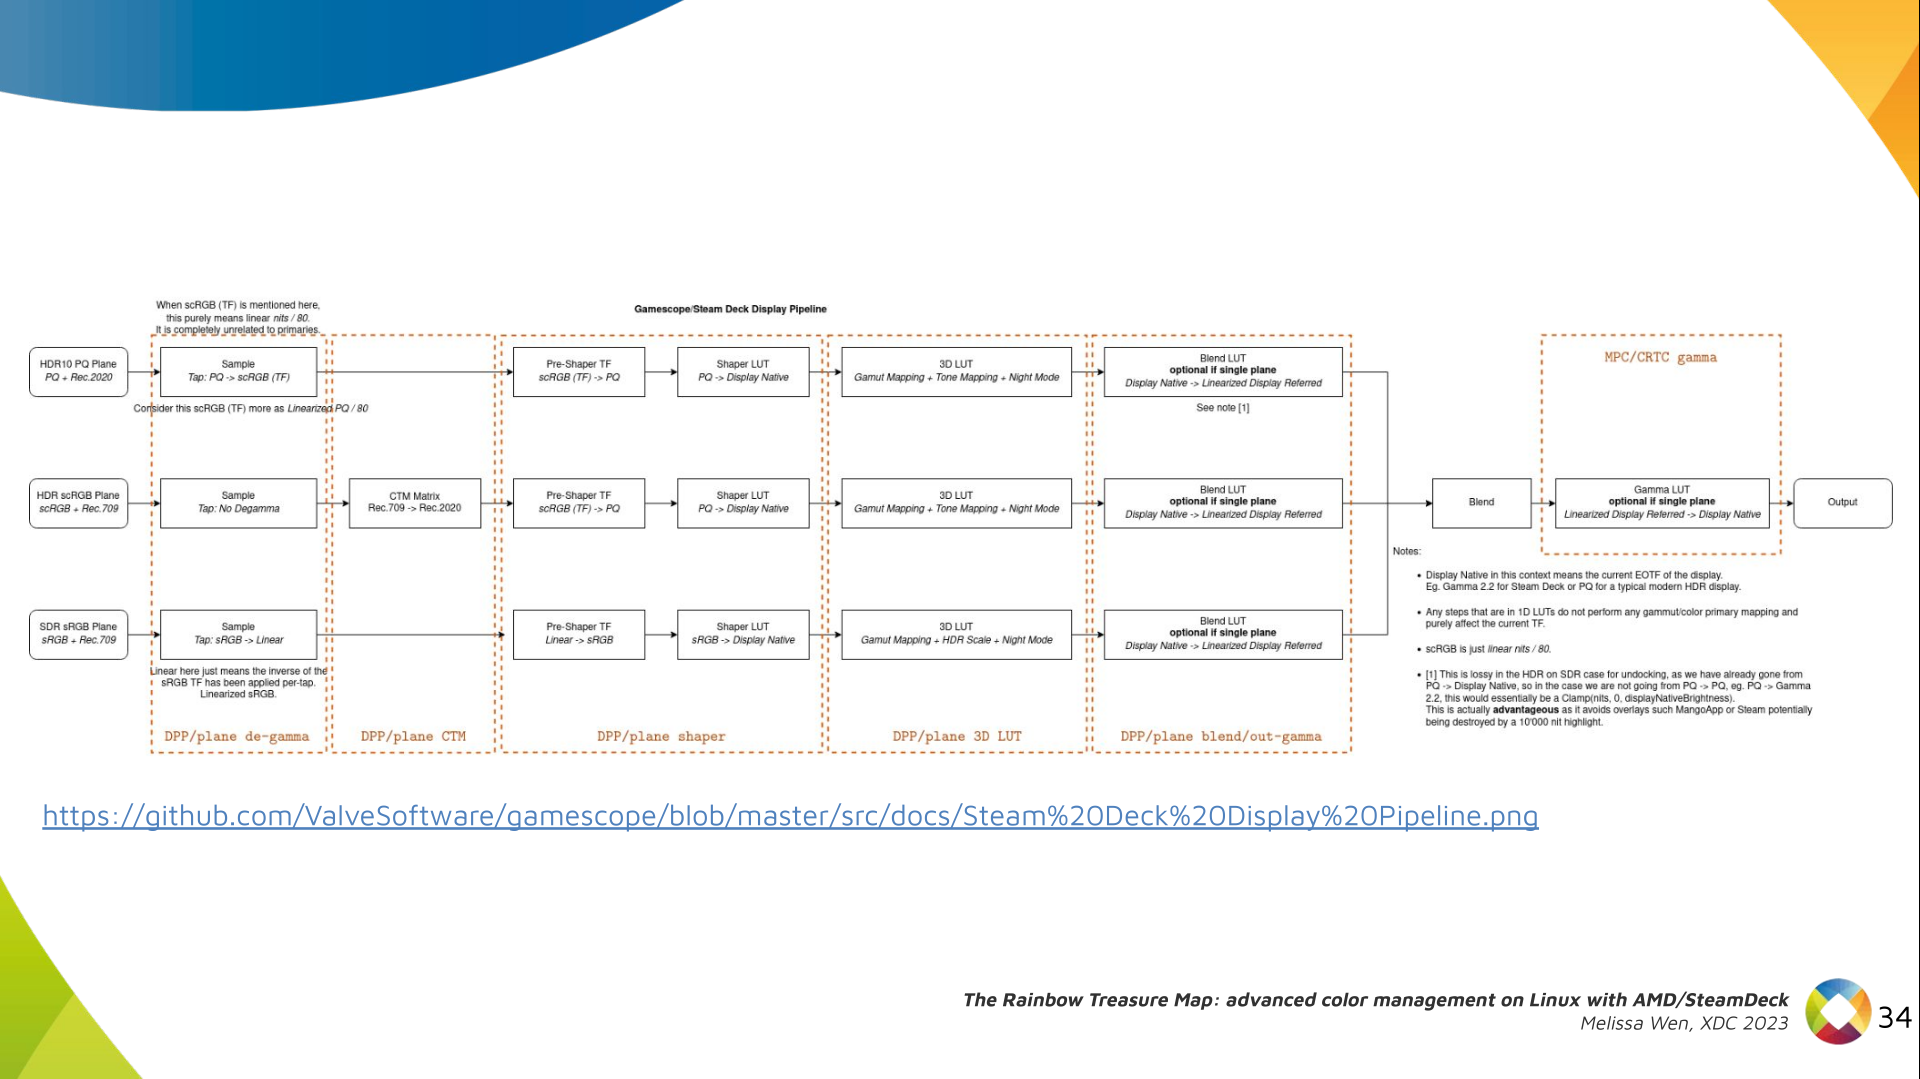

 Some years ago a customer needed a live ISO containing a customized
FAI environment (not for installing but for extended hardware stress
tests), but on an USB stick with the possibility to store the logs of
the tests on the USB stick. But an ISO file system (iso9660) remains
read-only, even when put onto an USB stick.
I had the idea to add another partition onto the USB stick after
the ISO was written to it (using cp or dd).
You can use fdisk with an ISO file, add a new partition, loop mount
the ISO and format this partition. That's all. This worked perfect for my customer.
I forgot this idea for a while but a few weeks ago I remembered it.
What could be possible when my FAI (Fully Automatic Installation)
image would also provide such a partition? Which things could be
provided on this partition?
Could I provide a FAI ISO and my users would be able to easily put
their own .deb package onto it without remastering the ISO or building
an ISO on their own?
Now here's the shell script, that extends an ISO or an USB stick with an
ext4 or exFAT partition and set the file system label to MY-DATA.
Some years ago a customer needed a live ISO containing a customized
FAI environment (not for installing but for extended hardware stress
tests), but on an USB stick with the possibility to store the logs of
the tests on the USB stick. But an ISO file system (iso9660) remains
read-only, even when put onto an USB stick.
I had the idea to add another partition onto the USB stick after
the ISO was written to it (using cp or dd).
You can use fdisk with an ISO file, add a new partition, loop mount
the ISO and format this partition. That's all. This worked perfect for my customer.
I forgot this idea for a while but a few weeks ago I remembered it.
What could be possible when my FAI (Fully Automatic Installation)
image would also provide such a partition? Which things could be
provided on this partition?
Could I provide a FAI ISO and my users would be able to easily put
their own .deb package onto it without remastering the ISO or building
an ISO on their own?
Now here's the shell script, that extends an ISO or an USB stick with an
ext4 or exFAT partition and set the file system label to MY-DATA.


 Nextcloud is a popular self-hosted solution for file sync and share as well as cloud apps such as document editing, chat and talk, calendar, photo gallery etc. This guide will walk you through setting up Nextcloud AIO using Docker Compose. This blog post would not be possible without immense help from Sahil Dhiman a.k.a.
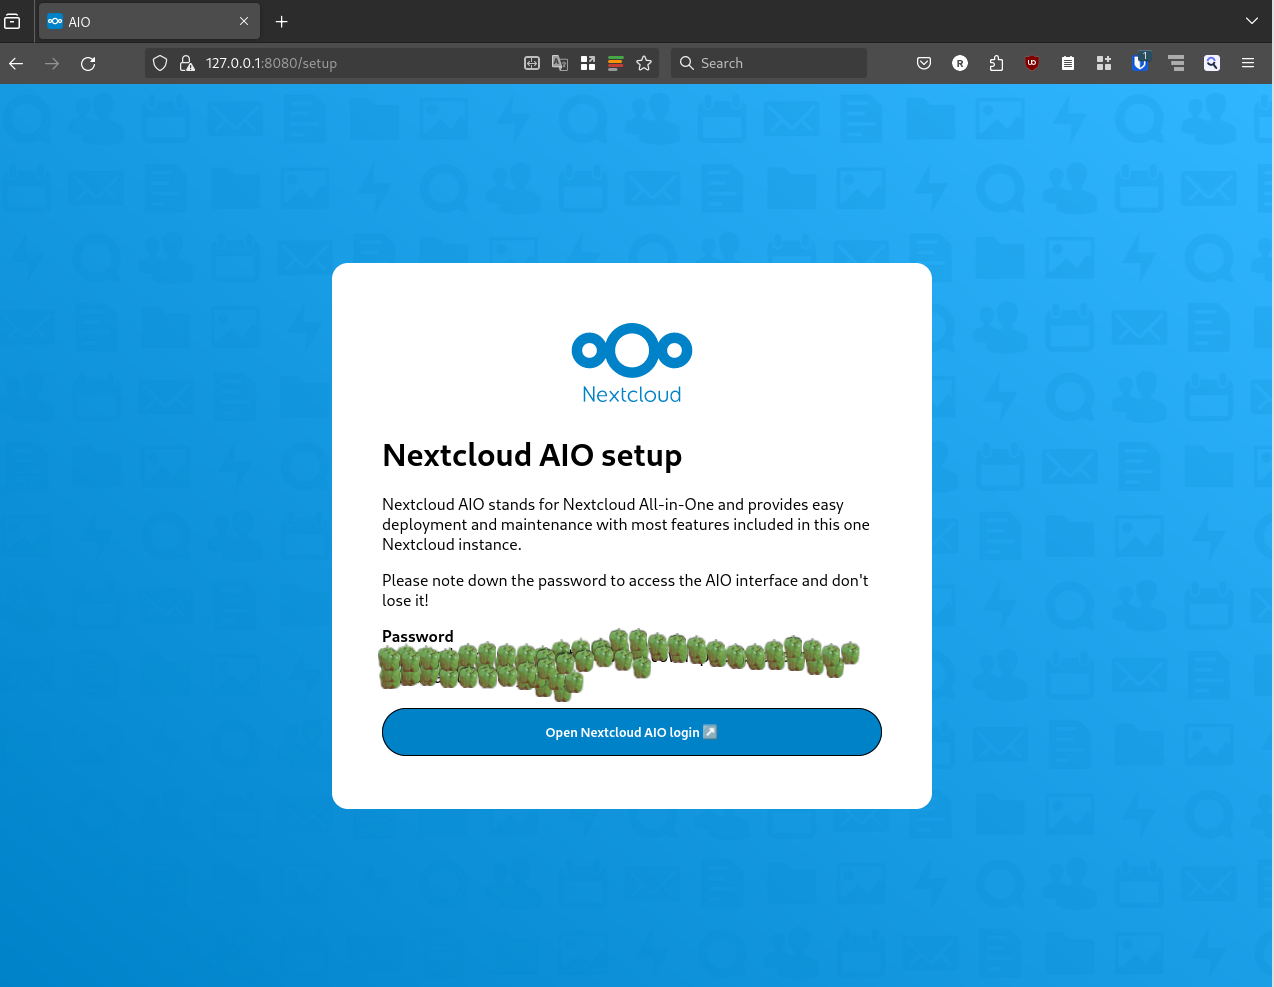
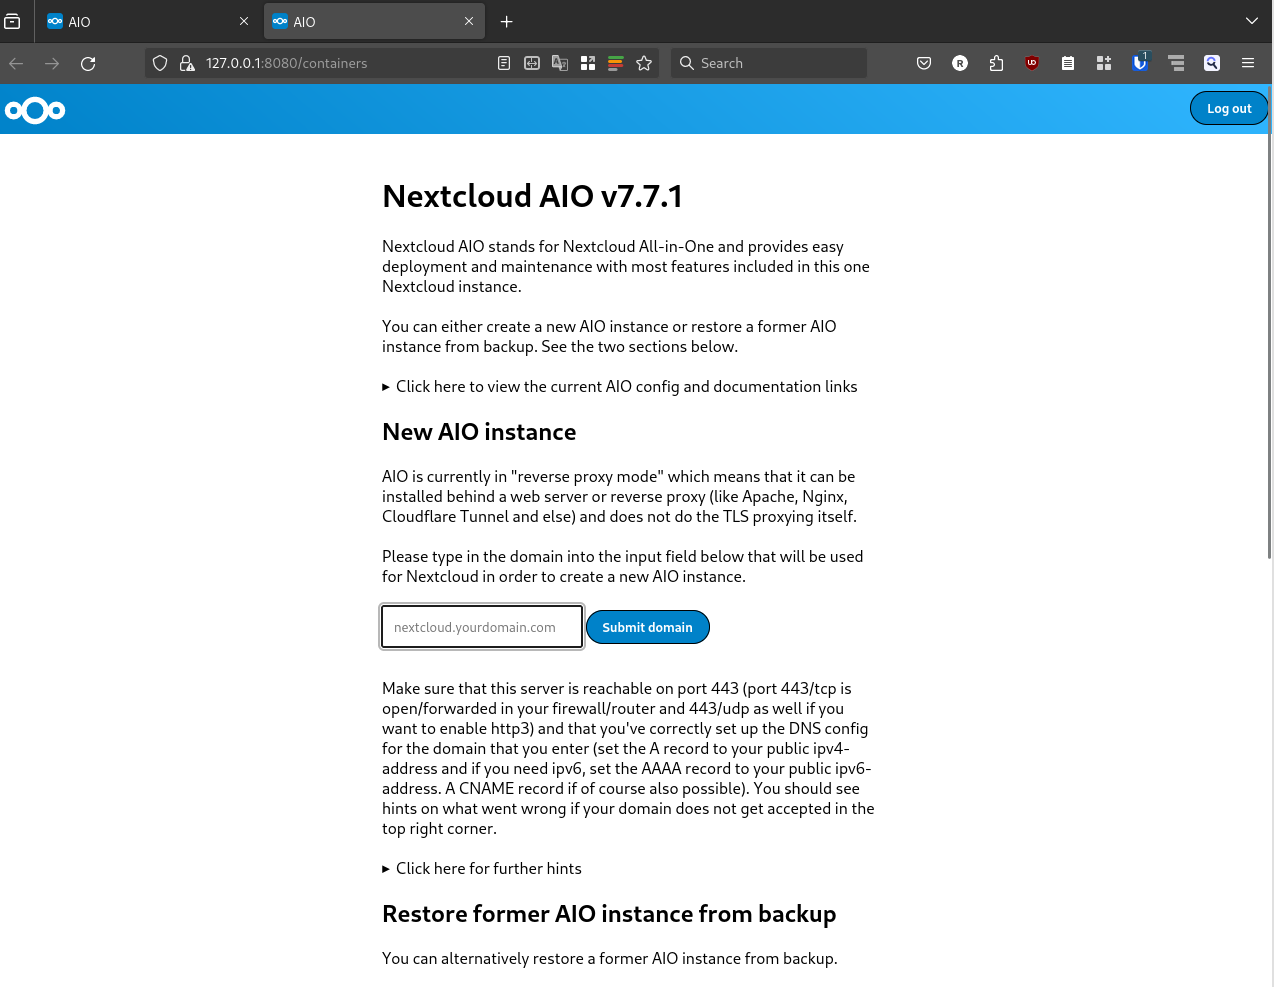
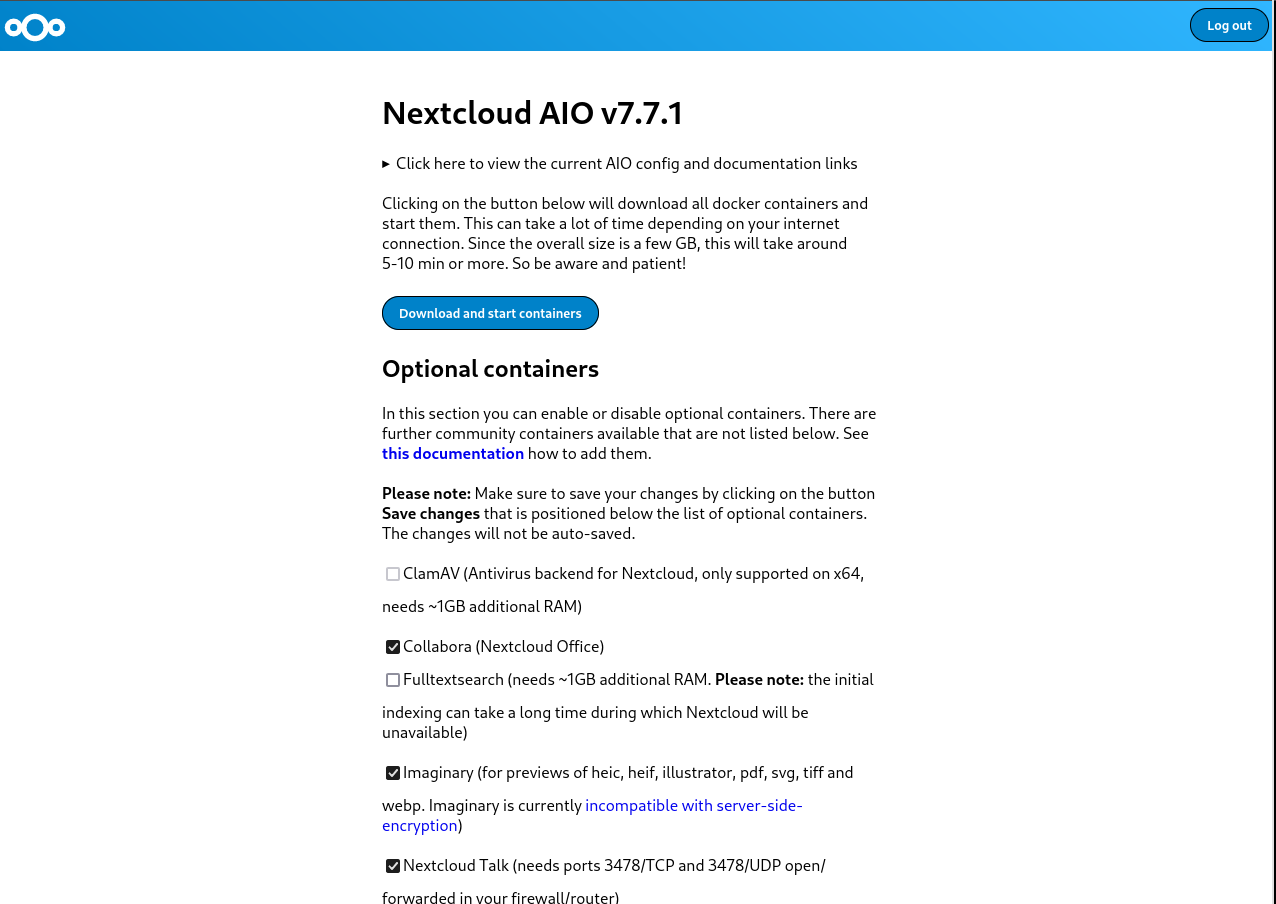
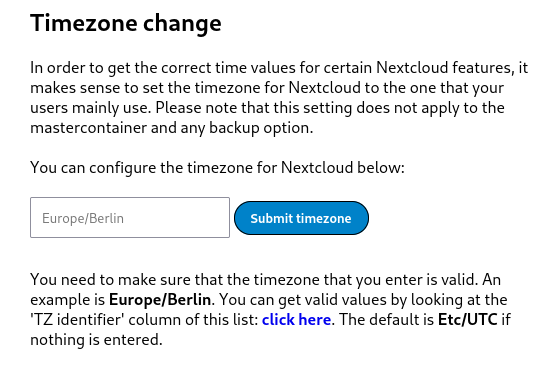
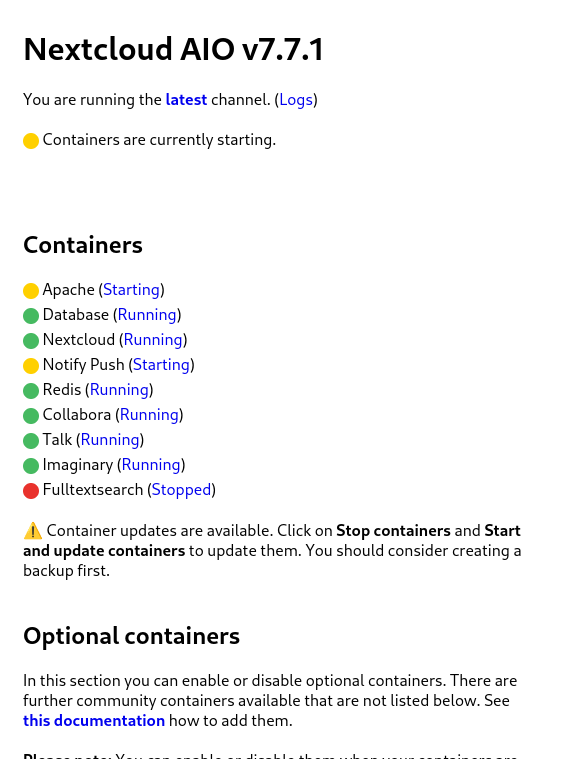
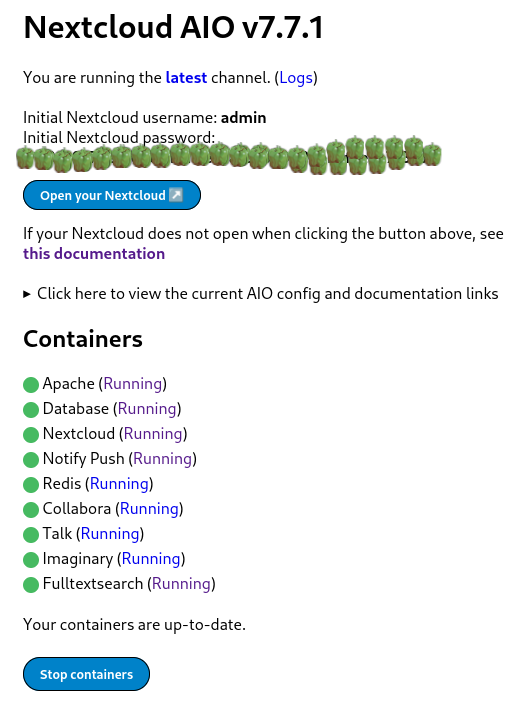
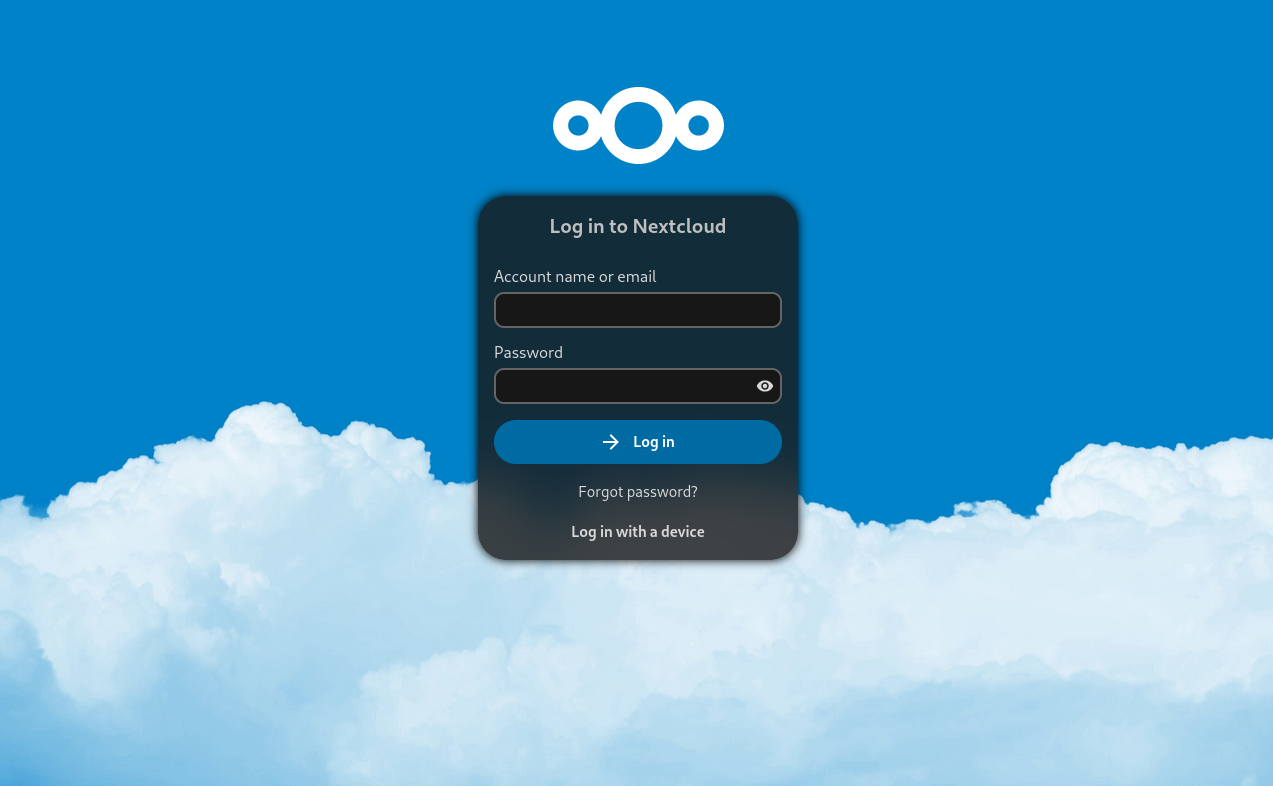


 Hello from a snowy Montr al! My life has been pretty busy lately


 A new maintenance release 0.1.11 of the